| 3.7. Tagging | ||
|---|---|---|

|
3. Dialogvindauge relaterte til biletinnhaldet |  |
I menyane for penslar, fargeovergangar, mønsterelement og palettane og i nokre dokkpanel, kan du definera taggar og reorganisere dei i høve til den valde taggen.
Tagginga er delt i to delar:
Eit «Filter»-felt øverst der du kan skriva inn eller velja ein kode som er definert tidlegare. Berre ressursane (penslar, fargeovergangar, mønster, palettar osv.) som har den gjevne taggen vert viste.
Du kan skriva inn fleire taggar skilde med komma. Gjer du dette, vert berre resursane som har alle desse taggane definerte synlege.
Vel du ein tagg med musepeikaren, verkar dette litt annleis: Berre éin tagg kan vera i bruk om gongen. Viss du ønskjer å merkja ein annan tagg, må du først klikka på den gjeldande taggen for å slå han av.
Feltet «Skriv inn tagg» nedføre lista over resursar kan brukast for å leggja taggar til den gjeldande resursen. Taggane som høyrer til den gjeldande penselen, fargeovergangen, mønsteret, paletten osv. vert vist.
Du kan leggja til fleire taggar til gjeldande ressurs ved å klikka på ein av dei definerte taggane i sprettopplista i feltet, eller du kan laga din egen tagg for dette elementet ved å skriva inn namnet i feltet. Den nye taggen vert då vist i tagglista.
![[Notat]](images/note.png)
|
Notat |
|---|---|
|
Dialogvindauget for skrifttypar har også felt for «Filter» og «Enter», men GIMP set førebels ingen taggar for metadata for skrifttypar og lagrar dei heller ikkje. |
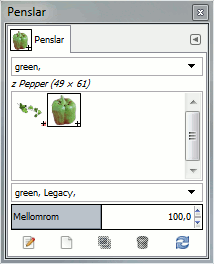
Figur 15.44. Eksempel

I dette eksempelet har vi definert ein «green» tagg for penslane «Vine» og «Pepper». Når vi deretter skriv inn «green» i innskrivingsfeltet Filter, vert berre penslar med denne taggen viste.
![[Tips]](images/tip.png)
|
Tips |
|---|---|
|
For å gi fleire penslar den same fanen samstundes, vis penslane i listemodus og bruk Ctrl + på dei penslane du vil ha med. |
Du kan sletta ein tagg ved å markere ein pensel og deretter markere den aktuelle taggen i «Skriv inn»-feltet og trykke tastenDelete. Når den valde taggen er fjerna frå alle penslane, vert han også fjerna frå lista.