| 第 7 章 用 GIMP 绘画 | ||
|---|---|---|

|
部分 II. 我如何成为GIMP向导? |  |
| 第 7 章 用 GIMP 绘画 | ||
|---|---|---|
|
|
部分 II. 我如何成为GIMP向导? | |
目录
通常,当您对图像进行操作时,您只想影响其中的一部分。在GIMP中,您可以通过选择该部分来实现这一点。每个图像都有一个 与之关联的选区。大多数(但不是全部)GIMP的操作仅作用于图像的选定部分。
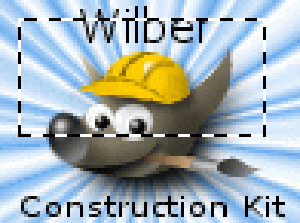
在很多很多情况下,创建正确的选区是获得所需结果的关键,而且通常并不容易做到。例如,在上图中,假设我想从背景中剪下这棵树,然后将其粘贴到不同的图像中。为此,我需要创建一个包含树的选区,除了树之外什么都没有。这很困难,因为这棵树形状复杂,并且在几个地方很难与它后面的物体区分开来。
现在这里有一个非常重要的点,理解这一点至关重要。通常,当您创建选区时,您会将其视为图像中虚线包围的一部分。您可以从中得到的常见但不完全准确的想法是,选区是一种容器,图像的选定部分在里面,未选择的部分在外面。虽然这个选区概念在很多方面都可以,但它并不完全正确。
实际上,选区是作为通道实现的。就其内部结构而言,它与图像的红色、绿色、蓝色和 Alpha 通道相同。因此,选区具有在图像的每个像素处定义的值,范围在 0(未选择)和 255(完全选择)之间。这种方法的优点是允许一些像素被部分选择,通过为它们提供 0 到 255 之间的值。正如您将看到的,在许多情况下需要在选定区域和未选定区域之间进行平滑过渡。
那么,创建选区时出现的虚线是什么?
虚线是等高线,将选择一半以上的区域与选择不到一半的区域分开。
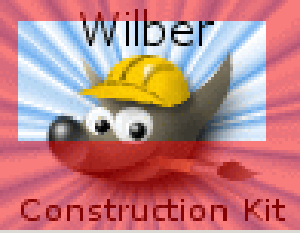
While looking at the dashed line that represents the selection, always remember that the line only tells part of the story. If you want to see the selection in full detail, the easiest way is to click the Quick Mask button in the lower left corner of the image window. This causes the selection to be shown as a translucent overlay atop the image. Selected areas are unaffected; unselected areas are reddened. The more completely selected an area is, the less red it appears.
Many operations work differently in Quick Mask mode, as mentioned in the Quick Mask overview. Use the Quick Mask button in the lower left corner of the image window to toggle Quick Mask mode on and off.
With the default settings, the basic selection tools, such as the Rectangle Select tool, create sharp selections. Pixels inside the dashed line are fully selected, and pixels outside completely unselected. You can verify this by toggling Quick Mask: you see a clear rectangle with sharp edges, surrounded by uniform red. Use the “Feather edges” checkbox in the Tool Options to toggle between graduated selections and sharp selections. The feather radius, which you can adjust, determines the distance over which the transition occurs.
If you are following along, try this with the Rectangle Select tool, and then toggle Quick Mask. You will see that the clear rectangle has a fuzzy edge.
Feathering is particularly useful when you are cutting and pasting, so that the pasted object blends smoothly and unobtrusively with its surroundings.
It is possible to feather a selection at any time, even if it was originally created as a sharp selection. Use → from the main menu to open the Feather Selection dialog. Set the feather radius and click . Use → to do the opposite—sharpen a graduated selection into an all-or-nothing selection.
![[注意]](images/note.png)
|
注意 |
|---|---|
|
For technically oriented readers: feathering works by applying a Gaussian blur to the selection channel, with the specified blurring radius. |
You can set layer opacity, but you cannot do that directly for a selection. It is quite useful to make the image of a glass transparent. Use the following methods to set the layer opacity:
For simple selections, use the Eraser tool with the desired opacity.
For complex selections: use → to create a floating selection. This creates a new layer with the selection called “Floating Selection” (第 4.5 节 “Float”). Set the opacity slider in the Layers dialog to the desired opacity. Then anchor the selection: outside the selection, the mouse pointer includes an anchor. When you click while the mouse pointer includes the anchor, the floating selection disappears from the Layers dialog and the selection is at the right place and partially transparent (anchoring works this way only if a selection tool is activated: you can also use the Anchor Layer command in the context menu by right clicking on the selected layer in the Layers dialog).
And, if you use this function frequently: Ctrl-C to copy the selection, Ctrl-V to paste the clipboard as a floating selection, and → to turn the selection into a new layer. You can adjust the opacity before, or after creating the new layer.
Another way: use → → to add a layer mask to the layer with the selection, initializing it with the selection. Then use a brush with the desired opacity to paint the selection with black, i.e. paint it with transparency. Then → → . See 第 2.1.4 节 “Layer masks”.
To make the solid background of an image transparent, add an Alpha channel, and use the Magic Wand to select the background. Then, use the Color Picker tool to select the background color, which becomes the foreground color in Toolbox. Use the Bucket Fill tool with the selected color. Set the Bucket Fill mode to “Color Erase”, which erases pixels with the selected color; other pixels are partially erased and their color is changed.
The simplest method is to use → , which gives complete transparency to a selection.