| 3.5. Diálogo “Paletas” | ||
|---|---|---|
 |
3. Diálogos relacionados con el contenido de la imagen |  |
| 3.5. Diálogo “Paletas” | ||
|---|---|---|
| |
3. Diálogos relacionados con el contenido de la imagen | |
Una paleta es un conjunto de colores, sin un orden en particular. En la sección sobre paletas hallará la información básica sobre su creación y empleo.
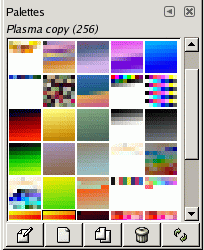
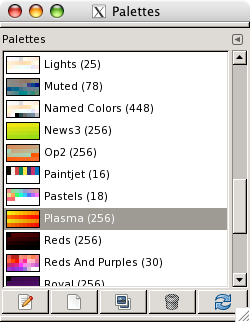
The “Palettes” dialog is used to select a palette, by clicking on it in a list or grid view. A few dozen more or less randomly chosen palettes are supplied with GIMP, and you can easily add new palettes of your own. The “Palettes” dialog also give you access to several operations for creating new palettes or manipulating the ones that already exist.
![[Nota]](images/note.png)
|
Nota |
|---|---|
|
The “Palettes” dialog is not the same thing as the Index Palette dialog, which is used to manipulate the colormaps of indexed images. |
The “Palettes” dialog is a dockable dialog; see the section Sección 2.3, “Diálogos empotrables” for help on manipulating it.
You can access it:
from the image menu: → → ;
from the Tab menu in any dockable dialog by clicking on
 and selecting
→ .
and selecting
→ .
Al hacer clic sobre una de las paletas del diálogo se la convierte en la paleta activa. Al hacer doble clic sobre una paleta aparece el editor de paletas, el que permite cambiar los colores de frente y fondo haciendo clic sobre sus colores.
Se puede editar el nombre de una paleta haciendo doble clic sobre el mismo, cuando el diálogo se ve como una lista. Note que sólo se le permite cambiar el nombre de las paletas que ha añadido Ud. mismo, no el de las provistas por el GIMP. Si edita un nombre que no puede cambiar, se revierte al nombre original tan pronto como termine de editarlo.
En el menú de la solapa, puede escojer entre y . En el modo de rejilla se disponen las paletas en un arreglo rectangular y se pueden ver muchas al mismo tiempo, lo que facilita encontrar la que está buscando. En el modo de lista (que es el predeterminado), las paletas se disponen en una lista vertical, con sus nombres al lado.
The option Preview Size allows you to adapt the size of color cell previews to your liking.
![[Sugerencia]](images/tip.png)
|
Sugerencia |
|---|---|
|
Ctrl+F opens a search field. See Ver como lista y ver como rejilla. |
The buttons of the Palettes Dialog
Below the palettes view, at the bottom of the dialog window, there are several buttons:
 Editar paleta
This button brings up the Sección 3.5.4, “Editor de paleta”.
For more information on this button please refer to Paleta nueva.
 Duplicar paleta
For more information on this button please refer to Duplicar paleta.
For more information on this button please refer to Borrar paleta.
 Refrescar paletas
For more information on this button please refer to Refrescar paletas.
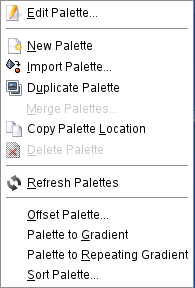
The “Palettes” pop-menu can be accessed by right-clicking
in the Palettes dialog, or by choosing the top item from the dialog Tab
menu
().
“Edit Palette” is an alternative way of activating
the
Palette Editor:
it can also be activated by double-clicking on a palette in the
Palettes dialog, or by pressing the “Edit Palette”
button at the bottom of the dialog.
“Paleta nueva” crea una nueva paleta sin título que inicialmente no contiene colores. Además abre el editor de paletas para que se le puedan añadir colores. El resultado se guarda automáticamente en su carpeta personal palettes cuando cierra el GIMP, para que se halle disponible desde el diálogo de paletas en las sesiones futuras.
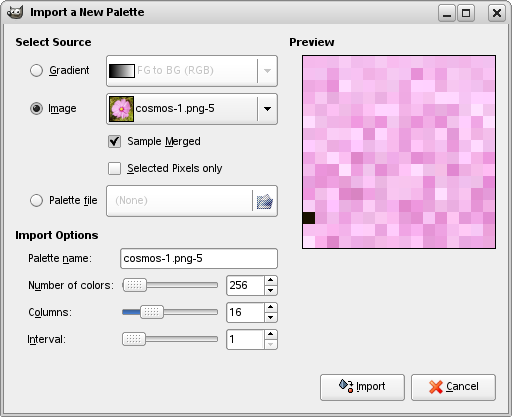
“Import Palette” allows you to create a new palette from the colors in a gradient, an image or a palette file. Choosing it brings up the “Import Palette” dialog, which gives you the following options:
|
|
Nota |
|---|---|
|
Former versions of GIMP had a “Save palette” command. It no longer exists. To save the palette of an image, indexed or not, you must import it in fact from the image. |
Puede importar una paleta tanto desde cualquiera de los degradados del GIMP, como desde cualquiera de las imagenes abiertas. Estos elementos se escogen desde los menús adjuntos. Desde la versión 2.2 del GIMP además puede importar archivos de paleta RIFF (que tienen la extensión .pal), que son el tipo empleado por varias aplicaciones de Microsoft Windows.
Two options concerning image as source, available for RGB images only:
Sample merged: When this option is checked, colors are picked from all visible layers. If unchecked, pixels are picked from the active layer only, even though not visible.
Selected pixels only: As the name says, pixels are picked from the selected area only, in the active layer or all visible layers according to the status of the previous option.
Aquí puede darle un nuevo nombre a la paleta. Si el nombre escogido ya estaba siendo usado por otra paleta, se forma un nombre único agregándole un número al nombre (por ejemplo "#1").
Aquí puede especificar la cantidad de colores de la paleta. Por defecto son 256, y esto es por tres razones: (1) todos los degradados tienen 256 colores; (2) los archivos GIF usan como máximo 256 colores; (3) Las imágenes indizadas del GIMP pueden tener como máximo 256 colores distintos. Sin embargo, puede cambiar este número por cualquiera: el GIMP crea la paleta intentando espacear la cantidad de colores especificados, incluso entre el rango de colores del degradado o de la imagen.
Aquí especifica el número de columnas de la paleta. Lo único que afecta con esto es la manera en que se muestra la paleta, no altera la manera en que ésta se usa.
FIXME
La paleta importada se añade al diálogo “Paletas”, y se guarda automáticamente en su carpeta personalpalettes cuando sale del GIMP, de manera que esté disponible para las sesiones futuras.
Esto crea una paleta nueva copiando la paleta actual, y hace aparecer el editor de paletas, para que se pueda modificar. El resultado se guarda automáticamente en su carpeta personal palettes cuando sale del GIMP, para que esté disponible en el diálogo “Paletas” en las sesiones futuras.
Esta operación no está implementada, y la entrada está siempre desactivada.
This command allows you to copy the palette file location to clipboard. You can then paste it in a text editor.
Delete Palette removes the palette from the “Palettes ”dialog, and deletes the disk file in which it is stored. Before it acts, it asks you confirm that you really want to do these things. Note that you cannot remove any of the palettes that are supplied with GIMP, only palettes you have added yourself.
Hace que se vuelvan a recorrer todas las carpetas de la ruta de búsqueda de paletas, y agrega las nuevas paletas que descubre al diálogo. Esto puede resultar útil cuando alguien le obsequia archivos de paleta, luego Ud. los copia en una carpeta, y al refrescar se encuentran disponibles sin necesidad de cerrar la sesión.
This command opens a dialog window:
This command takes the last color of the palette and puts it at the first place. The Offset parameter lets you set how many times this action must be performed.
With negative “Offsets” colors are put from the first position to the end of the colors list.
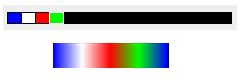
Figura 14.54. “Offset Palette” examples
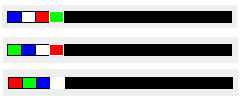
From top to bottom: original palette, Offset = 1, Offset = 2.
With this command, all the colors of the palette are used to form the current gradient which is saved in the Gradient Dialog. The created gradient is build with segments just as much as the number of colors on the given palette.
This command creates a repeating gradient, using all the colors of the palette. This gradient appears in the Gradient Dialog and becomes the current gradient. The gradient is created with segments one more than the number of colors on the given palette. The left side color at the leftmost segment will be the same color on the right side at the rightmost segment.
Figura 14.55. “Palette to repeating gradient” examples
Top: palette. Bottom: the gradient created with the command.
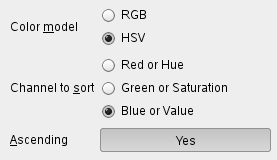
This command opens a dialog window which allows you to sort the colors of the palette according to certain criterions:
Color model: you can choose between RGB and HSV
Channel to sort: you can choose between the three RGB channels if the RGB model is selected, or the three HSV channels if the HSV channel is selected.
Ascending (default is Yes): values are sorted from the lower to the upper. By clicking on this you can toggle to and values will be sorted in descending order.
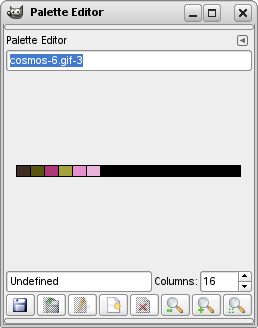
El editor de paletas tiene dos propósitos principales: primero, asignar otro color a los colores de frente y fondo (los que se muestran en el área de color de la caja de herramientas). Segundo, modificar la paleta misma. Puede activar el editor con cualquier paleta desde el diálogo “Paletas”, pero sólo se le permite modificar las paletas que ha creado Ud. mismo, no las que vienen provistar por el GIMP (de todas formas las puede duplicar y luego modificar las copias). Si modifica una paleta, los cambios se guardan automáticamente al salir del GIMP.
The Palette Editor is only accessible from the Palettes dialog: you
can activate it by double-clicking on a palette, or by pressing the
“Edit Palette” button at the bottom, or by choosing
“Edit Palette” from the “Palettes” Menu.
El editor de paletas es empotrable, diríjase a la sección sobre Diálogos empotrables para obtener ayuda acerca de los mismos.
Si hace un clic sobre una casilla de la paleta, se cambia el color de frente del GIMP al color seleccionado. Observe este comportamiento en el área de color de la caja de herramientas. Si mantiene presionada la tecla Ctrl mientras hace clic, el que se cambia es el color de fondo.
Al hacer doble clic no sólo se cambia el color de frente, sino que además aparece un editor de colores que le permiten modificar la casilla de la paleta seleccionada (esto sólo ocurre con las paletas que se le permiten modificar, esto es, las que ha creado Ud. mismo).
Al hacer clic derecho sobre el área de la paleta aparece su menú, que se describe más adelante.
Below the palette display area, at the left, appears a text entry area that shows the name of the selected color (or “Untitled ” if it does not have one). This information has no functional significance, and is present only to serve you as a memory aid.
A la derecha del texto del nombre hay una casilla que le permite especificar el número de columnas que se usan para mostrar la paleta. Esto sólo cambia su aspecto, no la manera en que trabaja. Si el valor se ajusta a cero, se emplea el valor por defecto.
Al final del diálogo hay un conjunto de botones, que dan casi las mismas opciones que el menú del editor, al que se accede haciendo clic derecho sobre la paleta. Estos son los botones:
 Guardar
This button causes the palette to be saved in your personal
palettes folder. It
would be saved automatically when GIMP exits
in any case, but you might want to use this button if you are
concerned that GIMP might crash in the
meantime.
 Revertir
Operación no implementada.
Editar el color
Abre un editor de colores, que le permite cambiar el color actualmente seleccionado. Este botón permanece desactivado si no se le permite modificar la paleta.
For more information on this button please refer to below.
For more information on this button please refer to below.
 Zoom Out
For more information on this button please refer to below.
 Ampliar
For more information on this button please refer to below.
 Zoom All
For more information on this button please refer to below.
Se puede acceder al menú del editor de paletas haciendo clic derecho sobre el área de paleta del editor, o escogiendo la primera entrada del menú de la solapa. Sus operaciones también pueden ejecutarse presionando los botones que se hallan al final del editor.
“Edit Color” brings up a color editor that allows you to modify the color of the selected palette entry. If the palette is one that you are not allowed to edit (that is, one supplied by GIMP when it is installed), then the menu entry will beinsensitive.
Cada uno de estos comandos crean una nueva casilla de color en la paleta, empleando el color de frente o el color de fondo (los que se muestran en el área de color de la caja de herramientas).
“Delete Color” removes the selected color entry from the palette. If the palette is one that you are not allowed to edit, then the menu entry will be insensitive.
“Zoom Out” reduces the vertical scale of the entries in the palette display.
“Zoom In” increases the vertical scale of the entries in the palette display.
Ajusta el espesor de las casillas para que encaje verticalmente en el área del editor.
When this option is checked (default), you can edit another palette by clicking on it in the “Palettes” dialog.