| 2.2. Herramienta de selección rectangular | ||
|---|---|---|
 |
2. Herramientas de selección |  |
| 2.2. Herramienta de selección rectangular | ||
|---|---|---|
| |
2. Herramientas de selección | |
The Rectangle Selection tool is designed to select rectangular regions of the active layer: it is the most basic of the selection tools, but very commonly used. For information on selections and how they are used in GIMP see Selections; for information on features common to all selection tools see Selection Tools.
Esta herramienta puede ser utilizada para pintar un rectángulo en la imagen. Para hacer un rectángulo relleno cree una selección rectangular, y luego rellénela empleando la cubeta. Para hacer sólo el contorno del rectángulo, la manera más simple y flexible es crear una selección rectangular y luego trazarla.
Puede acceder a esta herramienta de selección de varias maneras:
from the image menu bar → → ,
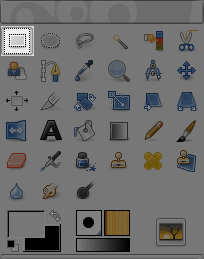
by clicking on the tool icon
 in the ToolBox,
by using the keyboard shortcut R.
![[Nota]](images/note.png)
|
Nota |
|---|---|
|
En la sección Herramientas de selección se encuentran las teclas modificadoras que afectan a todas estas herramientas de la misma forma. Sólo los efectos específicos a la herramienta de selección rectangular son explicados aquí. |
Pressing the Ctrl key after starting
your selection, and holding it down until you are finished,
causes your starting point to be used as the center of the
selected rectangle, instead of a corner. Note that if you
press the Ctrl key before
starting to make the selection, the resulting selection will be
subtracted from the existing selection. The cursor becomes

If you press the Shift key
before starting the selection, the
resulting selection will be added to the existing one. The cursor
becomes

Pressing the Shift key after starting your selection, toggles the Fixed option, and holding it down until you are finished, will constrain the selection to a square, if it is your first selection. Later, with the default Aspect Ratio , your selection will respect the aspect ratio of the previous selection.
Pressing both keys after starting your selection
combines the two effects, giving you a square selection centered
on your starting point. Note that pressing these keys before
starting your selection intersects the resulting selection with
the existing one and the pointer change shape accordingly :

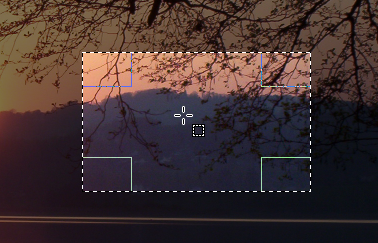
When this tool is selected the mouse pointer is displayed like this:
 as soon as it is over the image. A drag and drop allows to get a
rectangular (or square) shape. When the mouse button is relaxed, a
dotted line (“marching ants”) outlines the selection. It's
not necessary to adjust the selection with care; you can resize it
easily later.
as soon as it is over the image. A drag and drop allows to get a
rectangular (or square) shape. When the mouse button is relaxed, a
dotted line (“marching ants”) outlines the selection. It's
not necessary to adjust the selection with care; you can resize it
easily later.
When the pointer is moving on the canvas, the pointer and selection aspects change:
- outside the selection it looks like previously; this allows to design a new selection but will erase the existing one if this isn't combined with an action on the relevant key to add or subtract another selection as described in the previous paragraph.
- within selection peripheral parts, the mouse pointer changes into
various shapes when overflying rectangular sensitive and clearly marked
areas. These handles allow you to resize the
selection. In selection corners the pointer changes into a shape
according to the context; for instance in the low right corner it
becomes:
 .
So, by click-and-dragging these areas, you can magnify or shrink the
selection size. Over median selection parts, lateral, low or up,
pointer is changed into appropriate shapes according to the context.
For instance, when the mouse pointer is over the median right side, the
pointer looks like:
.
So, by click-and-dragging these areas, you can magnify or shrink the
selection size. Over median selection parts, lateral, low or up,
pointer is changed into appropriate shapes according to the context.
For instance, when the mouse pointer is over the median right side, the
pointer looks like:
 .
So you can click-and-drag to magnify or to shrink the selection size by
moving the chosen boundary.
.
So you can click-and-drag to magnify or to shrink the selection size by
moving the chosen boundary.
- inside selection central area the mouse pointer looks like usual for
object manipulation, i.e.:
 .
So you can move the whole selection by a click-and-drag.
.
So you can move the whole selection by a click-and-drag.
Moreover, if you have not unchecked the Highlight option, your work will be easier because what is out the selection will be darkest than what is in the selection, and then the selection seems highlighted.
![[Sugerencia]](images/tip.png)
|
Sugerencia |
|---|---|
|
If you use moving keys you can move the selection or modify its size by one pixel step. If you use it in combination with Shift you can move it by a 25 pixel step. |
Figura 13.11. Sensitive selection areas
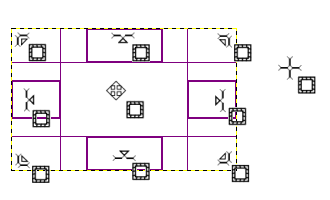
Display of all possible pointers in function of their localization with respect to the selection area.
After creating and modifying the selection, you will have to exit this editing mode (and commit any changes). You can do this with a single click inside the selection or by pressing the Enter key. Or you can just use a non-selection tool and, for example, fill or paint the selection.
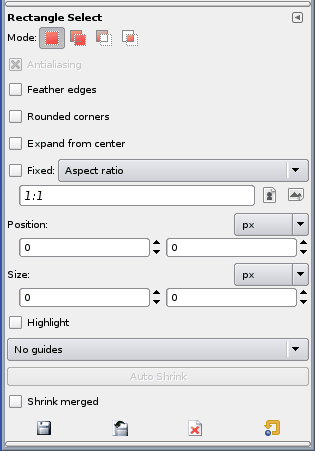
Normally, tool options are displayed in a window attached under the Toolbox as soon as you activate a tool. If they are not, you can access them from the image menu bar through → → which opens the option window of the selected tool.
|
|
Nota |
|---|---|
|
Diríjase a la sección Herramientas de selección para conocer las opciones que son comunes a todas las herramientas de este grupo. Aquí sólo se explican las opciones específicas a la herramienta de selección rectangular. |
Usuales opciones de selección.
If you enable this option, a slider appears. You can use this to adjust the radius that is used to round the corners of the selection.
If you enable this option, the point the selection is started by pressing the mouse button is used as center of the selected area.
Este menú le permite restringir la forma del rectángulo de tres maneras diferentes.
Esta opción le permite redimensionar la selección mientras se mantiene fija su proporción, según los dos números ingresados en los controles de anchura y altura.
Esta opción le permite especificar manualmente un tamaño para la selección, empleando los controles de anchura, altura y unidad.
Esta opción le permite fijar la altura de la selección.
Esta opción le permite fijar el tamaño de la selección.
These four text fields contain the current place and size of the selection. You can use these fields to adjust size and place of the selection by numbers.
If you enable this option, the selected area is emphasized by a surrounding mask to make visual selection much easier.
Con este menú se puede seleccionar los tipos de guías que son mostradosdentro de la selección para hacer la creación de una selección más fácil, respetando Reglas de foto-composición.
Ninguna guía es mostrada
Solo se muestran las líneas medias dentro de la área seleccionada.
Mientras se crea la selección, se muestran las guías siguiendo la regla de los tercios
Con esta opción, las guías se muestran para marcar las secciones aúreas.
La casilla Encoger selección automáticamente hace que la selección se ajuste automáticamente, encogiéndose para contener tan solo la forma de la capa de la imagen que se encuentra adentro. El algoritmo que halla el mejor rectangulo que se ajuste es “inteligente”, lo que en este caso significa que algunas veces realiza cosas sorprendentemente sofisticadas, y otras veces realiza cosas sorprendentemente extrañas. En cualquier caso, si la región que desea seleccionar tiene un contorno suficientemente sólido, esta herramienta se comportará correctamente. Note que la selección resultante no necesariamente tendrá la misma forma que el rectángulo que Ud. trace.
Si además se encuentra activa la opción Muestra combinada, al encogerse la selección automáticamente se tendrá en cuenta la información de los píxeles visibles de toda la imagen, en lugar de considerarse sólo la información de la capa activa. Para mayor información sobre la muestra combinada, diríjase a la entrada del glosario Muestra combinada.