Figura 17.200. Applying example for the Text Styling filter
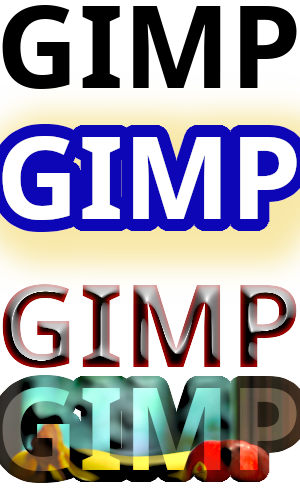
Text Styling examples. Topmost unstyled text; second: color, outline and shadow applied; third: bevel and inner glow applied; bottom: image and outline image overlay applied.
This filter allows you to combine and apply several styles to a layer, such as an outline, shadow, bevel, inner glow and image overlay. Although this can be especially useful for text, it works on other layers too. Some of the settings require an alpha channel and transparent areas for best results.
The settings consist of three parts. Which part is visible can be selected by changing Part of filter to be displayed.
- Predefinits, «Tipus d’entrada», Retallat, Opcions de combinació, Previsualització, Combina el filtre, Vista dividida
-
![[Nota]](images/note.png)
Nota Aquestes opcions es descriuen a Secció 2, «Característiques comunes».
- Part of filter to be displayed
-
The settings consist of three parts. Which part is visible can be changed by selecting a choice from the drop-down list here. The choices are Color, Outline, Shadow, Bevel and Inner Glow, and Image upload and Outline Bevel.
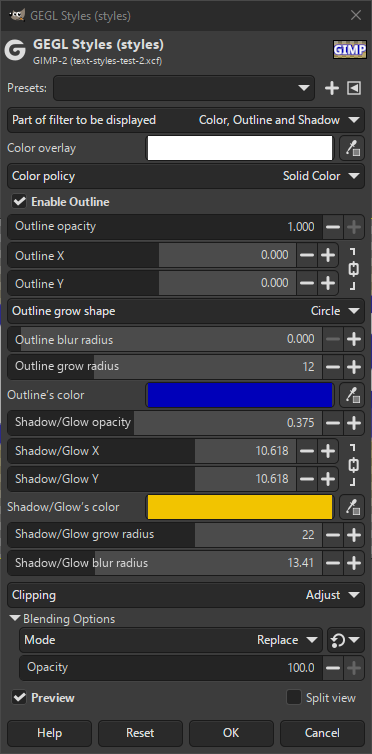
- Color, Outline and Shadow
-
The below settings control color, outline and shadow styles.
- Color Overlay
-
This sets the color of the non-transparent areas of the layer or selection. Changing the color can be done by clicking the color button, or the color picker.
- Color policy
-
This decides how the color is applied to the layer or selection. The choices are:
- No Color
-
Do not use the color selected here.
- Multiply
-
Multiply the color of the selection or layer with that of the styles color.
- Solid Color
-
Replace the colors of the layer or selection with the styles color.
- Enable Outline
-
When this is enabled, an outline will be created around the edges of the objects in the selection or layer. The following settings control the parameters used to create the outline.
- Outline Opacity
-
The opacity of the outline controls how transparent the outline will be.
- Outline X, Outline Y
-
These control the location where the outline starts.
By default these slide together. You can click the lock to the right of the sliders to make them move separately (and vice versa).
- Outline Grow Shape
-
The shape used to grow the outline. Choices are Square, Circle (default), and Diamond.
- Outline blur radius
-
This determines the amount of blur to use on the outline.
- Outline grow radius
-
This determines the size of the outline.
- Outline's color
-
This sets the color of outline. Changing the color can be done by clicking the color button, or the color picker.
- Shadow/Glow opacity
-
This controls the visibility and transparency of the shadow glow around the outline. When set to 0.0 there is no shadow glow.
- Shadow/Glow X, Shadow/Glow Y
-
These control the location where the shadow glow starts.
By default these slide together. You can click the lock to the right of the sliders to make them move separately (and vice versa).
- Shadow/Glow's color
-
This sets the color of the shadow glow. Changing the color can be done by clicking the color button, or the color picker.
- Shadow/Glow grow radius
-
The distance to expand the shadow glow before blurring.
- Shadow/Glow blur radius
-
This determines the amount of blur to use for the shadow glow.
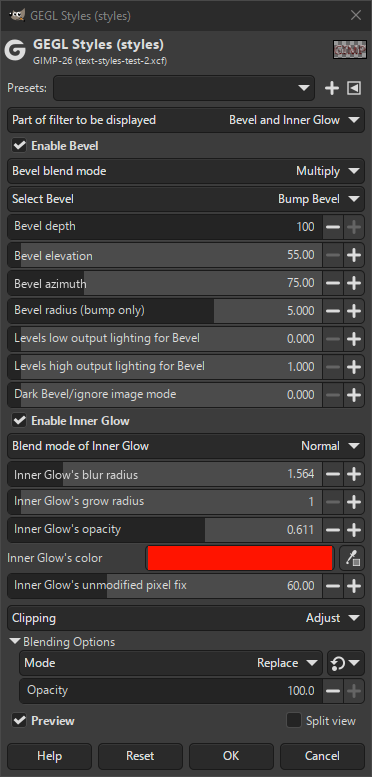
- Bevel and Inner Glow
-
The below settings control bevel and inner glow styles.
- Enable Bevel
-
When enabled a bevel is added. The settings below define how exactly the bevel is made.
- Bevel blend mode
-
This selects the blend mode that will be used to blend the bevel with the layer or selection. This affects how the two will be combined and thus the visual effect.
Choices are Multiply, Add, Hard Light, Darken, and Color Dodge.
- Select Bevel
-
You can choose between the following bevel types: Bump Bevel (the default) and Chamfer Bevel.
- Bump Bevel
-
Makes a 3D effect by adding an emboss effect on top of a blur.
- Chamfer Bevel
-
Simulates lighting of chamfered 3D-edges. Chamfered edges are sloped edges between two faces of an object.
- Bevel depth
-
This controls the emboss depth; i.e. how deep and detailed the bevel will be.
- Bevel elevation
-
This controls the elevation angle of the bevel.
- Bevel azimuth
-
This controls the angle of the light source illuminating and shading the bevel.
- Bevel radius (bump only)
-
Only available for Bump Bevel. This determines the size of the softening for the bump.
- Levels low output lighting for Bevel, Levels high output lighting for Bevel
-
These allow adjustment of the low and high levels of the bevel, which control the dark and light areas.
- Dark Bevel/ignore image mode
-
This instructs the outline bevel to ignore image details if there is an image file overlay below it. It also allows outline bevel to work better when the user selects darker colors.
This effect is mainly intended for Bump Bevel and will be hardly noticeable when Chamfer Bevel is selected.
- Enable Inner Glow
-
When enabled an inner glow is added. The settings below define how exactly the inner glow is made.
- Blend mode of Inner Glow
-
This selects the blend mode that will be used to blend the inner glow with the layer or selection. This affects how the two will be combined and thus the visual effect.
Choices are Normal, Overlay, Screen, Hard Light, Color Dodge, and Plus.
- Inner Glow's blur radius
-
This determines the size of the blur.
- Inner Glow's grow radius
-
The distance to expand the inner glow before blurring.
- Inner Glow's opacity
-
This determines how transparent or solid the inner glow will be.
- Inner Glow's color
-
The color to use for the glow. By default picks the current foreground color, but it can be changed using either the color selection button or the color picker.
- Inner Glow's unmodified pixel fix
-
Median blur covers unaffected pixels. Setting this slider too high will make it outline-like. Only slide it high enough to cover thin shaped corners.
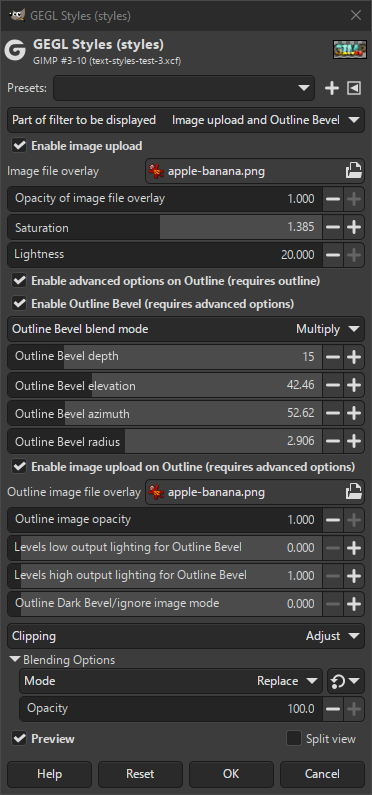
- Image upload and Outline Bevel
-
The below settings control image overlay and outline bevel styles.
- Enable image upload
-
When enabled an external image will be used as overlay and adjust related settings below it.
- Image file overlay
-
This allows you to browse for and select an image on your computer to be used as image overlay. This will be shown on top of the opaque parts of the layer or selection.
- Opacity of image file overlay
-
This setting allows you to adjust the opacity of the image overlay. By lowering the opacity you will be able to see a combination of the overlay and what's under it.
- Saturation
-
This allows you adjust the saturation of the image overlay, or anything below it when no image was chosen.
- Lightness
-
This allows you adjust the lightness of the image overlay, or anything below it when no image was chosen.
- Enable advanced options on Outline (requires outline)
-
When enabled, and Enable Outline is enabled, the below settings can be used to set additional outline options.
- Enable Outline Bevel (requires advanced options)
-
When enabled and the advanced options setting is also enabled, it allows you to outline the bevel.
- Outline Bevel blend mode
-
This selects the blend mode that will be used to blend the bevel with the outline. This affects how the two will be combined and thus the visual effect.
Choices are Multiply, Add, Hard Light, Darken, and Color Dodge.
- Outline Bevel depth
-
This controls the emboss depth; i.e. how deep and detailed the bevel will be.
- Outline Bevel elevation
-
This controls the elevation angle of the bevel.
- Outline Bevel azimuth
-
This controls the angle of the light source illuminating and shading the bevel.
- Outline Bevel radius
-
This determines the size of the softening for the bump.
- Enable image upload on Outline (requires advanced options)
-
When enabled and the advanced options setting is also enabled, it allows you to outline the bevel.
- Outline image file overlay
-
This allows you to browse for and select an image on your computer to be used as image overlay for the outline. This will be shown on top of the opaque parts of the outline.
- Outline image opacity
-
This setting allows you to adjust the opacity of the image overlay for the outline. By lowering the opacity you will be able to see a combination of the overlay and what's under it.
- Levels low output lighting for Outline Bevel, Levels high output lighting for Outline Bevel
-
These allow adjustment of the low and high levels of the outline bevel, which control the dark and light areas.
- Outline Dark Bevel/ignore image mode
-
This instructs the outline bevel to ignore image details if there is an image file overlay below it. It also allows outline bevel to work better when the user selects darker colors.