GIMP user interface is available in two modes: single-window mode (default), and multi-windows mode that you can get unchecking the → option.
이미지 없이 김프를 실행하면, 단일창 모드에서는 이미지 창이 비어 있게 되고, 다중창 모드에서는 빈 이미지 창이 열립니다.
여기서는 일반적인 이미지창에 기본값으로 표시되는 요소들에 대해 설명할 것입니다. 이 요소들 중 일부는 보기 메뉴의 하위 명령들을 이용하여 숨길 수도 있습니다.
![[참고]](images/note.png)
|
참고 |
|---|---|
|
용어의 혼란을 막기 위해 단일창 모드의 이미지 영역을 “이미지 창”이라고 부르겠습니다. |
-
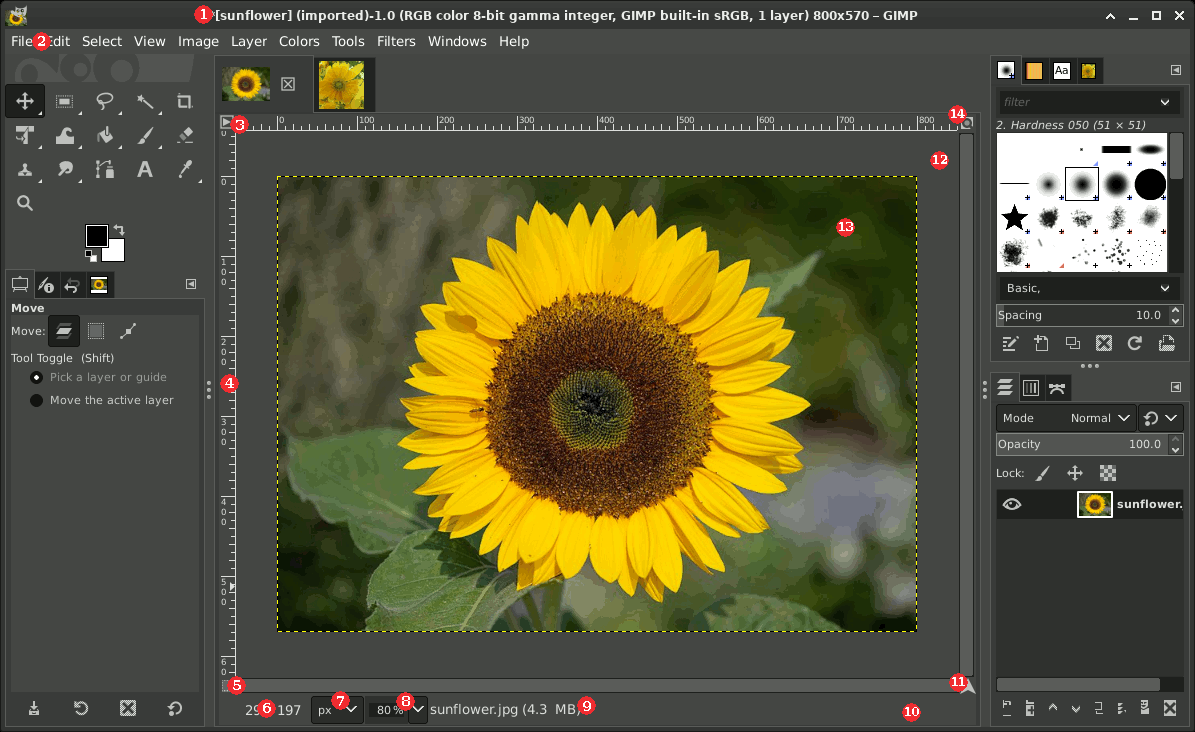
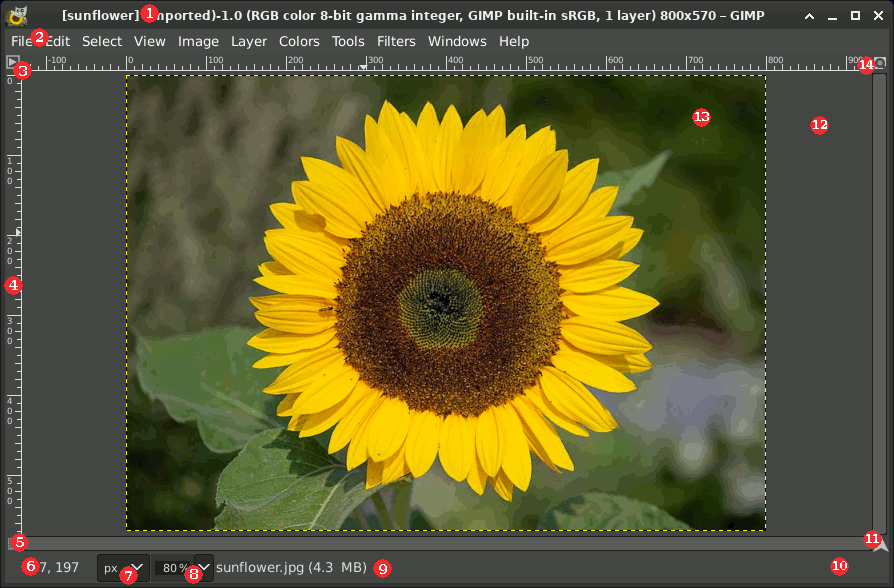
Title Bar: The Title Bar in an image window without an image displays “GNU Image Manipulating Program”. An image window with an image displays the image name and its specifications in the title bar according to the settings in Preferences Dialog. The Title Bar is provided by the operating system, not by GIMP, so its appearance is likely to vary with the operating system, window manager, and/or theme.
xcf 형식이 아닌 이미지를 열면, 이 이미지는 .xcf 파일 형식으로 “(가져옴)” 상태가 되며, 이미지창의 하단에 있는 상태 표시줄에 원본 이름이 표시됩니다.
When an image is modified, an asterisk appears in front of its title.
-
Main Menu: Directly below the Title Bar appears the Menu bar (unless it has been suppressed). The Main Menu provides access to nearly every operation you can perform on an image. You can also right-click on an image to display a pop-up menu, [1], or by left-clicking on the little “arrow-head” symbol in the upper left corner, called Menu Button, described just below. Many menu commands are also associated with keyboard shortcuts as shown in the menu. You can define your own custom shortcuts for menu actions in the Keyboard Shortcuts Dialog.
-
Menu Button: Click the Menu Button to display the Main Menu in a column, (essential in full screen mode). If you like to use keyboard shortcuts, use Shift+F10 to open the menu.
-
눈금자: 기본 화면에서 눈금자는 이미지의 상단과 왼쪽에 표시되며, 이미지 내의 좌표를 나타내는데 사용됩니다. 기본 수치 단위는 픽셀이지만, 원한다면 아래에 설명되어 있는 단위 설정법을 이용해 다른 타입으로 바꿀 수도 있습니다.
One of the most important uses of rulers is to create guides. Click and drag a ruler into the image to create a guide. A guide is a line that helps you accurately position things—or verify that another line is truly horizontal or vertical. Using the Move tool, you can click and drag a guide. Drag a guide out of the image to delete it; you can always drag another guide into the image. You can even use multiple guides at the same time.
이미지 창 내에서 마우스 커서를 움직이면 눈금자 부분에 현재 마우스 커서의 가로/세로 위치를 표시하는 작은 화살표가 표시됩니다.
-
Quick Mask Toggle: The small button in the lower left corner of the image toggles the Quick Mask on and off. When the Quick Mask is on, the button is outlined in red. See Quick Mask for more details on this highly useful tool.
-
커서 좌표: 마우스 커서가 이미지 경계안에 있을 경우 창의 왼쪽 아래 구석에 있는 사각형 부분에 현재 커서의 좌표가 표시됩니다. 좌표의 단위는 눈금자와 동일합니다.
-
단위 메뉴: 이 메뉴는 눈금자나 다른 여러 목적에 사용되는 단위를 바꾸는데 사용됩니다. 기본 단위는 픽셀입니다. 하지만 이 메뉴를 통해 인치나 cm 등 다른 단위로 바꿀 수도 있습니다. 단위를 바꿀 경우 보여지는 비율이 바뀔 수 있으므로 보기 메뉴의 “점대점” 설정을 확인해야 합니다. 이에 대한 자세한 내용은 점대점에 있습니다.
-
확대/축소 버튼: 이미지를 확대하거나 축소해 보는 방법에는 여러 가지가 있지만 이 메뉴를 이용하는 것이 가장 간단합니다. 더 정확한 확대/축소를 위해 원하는 확대/축소 비율값을 직접 입력할 수도 있습니다.
-
상태 표시 영역: 상태 표시 영역은 이미지 창의 가장 아랫 부분에 있습니다. 기본적으로 상태 표시 영역에는 원본 이미지.xcf 파일의 이름과 이미지의 시스템 메모리 사용량이 표시됩니다. → → → 에서 상태 표시 영역에 표시되는 정보를 변경할 수 있습니다. 시간이 소요되는 작업을 하는 경우, 작업이 진행되는 동안 상태 표시 영역에 진행 중인 작업 내용과 진행률이 표시됩니다.
참고 Note that the memory used by the image is very different from the image file size. For instance, a 70 kB .PNG image may occupy 246 kB in RAM when displayed. There are two primary reasons the difference in memory usage. First, a .PNG file is compressed format, and the image is reconstituted in RAM in uncompressed form. Second, GIMP uses extra memory, and copies of the image, for use by the Undo command.
-
취소 버튼: 플러그인 사용과 같이 복잡하고 시간이 걸리는 작업을 하는 경우, 창의 오른쪽 하단에 취소 버튼이 표시됩니다. 이 취소 버튼을 눌러 작업을 취소 할 수 있습니다.
참고 몇몇 플러그인은 취소를 해도 응답이 없는 경우가 있는데, 이것은 실행 중단으로 인해 쓸모없어진 이미지 조각들을 삭제하고 있기 때문입니다.
-
Navigation Control: This is the
 button at the lower right corner of the image window.
Click and hold (do not release the mouse button)
on the navigation control to display the Navigation Preview.
The Navigation Preview has a miniature view of the image
with the displayed area outlined. Use the Navigation Preview
to quickly pan to a different part of the
image—move the mouse while keeping the button pressed.
The Navigation Window is often the most convenient way to
quickly navigate around a large image with only a small portion
displayed. See
Navigation Dialog
for other ways to access the Navigation Window.
button at the lower right corner of the image window.
Click and hold (do not release the mouse button)
on the navigation control to display the Navigation Preview.
The Navigation Preview has a miniature view of the image
with the displayed area outlined. Use the Navigation Preview
to quickly pan to a different part of the
image—move the mouse while keeping the button pressed.
The Navigation Window is often the most convenient way to
quickly navigate around a large image with only a small portion
displayed. See
Navigation Dialog
for other ways to access the Navigation Window.
-
Inactive Padding Area: When the image dimensions are smaller than the image window, this padding area separates the active image display from the rest of the user interface, so you're able to distinguish between them. You cannot apply any Filters or Operations in general to the inactive area.
-
Image Display: The most important part of the image window is, of course, the image display or canvas. It occupies the central area of the window, surrounded by a yellow dotted line showing the image boundary, against a neutral gray background.
Besides the Navigation Control mentioned above, you can also pan across the image using a keyboard or mouse directly:
-
Hold the Shift key, then use the arrow keys to pan the view in that direction.
-
Use the scroll wheel on your mouse to pan the image vertically (up or down); hold the Shift key while using the scroll wheel to pan horizontally (left or right) instead.
-
If your mouse has a middle-button, click and drag with it to pan across the image.
-
Alternatively, you can press and hold Spacebar in combination with moving the mouse.
You can change the zoom level of the image display in a variety of ways, including using the Zoom Button mentioned above, and the Zoom setting described below. Other ways of adjusting the zoom are using Ctrl mousewheel, using the Zoom commands in the menu, and using the Zoom Tool.
-
-
창 크기 변경시 이미지 확대/축소 버튼: 일반적으로 이미지 창의 크기를 변경해도 이미지 자체의 크기나 확대/축소 비율은 변하지 않습니다. 하지만 이 기능을 사용하면 이미지 창 변경시 창의 크기에 따라 이미지의 확대/축소 비율이 변경됩니다. 따라서 이미지 창의 크기를 변경해도 항상 이미지의 같은 부분을 볼 수 있습니다.
![[작은 정보]](images/tip.png)
|
작은 정보 |
|---|---|
|
파일 탐색기에서 이미지 파일을 도구 상자 창으로 끌어 놓으면, 이미지가 새 이미지 창이나 탭으로 열립니다. Dragging an image file into the Layers dialog adds it to the image as a new layer. |
이미지 크기와 이미지 창의 크기는 서로 다른 개념입니다.
-
Ctrl+J: 이 단축키는 확대/축소 비율을 고정시키는 명령을 수행합니다. 창크기를 이미지에 맞춤 명령의 단축키도 이와 동일합니다.
-
Ctrl+Shift+J: 이 단축키는 창의 크기에 맞게 이미지의 확대/축소 비율을 변경하는 명령을 수행합니다.
단축키를 이용해 이미지 크기를 이미지 창의 크기에 맞춰 표시하거나 그 반대로 할 수 있습니다.


