The metadata editor allows you to edit the most common XMP metadata tags. Tags that have a corresponding IPTC tag are synchronized when writing the metadata. When opening the editor, the IPTC metadata is also checked. When only IPTC is available, the values of those tags are used to fill in the XMP metadata fields. If both are available, but different, they are in most cases concatenated.
It is currently not possible to edit Exif metadata.
When you are finished editing the metadata press the button to update the metadata in the image, or use if you don't want your changes to be added to the image. does not save the metadata to a file. Do that the usual way by saving or exporting your image.
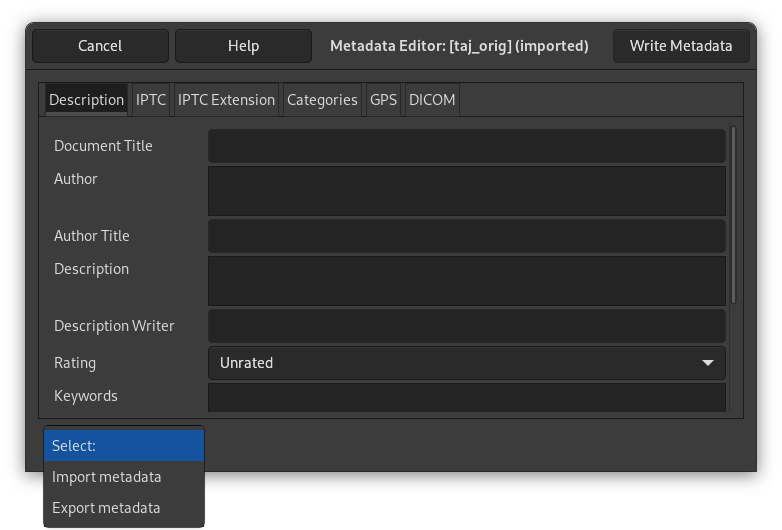
The metadata editor currently consists of the following tabs: Description, IPTC, IPTC Extension, Categories, GPS, and DICOM. We will explain these in more detail below. At the bottom of the editor there is also a Select: drop-down button, where you can choose to Import metadata or Export metadata.
Adding metadata to an image is a good way to give others some general information about your image, like a description what the image is about, where it was taken if it is a photo, the creator and more specific Copyright information.
It is good to realize that certain kinds of information can also be used to reveal personal information about you or others in the image. You have to make your own decision about what you are comfortable with in sharing with others.
More specific, things like a GPS location, your name, an address, or recognizable people or buildings in an image may be used to identify you or others.
The Description tab allows you to edit metadata that relates to general information about the image, such as the image creator, a description of the image, Copyright, etc.
- Document Title
-
The Document Title field is used to give a short name consisting of text and/or numbers to reference your image.
- Author
-
The Author field is used to tell who made the image. Multiple names, one per line, can be entered here.
- Author Title
-
The Author Title field is used to tell the job title of the creator of the image. This will generally only be useful if you created this image as part of your job.
- Description
-
The Description field is used to give a longer description of your image. Sometimes this is also used to add Copyright information.
- Description Writer
-
The Description Writer field is used to identify the person who wrote or edited the description metadata. Multiple names can be entered, separated by a comma.
- Rating
-
The Rating field is used to give a quality rating to this image. The drop-down list allows you to select a value from 1 to 5, or leave it unrated.
- Keywords
-
The Keywords field allows you to add keywords to the image. Keywords are words or sentences that describe your image. Multiple keywords can be added; each keyword should be entered on its own line.
- Copyright Status
-
The Copyright Status field is used to tell what sort of Copyright the image has. You can choose between Unknown (default), Copyrighted (someone owns or claims the copyright for this image), or Public Domain (the rights to this image have been released to the Public Domain).
- Copyright Notice
-
The Copyright Notice field allows you to write a text specifying what Copyright is attached to this image.
- Copyright URL
-
The Copyright URL field can be used to direct the viewers of this image to an online website where more details can be found about the Copyright on this image.
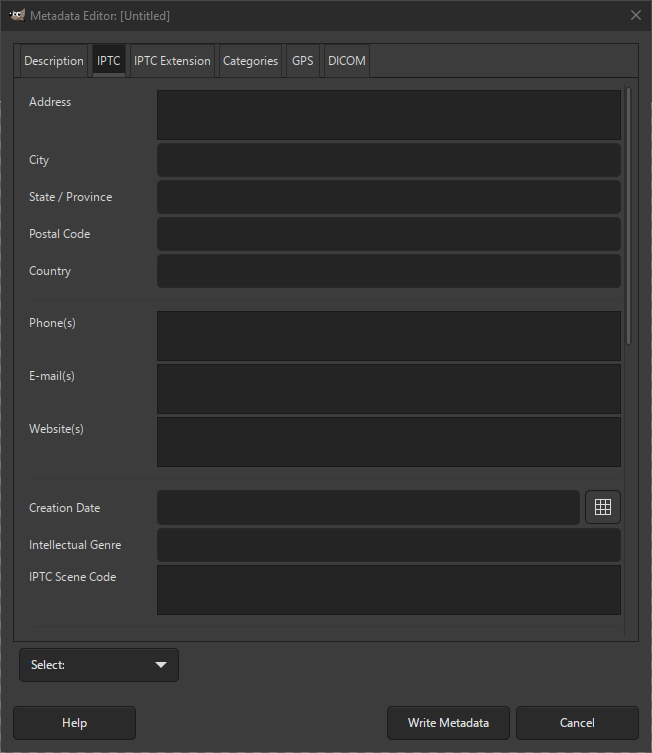
The IPTC tab allows you to edit more detailed creator, location and credits information, based on the IPTC metadata. As explained above, you have to decide what information you want to share.
- Contact Information
-
These fields serve as contact information for the person or organization this image belongs to.
- Address
-
This field is used to enter the address.
- City
-
This field is used to enter the city.
- State / Province
-
This field is used to enter the state or province.
- Postal Code
-
This field is used to enter the postal code or zip code.
- Country
-
This field is used to enter the country.
- Phone(s)
-
This field is used to enter the phone number(s).
- Email(s)
-
This field is used to enter the email address(es).
- Website(s)
-
This field is used to enter the website(s).
- Creation Date
-
This field is used to enter the date and optionally the time this image was created. This is not necessarily the same as the date and time a photo was taken.
The button next to this field allows you to select a date. However, this does not let you to pick a time. You will have to enter that manually.
- Intellectual Genre
-
Describes the nature, intellectual, artistic or journalistic characteristic of an image.
- IPTC Scene Code
-
Describes the scene of an image. Specifies one or more terms from the IPTC "Scene-NewsCodes". Each Scene Code should be on a separate line and consists of a string of 6 digits.
- Image Location Information
-
These fields serve to identify the image location. All of the fields in this section are considered legacy, meaning you usually would not use these to add new information.
We recommend instead to use similar named fields in the IPTC Extension tab for better compatibility with other apps using metadata.
- Sublocation
-
This field is used to enter the location shown in the image.
- City
-
This field is used to enter the city.
- State / Province
-
This field is used to enter the state or province.
- Country
-
This field is used to enter the name of the country.
- Country ISO-Code
-
This field is used to enter the ISO code of a country.
- Urgency
-
A field originally defined by Photoshop and nowadays considered deprecated and mostly left alone.
- Headline
-
A brief synopsis of the caption. According to the IPTC Headline is not the same as Document Title.
- IPTC Subject Code
-
Specifies one or more subjects from the IPTC Subject-NewsCodes to categorize the image. Each subject is represented as a string of 8 digits; each subject should be on a separate line. This field is also considered deprecated and rarely used.
- Job Identifier
-
A field used to identify the job this image belongs to in a business environment.
- Instructions
-
A field with instructions from the creator of the image to the receiver.
- Credit Line
-
A field that specifies who to give credit when using this image.
- Source
-
A field that specifies the name of a person or party who had a role in the content supply chain of making the image. This can be someone else than the creator.
- Usage Terms
-
A field specifying the license for using this image.
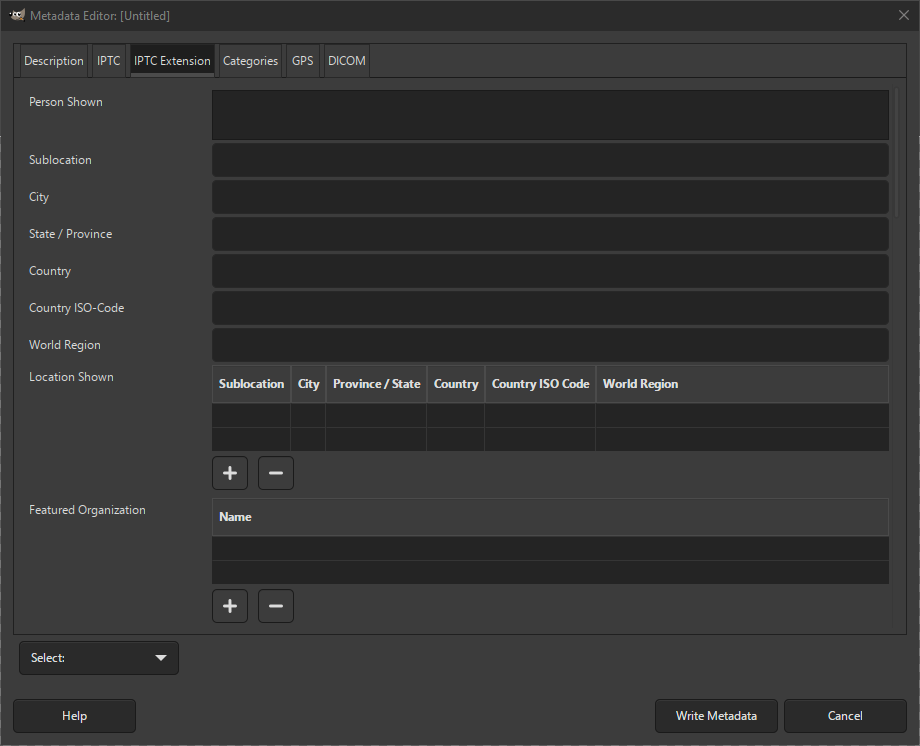
The IPTC Extension is an extension of the original IPTC metadata specification that allows more detailed information. In most cases it is recommended to enter your information here instead of similar fields in the IPTC tab.
A lot of the metadata fields here are specifically targeted at professional use cases in organizations. There is no need to fill in all fields. You can limit yourself to what is relevant for you.
- Person Shown
-
This field can be used to list the names of persons in an image. Each name should be listed on a separate line.
- Information about the location the image was created
-
- Sublocation
-
This field is used to enter the location.
- City
-
This field is used to enter the city.
- State / Province
-
This field is used to enter the state or province.
- Country
-
This field is used to enter the name of the country.
- Country ISO-Code
-
This field is used to enter the ISO code of a country.
- World Region
-
This field is used to enter the name of the region of the world.
- Editing metadata information in tables
-
We use tables to show and edit certain types of metadata. This is a short overview of how to edit data in a table.
In a table, each row lists information about one specific event or occurrence, where each column pertains to one specific part of that information. Multiple rows can be added when needed.
Below each table you see two buttons, one with a plus sign, to add a new row, and another with a minus sign, to remove an existing row.
To edit the metadata in one of the columns, first select the corresponding row by clicking on it. Then double-click on the column you want to edit. You will see an edit cursor in that field that will allow you to add and change the text in that field.
If you make a mistake while editing, you can use the Esc key to cancel your changes. If you are content with your text, use Enter or click somewhere else inside the table to finalize the change. If you click outside the table, the changes are cancelled.
- Location Shown
-
This table allows you to specify one or more locations that are shown in your image. The columns use the same basic data as that for the location created shown at the top of this tab page.
- Featured Organization
-
This table allows you to specify one or more names of organizations that are shown in your image, one per row.
For information about editing metadata in a table, see here.
- Organization Code
-
This table allows you to specify one or more organization codes related to the organizations that are shown in your image, one per row.
For information about editing metadata in a table, see here.
- Event
-
This field allows you to enter the name or description of the event at which this image was taken.
- Artwork or Object
-
This table allows you to specify one or more pieces of artwork or objects that are shown in your image, one per row.
For information about editing metadata in a table, see here.
The following types of metadata can be entered in the respective columns.
- Title
-
The title of the artwork or object.
- Date Created
-
The date and optionally the time the artwork or object was created.
- Creator
-
The name of the artist that created the artwork or object.
- Source
-
The organization registering the artwork or object in the image for inventory purposes.
- Source Inventory ID
-
The inventory identification issued by the source organization for the artwork or object in the image.
- Copyright Notice
-
The copyright notice for claiming the intellectual property for the artwork or an object in the image.
- Additional Model Info
-
Information about the model(s) in the image.
- Model Age
-
List the age(s) of the models shown in the image, one per line.
- Minor Model Age Disclosure
-
Age of the youngest model pictured in the image, at the time that the image was taken. Select one of the options from the drop-down list.
- Model Release Status
-
Enter information about the model releases, that authorize usage. Select one of the options from the drop-down list.
- Model Release Identifier
-
This table allows you to specify one or more model release identifiers that identify model release documents of models shown in your image, one per row.
For information about editing metadata in a table, see here.
- Image Supplier Name
-
The name of the supplier of the image, which is not necessarily the owner or creator.
- Image Supplier ID
-
The ID that identifies the supplier of the image.
- Supplier's Image ID
-
The ID by which the supplier identifies the image.
- Registry Entry
-
This table allows you to specify a Registry Organization identifier and an Item identifier to record any registration of this image with a registry.
For information about editing metadata in a table, see here.
- Max Available Width
-
The maximum width in pixels of the original photo from which this image has been derived.
- Max Available Heigth
-
The maximum heigth in pixels of the original photo from which this image has been derived.
- Digital Source Type
-
The type of the source of this digital image. Select one of the values from the drop-down list. This lists the values from the official Digital Source Type NewsCodes vocabulary.
- Image Creator
-
This table allows you to enter the names and optionally identifiers of the creator(s) of the image, one creator per line.
For information about editing metadata in a table, see here.
- Copyright Owner
-
This table allows you to enter the names and optionally identifiers of the copyright owner(s) of the image, one per line.
For information about editing metadata in a table, see here.
- Licensor
-
This table allows you to specify details about the persons or organizations that can be contacted for obtaining a license to use this image, one per row.
For information about editing metadata in a table, see here.
The following types of metadata can be entered in the respective columns.
- Name
-
The name of a licensor.
- Identifier
-
The identifier with which the licensor can be identified.
- Phone number 1
-
The phone number at which the licensor can be reached.
- Phone type 1
-
The type of phone number can be selected from a drop-down list.
- Phone number 2
-
The phone number at which the licensor can be reached.
- Phone type 2
-
The type of phone number can be selected from a drop-down list.
- Email address
-
The email address at which the licensor can be reached.
- Web address
-
The website at which the licensor can be reached.
- Property Release Status
-
Enter information about the property releases, that authorize usage of the properties appearing in the image. Select one of the options from the drop-down list.
- Property Release Identifier
-
This table allows you to specify one or more property release identifiers that identify property release documents of properties shown in your image, one per row.
For information about editing metadata in a table, see here.
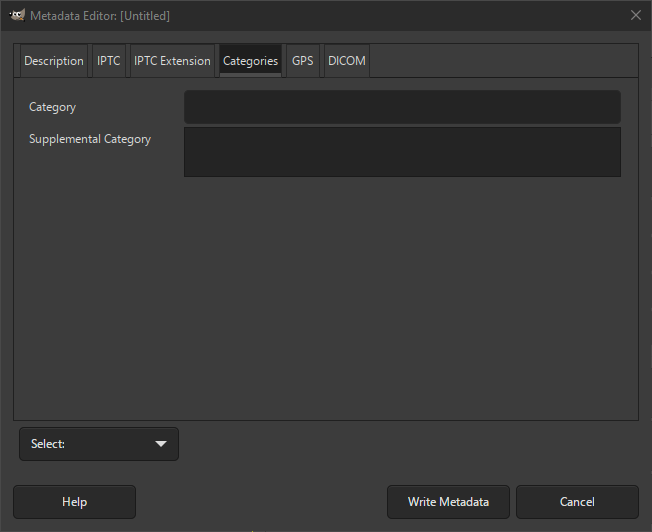
The Categories tab allows you to edit metadata that indicates what categories an image belongs to.
- Category
-
The category this image belongs to, usually a three-letter code.
This is a deprecated field and should generally not be used to add new information. Use IPTC Subject Code on the IPTC tab instead.
- Supplemental Category
-
The supplemental category this image belongs to, consisting of free-form text. This is a deprecated field and should generally not be used to add new information.
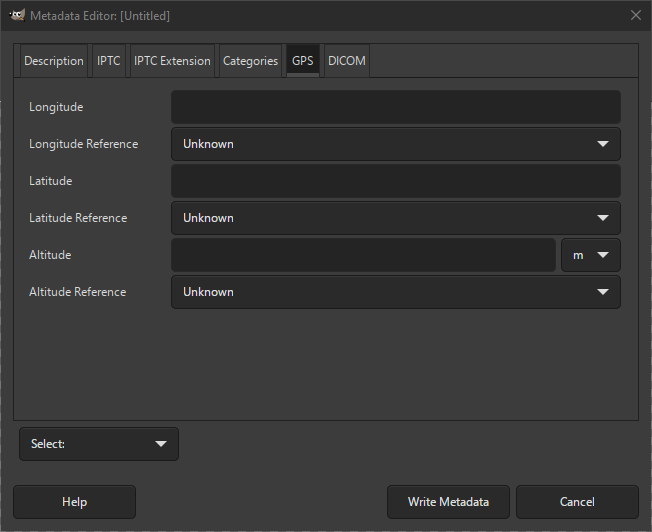
The GPS tab allows you to edit metadata related to GPS information, the information that shows you at what exact location the image was taken.
- Longitude
-
The longitude part of the GPS location information. Note that this will only be valid and saved when the Longitude Reference is also set and not Unknown.
This information is usually already set when taking an image with a digital camera.
Valid values consist of 1, 2 or 3 numbers that specify the degrees, minutes, and seconds of the longitude.
See the following examples:
10deg 15' 20", or10\u00b0 15' 20", or10:15:20.45, or10 15 20, or10 15.30, or10.45. - Longitude Reference
-
The longitude reference part of the GPS location information. This is required to be set for a valid longitude. Choose either East or West from the drop-down list.
- Latitude
-
The latitude part of the GPS location information. Note that this will only be valid and saved when the Latitude Reference is also set and not Unknown. See longitude for information on how to enter this information.
This information is usually already set when taking an image with a digital camera.
- Latitude Reference
-
The latitude reference part of the GPS location information. This is required to be set for a valid latitude. Choose either North or South from the drop-down list.
- Altitude
-
The altitude part of the GPS location information, which is the height above, or below sea level. Note that this will only be valid and saved when the Altitude Reference is also set and not Unknown. The button to the right of this field let's you choose whether the altitude is specified in meters (m) or feet (ft). A valid value consists of one number, e.g. 100, or 12.24.
This information is sometimes already set when taking an image with a digital camera.
- Altitude Reference
-
The altitude reference part of the GPS location information. This is required to be set for a valid altitude. Choose either Above sea level or Below sea level from the drop-down list.
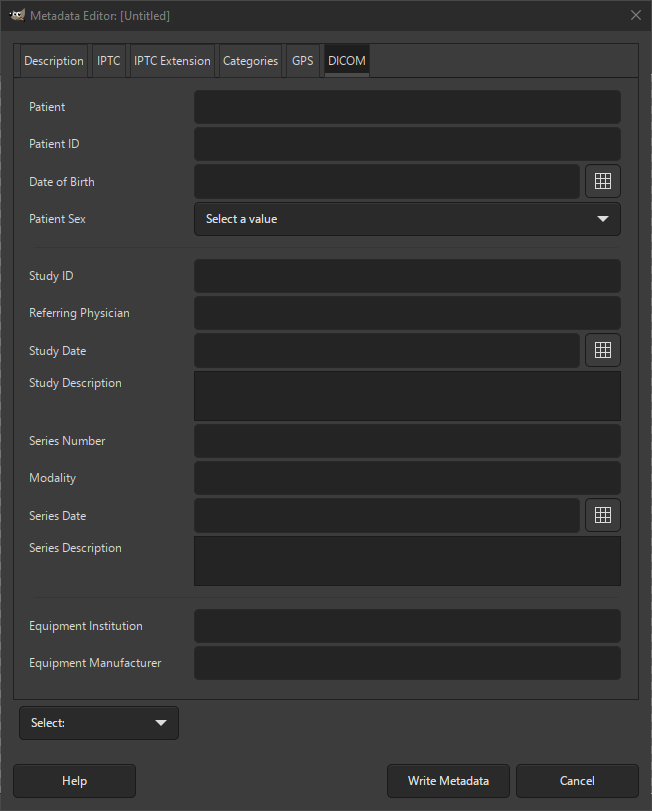
The DICOM tab allows you to edit metadata that relates to so-called DICOM metadata. That is medical information, usually related to x-ray images.
Most images usually don't have this kind of information, these fields are empty most of the time. Even if you have images that contain this information, you should consider removing most if not all of this metadata when you intend to share it, since it can be highly sensitive personal health information.
- Patient
-
The name of the patient.
- Patient ID
-
The ID of the patient.
- Date of birth
-
The birth date of the patient.
- Patient Sex
-
Select the sex of the patient from the drop-down list.
- Study ID
-
The Study ID that identifies the specific study for which this image was used.
- Referring Physician
-
The physician that referred the patient.
- Study Date
-
The date that the study took place.
- Study Description
-
A description of the study that was performed.
- Series number
-
The series number of this image.
- Modality
-
The date that the study took place.
- Series date
-
The date this series images was taken.
- Series Description
-
A description of this series.
- Equipment Institution
-
The institution that owns the equipment.
- Equipment Manufacturer
-
The maker of the equipment.
The Select: drop-down button at the bottom of the dialog, is where you can choose to Import or Export metadata. A good way to have your metadata filled with pre-defined information, is to open a new image without metadata, then in the metadata editor fill in all fields that you care about. You then choose Export metadata here and save it under a name you can remember. Next time you need to fill in your information, you choose Import metadata, then select the file to read that information from, and all metadata fields will be overwritten or filled with the information you saved previously.
