The Scissors Select tool is an interesting piece of equipment: it has some features in common with Free Select, some features in common with the Path tool, and some features all its own. It is useful when you are trying to select a region defined by strong color-changes at the edges. To use the Scissors, you click to create a set of "control nodes", also referred to as anchors or control points, at the edges of the region you are trying to select. The tool produces a continuous curve passing through these control nodes, following any high-contrast edges it can find. If you are lucky, the path that the tool finds will correspond to the contour you are trying to select.
Unfortunately, there seem to be some problems with the edge-following logic for this tool, with the result that the selections it creates tend to be pretty crude in a lot of cases. A good way to clean them up is to switch to Quick Mask mode, and use paint tools to paint in the problematic parts. On the whole, most people find the Path tool to be more useful than the Scissors, because, even though it does not have the intelligent edge-finding capability, the paths it produces persist until you delete them, and can be altered at any time.
There are different possibilities to activate the tool:
-
From the main menu: → → .
-
By clicking the tool icon
 in the Toolbox.
-
By pressing the I keyboard shortcut.
Das Standardverhalten der Zusatztasten Umschalt, Strg und Alt wird für alle Auswahlwerkzeuge in Abschnitt 2.1.1, „Zusatztasten“ beschrieben.
Eine Zusatztaste hat allerdings eine besondere Auswirkung, wenn Sie sie während des Bearbeitens einer Auswahl benutzen, d.h. nachdem Sie den ersten Kontrollpunkt eingefügt haben:
- Umschalt
-
Per Voreinstellung ist automatisches Einrasten aktiviert: jedes Mal, wenn Sie Klicken und den Mauszeiger bewegen, berechnet die intelligente Schere den Punkt des maximalen Gradienten (wo der Farbwechsel maximal ist), um dort einen neuen Kontrollpunkt zu platzieren bzw. einen bestehenden Kontrollpunkt dorthin zu verschieben.
Wenn Sie jetzt diese Taste gedrückt halten, während Sie klicken und ziehen, wird diese Funktion ausgeschaltet und der Kontrollpunkt wird einfach an der Position des Mauszeigers platziert, wenn Sie die Maustaste loslassen.
Die Rücktaste entfernt das zuletzt erstellte Segment, Escape entfernt alle Segmente.
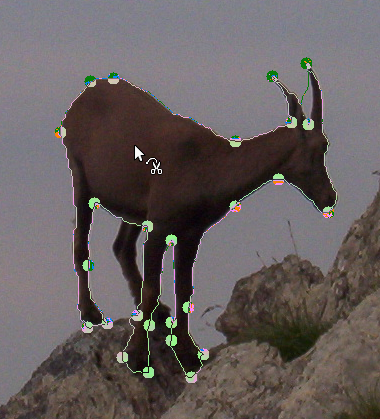
Each time you left-click with the mouse, you create a new control point, which is connected to the last control point by a curve that tries to follow edges in the image. To finish, click on the first point (the cursor changes to indicate when you are in the right spot) or press the Enter key. You can adjust the curve by dragging the control points, or by clicking on the boundary of the curve to create new control points. When you are satisfied and want to convert the curve to a selection, click anywhere inside the curve or press the Enter key.
As said above when you click with this tool you drop points. The
selection boundary is driven by these control points. During creation you
can move each one by clicking and dragging, except the first and the last
one. The selection is closed when you are clicking the last point over
the first one. When the selection is closed the pointer shape
changes according to its position: inside
 ,
on the boundary
,
on the boundary
 ,
and outside
,
and outside
 .
You can adjust the selection creating new points by clicking on the
boundary or by moving each control points (merged first and last
point). The selection is validated when you click inside.
.
You can adjust the selection creating new points by clicking on the
boundary or by moving each control points (merged first and last
point). The selection is validated when you click inside.
Beachten Sie, dass Sie mit diesem Werkzeug nur eine einzige Auswahl erstellen können. Wenn Sie damit eine zweite Auswahl erstellen, wird die erste gelöscht, sobald Sie die zweite abgeschlossen haben.
![[Warnung]](images/warning.png)
|
Warnung |
|---|---|
|
Achten Sie darauf, nicht in die durch die Kurve umrandete Region hinein zu klicken, bevor Sie alle Kontrollpunkte erzeugt und korrigiert haben. Wenn die Kurve erst einmal in eine Auswahl umgewandelt ist, können Sie die Kurve nicht mehr korrigieren und müssten von vorn beginnen. Außerdem sollten Sie darauf achten, dass Sie während der Erstellung einer Kurve mit der intelligenten Schere nicht das Werkzeug wechseln, denn auch dabei wird die Kurve in eine Auswahl umgewandelt, und Sie verlieren alle Kontrollpunkte. (Allerdings können Sie dann immer noch die Auswahl in einen Pfad umwandeln und dann mit dem Pfadwerkzeug arbeiten.) |
Wie man die Auswahl verschieben kann, finden Sie in Abschnitt 2.1, „Moving or Resizing a Selection“.
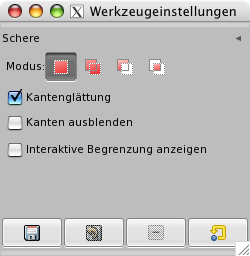
Normally, tool options are displayed in a window attached under the Toolbox as soon as you activate a tool. If they are not, you can access them from the main menu through → → which opens the option window of the selected tool. The available tool options can also be accessed by double clicking the corresponding tool icon in the Toolbox.
- Modus, Kantenglättung, Feather edges
-
![[Anmerkung]](images/note.png)
Anmerkung Schauen Sie bitte unter Eigenschaften von Auswahlwerkzeugen nach, falls Sie Hilfe zu den allgemeinen Eigenschaften der Auswahlwerkzeuge benötigen.
- Interaktive Umrandung
-
Wenn diese Eigenschaft aktiviert ist, wird bei der Erstellung eines Kontrollpunktes bereits die Kurve zum vorherigen Kontrollpunkt an der Farbkante entlanggeführt. Ist die Eigenschaft ausgeschaltet, wird hingegen die Verbindung zum vorherigen Kontrollpunkt durch eine gerade Linie symbolisiert. Wenn Ihr Computer nicht zu den leistungsstärksten gehört und die Kontrollpunkte sehr weit auseinander liegen, kann dies die Arbeitsgeschwindigkeit erhöhen.


