The Scissors Select tool is an interesting piece of equipment: it has some features in common with Free Select, some features in common with the Path tool, and some features all its own. It is useful when you are trying to select a region defined by strong color-changes at the edges. To use the Scissors, you click to create a set of "control nodes", also referred to as anchors or control points, at the edges of the region you are trying to select. The tool produces a continuous curve passing through these control nodes, following any high-contrast edges it can find. If you are lucky, the path that the tool finds will correspond to the contour you are trying to select.
Unfortunately, there seem to be some problems with the edge-following logic for this tool, with the result that the selections it creates tend to be pretty crude in a lot of cases. A good way to clean them up is to switch to Quick Mask mode, and use paint tools to paint in the problematic parts. On the whole, most people find the Path tool to be more useful than the Scissors, because, even though it does not have the intelligent edge-finding capability, the paths it produces persist until you delete them, and can be altered at any time.
There are different possibilities to activate the tool:
-
From the main menu: → → .
-
By clicking the tool icon
 in the Toolbox.
-
By pressing the I keyboard shortcut.
The default behavior of the Shift, Ctrl, and Alt keys is described in 2.1.1절. “Key modifiers” for all selection tools.
There is, however, one key modifier that has a special behavior if you use it while editing a selection, that is after you have added the first node:
- Shift
-
By default, the auto-edge snap feature is enabled: whenever you click and drag the mouse pointer, the Scissors tool finds the point of the maximal gradient (where the color change is maximal) for placing a new control node or moving an existing node.
Holding down this key while clicking and dragging disables this feature, and the control node will be placed at the position of the mouse pointer.
Backspace removes last segment drawn, Escape cancels all selection segments.
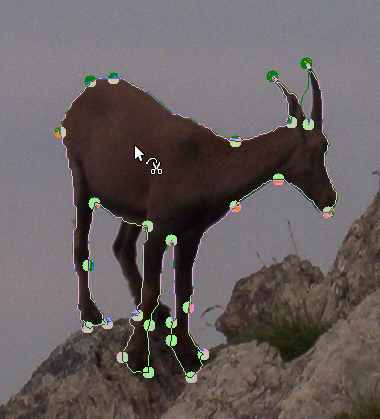
Each time you left-click with the mouse, you create a new control point, which is connected to the last control point by a curve that tries to follow edges in the image. To finish, click on the first point (the cursor changes to indicate when you are in the right spot) or press the Enter key. You can adjust the curve by dragging the control points, or by clicking on the boundary of the curve to create new control points. When you are satisfied and want to convert the curve to a selection, click anywhere inside the curve or press the Enter key.
As said above when you click with this tool you drop points. The
selection boundary is driven by these control points. During creation you
can move each one by clicking and dragging, except the first and the last
one. The selection is closed when you are clicking the last point over
the first one. When the selection is closed the pointer shape
changes according to its position: inside
 ,
on the boundary
,
on the boundary
 ,
and outside
,
and outside
 .
You can adjust the selection creating new points by clicking on the
boundary or by moving each control points (merged first and last
point). The selection is validated when you click inside.
.
You can adjust the selection creating new points by clicking on the
boundary or by moving each control points (merged first and last
point). The selection is validated when you click inside.
주의해야 할 점은 하나의 선택만을 만들 수 있다라는 점입니다. 만약 두번째 선택을 만들면 첫번째 선택은 사라집니다.
![[주의]](images/warning.png)
|
주의 |
|---|---|
|
따라서 영역 조정을 마무리하기 전까지는 곡선 안쪽을 클릭해서는 안됩니다. 한번 선택으로 변환하면, 맨 처음 상태로밖에 되돌리기를 할 수 없습니다. 따라서 처음부터 다시 영역을 만들기 시작해야 합니다. 마찬가지로 중간에 다른 도구를 선택하면 그동안 만든 조절점들이 모두 사라지므로 조심해야합니다. 하지만 선택의 경우, 경로로 변환한 뒤, 경로 도구를 이용해 같은 작업을 계속할 수 있습니다. |
선택의 이동에 대해서는 선택 이동하기 를 참조하십시오.
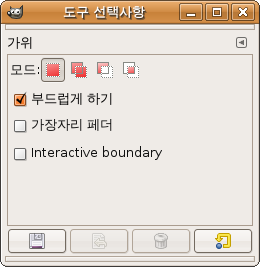
Normally, tool options are displayed in a window attached under the Toolbox as soon as you activate a tool. If they are not, you can access them from the main menu through → → which opens the option window of the selected tool. The available tool options can also be accessed by double clicking the corresponding tool icon in the Toolbox.
- 모드, 안티앨리어싱(Antialiasing), Feather edges
-
![[참고]](images/note.png)
참고 See Selection Tools Options for help with options that are common to all these tools. Only options that are specific to this tool are explained here.
- 경계 바로보기
-
이 옵션을 활성화시키면, 조절점을 이동시키는 동안 선택의 경계가 될 경로가 표시됩니다. 비활성화시키면 조절점을 이동시키는 동안 해당 점이 이전 점과 직선으로 연결되며 마우스버튼을 놓은 후에 경로가 표시됩니다. 이는 느린 시스템에서 조절점간의 거리가 멀 경우 유용합니다.


