| Capítulo 7. Pintar con GIMP | ||
|---|---|---|

|
Parte II. ¿Cómo convertirse en un mago de GIMP? |  |
| Capítulo 7. Pintar con GIMP | ||
|---|---|---|
|
|
Parte II. ¿Cómo convertirse en un mago de GIMP? | |
Tabla de contenidos
A menudo, cuando opera sobre una imagen, quiere que sólo una parte de ella se vea afectada. En GIMP, esto se logra seleccionando esa parte. Cada imagen tiene una selección asociada a ella. Muchas operaciones de GIMP, pero no todas, actúan solamente sobre las porciones seleccionadas de la imagen.
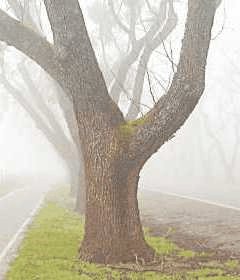
Hay muchísimas situaciones en las que crear la selección adecuada es la clave para obtener el resultado deseado y, a menudo, esto no es nada fácil de lograr. Por ejemplo, en la imagen de arriba, supongamos que deseamos cortar el árbol del fondo, y pegarlo en otra imagen. Para hacerlo, necesitamos crear una selección que contenga al árbol y a nada más. Esto es difícil porque el árbol tiene una silueta muy compleja, y en varias zonas se hace imposible distinguirlo de los objetos que hay detrás.
He aquí un punto muy importante, y es crucial entenderlo. En general cuando se crea una selección, se visualiza como una línea discontinua que encierra una porción de la imagen. La idea que podría hacerse es que la selección es un tipo de contenedor, con las partes de la imagen seleccionadas adentro, y las partes no seleccionadas afuera. Este concepto de selección está bien para muchos propósitos, pero no es del todo correcto.
En realidad la selección está implementada como un canal. En términos de su estructura interna, es idéntico a los canales rojo, verde, azul, y alfa de una imagen. Por esto, la selección tiene un valor definido para cada píxel de la imagen, que va desde 0 (no seleccionado) hasta 255 (completamente seleccionado). La ventaja de esto es que permite que algunos píxeles se encuentren parcialmente seleccionados, dándoles valores intermedios. Como podrá observar, hay muchas situaciones en las que es preferible tener transiciones suaves entre las regiones seleccionadas y las no seleccionadas.
Pues entonces, ¿qué es esa línea de guiones que aparece cuando se crea una selección?
La línea discontinua es una línea de contorno, que divide las áreas que se encuentran más de un 50% seleccionadas, de las áreas que se encuentran menos de un 50% seleccionadas.
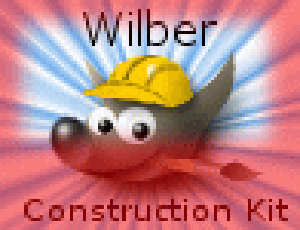
While looking at the dashed line that represents the selection, always remember that the line only tells part of the story. If you want to see the selection in full detail, the easiest way is to click the Quick Mask button in the lower left corner of the image window. This causes the selection to be shown as a translucent overlay atop the image. Selected areas are unaffected; unselected areas are reddened. The more completely selected an area is, the less red it appears.
Many operations work differently in Quick Mask mode, as mentioned in the Quick Mask overview. Use the Quick Mask button in the lower left corner of the image window to toggle Quick Mask mode on and off.
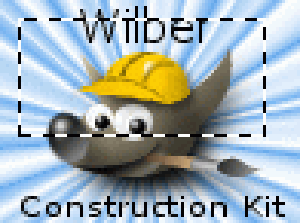
With the default settings, the basic selection tools, such as the Rectangle Select tool, create sharp selections. Pixels inside the dashed line are fully selected, and pixels outside completely unselected. You can verify this by toggling Quick Mask: you see a clear rectangle with sharp edges, surrounded by uniform red. Use the “Feather edges” checkbox in the Tool Options to toggle between graduated selections and sharp selections. The feather radius, which you can adjust, determines the distance over which the transition occurs.
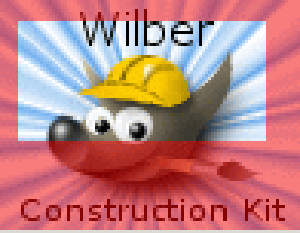
If you are following along, try this with the Rectangle Select tool, and then toggle Quick Mask. You will see that the clear rectangle has a fuzzy edge.
El difuminado es particularmente útil cuando corta y pega, porque ayuda a que el objeto pegado se combine suavemente en sus contornos.
It is possible to feather a selection at any time, even if it was originally created as a sharp selection. Use → from the main menu to open the Feather Selection dialog. Set the feather radius and click . Use → to do the opposite—sharpen a graduated selection into an all-or-nothing selection.
![[Nota]](images/note.png)
|
Nota |
|---|---|
|
Para lectores con una orientación técnica: el difuminado trabaja aplicando un desenfoque gaussiano al canal de selección, con el radio de desenfoque especificado. |
Puede ajustar la opacidad de la capa, pero no puede hacerlo directamente para una selección. Es bastante útil que la imagen sea transparente como el cristal. Use los siguientes métodos para ajustar la opacidad de la capa:
Para selecciones simples, use la herramienta de borrador con la opacidad deseada.
For complex selections: use → to create a floating selection. This creates a new layer with the selection called “Floating Selection” (Sección 4.5, “Flotante”). Set the opacity slider in the Layers dialog to the desired opacity. Then anchor the selection: outside the selection, the mouse pointer includes an anchor. When you click while the mouse pointer includes the anchor, the floating selection disappears from the Layers dialog and the selection is at the right place and partially transparent (anchoring works this way only if a selection tool is activated: you can also use the Anchor Layer command in the context menu by right clicking on the selected layer in the Layers dialog).
And, if you use this function frequently: Ctrl-C to copy the selection, Ctrl-V to paste the clipboard as a floating selection, and → to turn the selection into a new layer. You can adjust the opacity before, or after creating the new layer.
Another way: use → → to add a layer mask to the layer with the selection, initializing it with the selection. Then use a brush with the desired opacity to paint the selection with black, i.e. paint it with transparency. Then → → . See Sección 2.1.4, “Máscaras de capa”.
Para hacer transparente el fondo sólido de una imagen, añada un canal alfa, y use la varita mágica para seleccionar el fondo. Entonces, use la herramienta «recoge color» para seleccionar el color de fondo, que se convierte en el color de primer plano de la caja de herramientas. Ajuste el modo de la herramienta de relleno de cubeta a “Borrar color”, lo que borrará los píxeles con el color seleccionado; otros píxeles se borrarán parcialmente y cambiará su color.
El método más sencillo es usar → , que da una transparencia completa a una selección.