”Luo uusi kuva” valintaikkunan kautta voit luoda uuden tyhjän kuvan ja asettaa sen ominaisuudet. Kuva näytetään uudessa kuvaikkunassa. Näytölläsi voi olla useampi kuin yksi kuva samaan aikaan.
-
You can access this command from the main menu through → .
-
You can also use the keyboard shortcut Ctrl+N.
- Malli
-
Sen sijaan, että syötät arvot käsin, voit valita joitakin ennalta määriteltyjä arvoja kuvallesi mallivalikosta, jotka edustavat yleisesti käytettyjä kuvatyyppejä. Mallit asettavat arvot koolle, tarkkuudelle, kommenteille, jne. Jos sinulla tietty kuvan muoto, jota käytät usein ja se ei esiinny listalla, voit luoda uuden mallin, käyttämällä Mallit valintaikkunaa.
- Kuvan koko
-
Täällä asetat uuden kuvan leveyden ja korkeuden. Oletusyksikköjä ovat pikselit, mutta voit halutessasi asettaa toisen yksikön, käyttäen viereistä valikkoa. Jos teet näin, huomioi, että seurauksena tulleen pikselikoon määrittää X ja Y tarkkuudet (jotka voit vaihtaa Lisäasetuksissa), ja asettamalla ”piste pisteeltä” .
Jos kuvaa ei ole avoinna, ”Uusi” kuva avataan tyhjään kuvaikkunaan määrittämälläsi oletuskoolla. Jos avaat ”Uusi” kuva kun toinen on avoinna (tai on ollut), sitten se avataan toiseen ikkunaan, samalla koolla kuin ensimmäinen kuva.
- Pystysuuntainen/vaakasuuntainen näppäimet
-
These buttons toggle between Portrait and Landscape mode. Their effect is to exchange the values for Width and Height. If the X and Y resolutions are different (in Advanced Options), then these values are also exchanged. On the right, image size, image resolution and color space are displayed.
The Advanced Options are mostly of interest to more advanced GIMP users. You can display these options by clicking on the small triangle on the lower edge of the dialog window. Note that you will need to scroll down to see all the available options.
- X ja Y tarkkuus
-
Arvot X resolution ja Y tarkkuus alueissa koskevat pääosin tulostusta: ne eivät vaikuta kuvan kokoon pikseleissä, mutta ne voivat määrittää sen fyysisen koon kun se on tulostettu. X ja Y tarkkuuden arvot määrittävät kuinka pikselit muutetaan muihin mittayksikköihin, kuten millimetreihin ja tuumiin.
![[Vihje]](images/tip.png)
Vihje If you want to display the image on the screen at the correct dimensions, select → . Set the zoom factor to 100% to see the image at its true screen size. The calibration of the screen size is normally done when GIMP is installed, but if the image does not display at the correct size, you may have to adjust the screen parameters in GIMP. You can do this in the Preferences dialog.
- Color space
-
Voit luoda uuden kuvan erilaisissa väritiloissa, joko RGB kuvana tai harmaasävykuvana.
- RGB väri
-
Kuva luodaan Puna, Vihreä, Sininen värijärjestelmillä, jota monitorisi tai televisiosi näyttö käyttää.
- Harmaasävy
-
The image is created in black and white, with various shades of gray. Aside from your artistic interests, this type of image may be necessary for some plug-ins. Nevertheless, GIMP allows you to change an RGB image into grayscale, if you would like.
Et voi luoda indeksoitua kuvaa suoraan tässä valikossa, mutta voit tietenkin muuntaa kuvan indeksoituun tilaan kun se on luotu. Tehdäksesi tämän, käytä → → komentoa.
- Precision
-
This setting lets you define the encoding used to store pixel information. For more details, please see the Image Encoding section.
Five options are available:
-
8-bit integer
-
16-bit integer
-
32-bit integer
-
16-bit floating point
-
32-bit floating point
If you wonder what the difference is between integer and floating point (in the graphics area): If you have an image with 16-bit integer precision per channel, then you have 65,536 shades of different red, green and blue color tones – all of them equally stepped to each other (equal color distance). If you have it in floating point, then there are no equal-wide steps – so you can distribute the possible color values over selected ranges. For example: if you know that you have a very dark image with many shades of dark red color tones then you would benefit from floating point because you can decrease the importance of the brighter color tones and get most color detail out of only the darker reds.
Kuva 16.3. Precision example
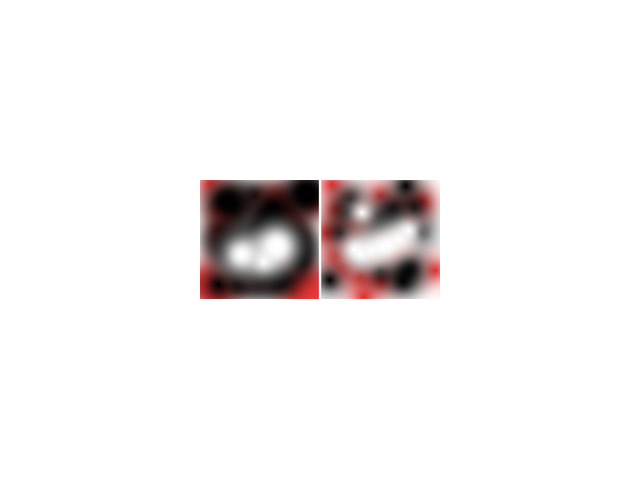
Left image is 8-bit, right is 32-bit. You can see that there are much more available colors between color transitions on the right image.
-
- Gamma
-
Here you can choose the channel encoding for your image. Choices are Non-linear and Linear light. For 8-bit integer precision the default is Non-linear, and for 32-bit floating point precision it is Linear light. For more information see which precision options should you choose.
- Color profile
-
Here you can choose a color profile to be used for your image. The default is GIMP's standard color profile based on Color space, Precision, and Gamma. If you prefer to use a different color profile you can select an ICC color profile file from a location on your computer by choosing Select color profile from disk….
- Soft-proofing color profile
-
You can attach a CMYK color profile to the image with this option. This profile will be used to create a soft-proofed display of the image when the Proof Colors option is enabled in the View menu. As with the Color Profile, if you prefer to use a different color profile you can select an ICC color profile file from a location on your computer by choosing Select color profile from disk….
- Soft-proofing rendering intent
-
This option lets you select the rendering intent that will be used to convert the colors from the soft-proofed image to your display device when → → is enabled. The four intents are ”Perceptual”, ”Relative colorimetric”, ”Saturation” and ”Absolute colorimetric”. See Kohta 6.4, ”Värin hallinta” and Kohta 6.8, ””Color Management” Submenu” for more information.
- Use Black Point Compensation
-
When enabled, the BPC algorithm attempts to adjust the display of darker areas in the image when the Proof Colors option is enabled in the View menu.
- Fill with
-
Here, you specify the background color that is used for your new image. It is certainly possible to change the background of an image later, too. You can find more information about doing that in the Layers Dialog.
Täällä on useita vaihtoehtoja:
-
Täytä kuva nykyisellä Edustavärillä, näytettynä työkalupakissa.
Huomioi, että voit muuttaa edustavärin samalla kun ”Uusi kuva” ikkuna on auki.
-
Täytä kuva nykyisellä taustavärillä, näytettynä työkalupakissa. (Voit muuttaa myös taustaväriä, kun valintaikkuna on auki.)
-
Fill the image with Middle Gray (CIELAB). This will create a layer with a gray color that is 50% of perceptual lightness in the selected color mode.
-
Täytä kuva Valkoisella.
-
Fill the image with Transparency. If you choose this option, the image is created with an alpha channel and the background is transparent. The transparent parts of the image are then displayed with a checkered pattern, to indicate the transparency.
-
Fill the image with a Pattern. If you choose this option, the image is filled with the currently active pattern (which you can change while this dialog is open).
-
- Kommentti
-
Voit kirjoittaa kuvaavan kommentin tähän. Teksti liitetään kuvaan parasiittina, ja tallennetaan kuvan kanssa jollakin tiedostomuodoista (PNG, JPEG, GIF).
![[Huomaa]](images/note.png)
Huomaa Voit katsoa ja editoida tätä kommenttia Kuvaominaisuudet ikkunassa.


