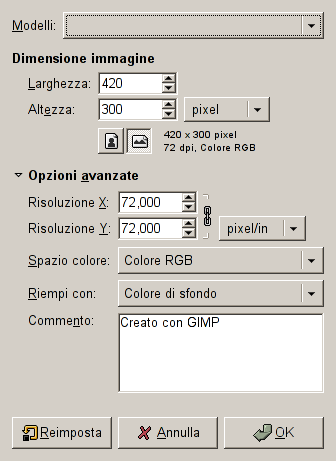
Usando la finestra di dialogo «Nuova immagine», è possibile creare una nuova immagine vuota e impostarne le sue proprietà. L'immagine viene mostrata in una nuova finestra immagine. È possibile avere più finestre immagine allo stesso tempo sullo schermo.
-
È possibile accedere a questo comando dalla barra del menu principale tramite → ,
-
o usando la scorciatoia da tastiera Ctrl+N.
- Modelli
-
Invece di inserire tutti i valori a mano, è comodo utilizzare alcuni valori predefiniti per l'immagine prelevandoli da un menu di modelli per i tipi più comunemente utilizzati. I modelli contengono valori per la dimensione, la risoluzione, i commenti ecc. dell'immagine. Se c'è un modello di immagine che si usa spesso ma che non è presente nell'elenco, è possibile crearne uno usando la finestra di dialogo dei modelli.
- Dimensione immagine
-
Qui si imposta la larghezza e altezza della nuova immagine. L'unità di misura predefinita è in pixel, ma è possibile scegliere un'unità di misura differente di propria scelta, usando il menu associato. Da notare che se si opera questa scelta, la dimensione dei pixel è determinata dalla risoluzione X e Y (che può essere variata tramite in menu Opzioni avanzate), e impostando «Punto per punto» nel menu .
Se non ci sono immagini aperte, la «Nuova» immagine viene aperta nella finestra di immagine vuota, con la dimensione che si è impostata. Se si apre la «Nuova» immagine quando un'altra è già aperta (o lo è stata), allora si aprirà in un'altra finestra, con la stessa dimensione della prima immagine.
- Pulsanti di orientamento verticale/orizzontale
-
These buttons toggle between Portrait and Landscape mode. Their effect is to exchange the values for Width and Height. If the X and Y resolutions are different (in Advanced Options), then these values are also exchanged. On the right, image size, image resolution and color space are displayed.
The Advanced Options are mostly of interest to more advanced GIMP users. You can display these options by clicking on the small triangle on the lower edge of the dialog window. Note that you will need to scroll down to see all the available options.
- Risoluzione X e Y
-
I valori presenti nei campi risoluzione X e risoluzione Y riguardano principalmente le stampe: questi non modificano la dimensione in pixel dell'immagine, ma ne possono determinare la dimensione fisica quanto questa viene stampata. I valori di risoluzione X e Y possono determinare come i pixel vengono traslati in altre unità di misura, come per esempio in millimetri o in pollici.
![[Suggerimento]](images/tip.png)
Suggerimento If you want to display the image on the screen at the correct dimensions, select → . Set the zoom factor to 100% to see the image at its true screen size. The calibration of the screen size is normally done when GIMP is installed, but if the image does not display at the correct size, you may have to adjust the screen parameters in GIMP. You can do this in the Preferences dialog.
- Spazio colore
-
Si può creare la nuova immagine in diverse modalità di colore, come un'immagine RGB o in scala di grigi.
- Colore RGB
-
L'immagine viene creata nel sistema di colore Rosso, Verde(G), e Blu (RGB) che è lo spazio colore usato dal monitor o dalla televisione.
- Scala di grigi
-
The image is created in black and white, with various shades of gray. Aside from your artistic interests, this type of image may be necessary for some plug-ins. Nevertheless, GIMP allows you to change an RGB image into grayscale, if you would like.
Non è possibile creare direttamente un'immagine indicizzata da questo menu ma naturalmente si può sempre convertire l'immagine in modalità indicizzata dopo averla creata. Per fare ciò basta usare il comando → → .
- Precisione
-
Questa impostazione consente di definire la codifica utilizzata per memorizzare le informazioni sui pixel. Per maggiori dettagli, consultare la sezione Codifica delle immagini.
Sono disponibili cinque opzioni:
-
interi 8-bit
-
interi 16-bit
-
interi 32-bit
-
virgola mobile 16-bit
-
virgola mobile 32-bit
If you wonder what the difference is between integer and floating point (in the graphics area): If you have an image with 16-bit integer precision per channel, then you have 65,536 shades of different red, green and blue color tones – all of them equally stepped to each other (equal color distance). If you have it in floating point, then there are no equal-wide steps – so you can distribute the possible color values over selected ranges. For example: if you know that you have a very dark image with many shades of dark red color tones then you would benefit from floating point because you can decrease the importance of the brighter color tones and get most color detail out of only the darker reds.
Figura 16.3. Esempio di precisione

L'immagine a sinistra è a 8-bit, a destra a 32-bit. Si può osservare che ci sono molti più colori disponibili nelle transizioni di colore dell'immagine a destra.
-
- Gamma
-
Qui si può scegliere la codifica di canale per l'immagine. Le opzioni disponibili sono Non lineare e Luce lineare. Per la precisione intera a 8 bit, l'impostazione predefinita è Non lineare, mentre per la precisione in virgola mobile a 32 bit è Luce lineare. Per ulteriori informazioni, consultare la sezione quali opzioni di precisione scegliere.
- Profilo colore
-
Qui si può scegliere un profilo colore da utilizzare per l'immagine. Il profilo colore predefinito è quello standard di GIMP basato su Spazio colore, Precisione e Gamma. Se si preferisce usare un profilo colore diverso, si può prelevare un file di profilo colore ICC dal proprio computer selezionando Seleziona il profilo colore da disco….
- Profilo colore provino
-
Con questa opzione è possibile allegare un profilo colore CMYK all'immagine. Questo profilo verrà utilizzato per creare una visualizzazione a provino video dell'immagine quando l'opzione Colori provino è abilitata nel menu Visualizza. Come per il Profilo colore, se si preferisce utilizzare un profilo colore diverso, è possibile selezionare un file di profilo colore ICC sul computer scegliendo Seleziona il profilo colore da disco….
- Intento di rendering provino video
-
This option lets you select the rendering intent that will be used to convert the colors from the soft-proofed image to your display device when → → is enabled. The four intents are «Perceptual», «Relative colorimetric», «Saturation» and «Absolute colorimetric». See Sezione 6.4, «Gestione del colore» and Sezione 6.8, ««Color Management» Submenu» for more information.
- Usa la compensazione del punto nero
-
When enabled, the BPC algorithm attempts to adjust the display of darker areas in the image when the Proof Colors option is enabled in the View menu.
- Riempi con
-
Here, you specify the background color that is used for your new image. It is certainly possible to change the background of an image later, too. You can find more information about doing that in the Layers Dialog.
Ci sono diverse possibilità:
-
Riempie l'immagine con il colore di primopiano corrente, mostrato nel pannello degli strumenti.
Si noti che mentre la finestra di dialogo «Nuova immagine» è aperta, si può cambiare il colore di sfondo.
-
Riempie l'immagine con il colore di sfondo corrente, mostrato nel pannello degli strumenti (mentre la finestra di dialogo è aperta, si può cambiare anche il colore dello sfondo).
-
Riempire l'immagine con Grigio medio (CIELAB). Questo creerà un livello con un colore grigio che corrisponde al 50% della luminosità percettiva nella modalità colore selezionata.
-
Riempie l'immagine di bianco.
-
Fill the image with Transparency. If you choose this option, the image is created with an alpha channel and the background is transparent. The transparent parts of the image are then displayed with a checkered pattern, to indicate the transparency.
-
Riempire l'immagine con un Motivo. Se si sceglie questa opzione, l'immagine verrà riempita con il motivo attualmente attivo (che si può modificare mentre questa finestra di dialogo è aperta).
-
- Commento
-
Qui è possibile scrivere una piccola descrizione. Il testo viene allegato all'immagine sottoforma di parassita e, in alcuni formati di file immagine, per esempio PNG, JPEG e GIF, viene salvato con l'immagine.
![[Nota]](images/note.png)
Nota È possibile rileggere questo commento usando la finestra Proprietà dell'immagine.


