The commands in this submenu vary somewhat, depending upon your system, since GIMP makes calls to system functions.
When you copy a selection, it goes into the clipboard. Use → → or press Shift+Ctrl+V to create a new image from the content in the clipboard.
This command has the same action as the Paste as New Image command.
The Print Screen keyboard key captures the screen and puts it in the clipboard. This command has the same action as “taking a screenshot of the entire screen” in the Screenshot dialog window. The Alt+Print Screen key combination grabs the active window in the screen with its decorations and puts it in the clipboard.
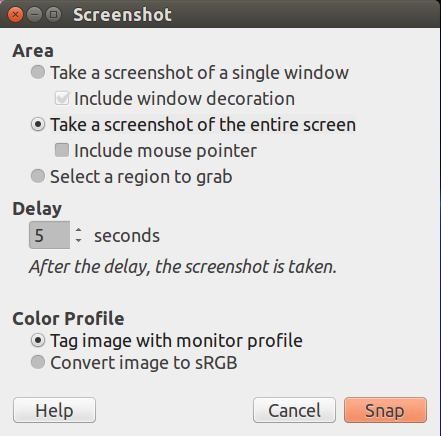
Slika 16.4. The “Screenshot” dialog
The Windows version of the Screenshot Dialog, without the Selection delay setting.
![[Bilješka]](images/note.png)
|
Bilješka |
|---|---|
|
The Screenshot dialog may look different depending on your operating system. For example, on a Linux system which implements the XDG portal specification, the screenshot dialog provided by your operating system may get opened instead of GIMP's built-in dialog described in this section. |
The command opens a dialog with the following options:
- Shoot area
-
- Take a screenshot of a single window
-
The mouse pointer becomes a cross. Click in the image window you want to capture. A new image is created.
- Take a screenshot of the entire screen
-
This is useful if you want to capture a pop menu. A delay is then necessary, so that you have time to pull the pop menu down.
- Select a region to grab
-
The mouse pointer becomes a cross. Click and drag to create a rectangular selection in the image window. This selection will be opened as a new image. Its size is adapted to the selection size. Note: this setting is not available on Windows.
- Contents
-
- Include window decoration
-
If the Include window decoration option is unchecked, the title bar and the frame around the image will be removed.
- Include mouse pointer
-
If the Include mouse pointer option is checked, then the mouse pointer and its coming with icon are also captured. The mouse pointer is captured in a separate layer. So you can move it to another place in the image.
- Delay
-
- Selection delay (not available on Windows)
-
The seconds to let pass until you select the shoot area.
- Screenshot delay
-
When taking a screenshot of the entire screen, the screen is captured after this delay. In the other cases, the mouse pointer turns to a cross after this delay.
- Color Profile
-
Select whether to Tag image with monitor profile or to Convert image with sRGB to GIMP's built-in sRGB color space. See Odjeljak 6.8, ““Color Management” Submenu” for more information.
Bilješka Due to a software bug, GIMP may assign an incorrect color profile to screenshots.
This item is present in Windows operating system, using TWAIN. Image input devices appear in the dialog, if they are plugged-in. On Linux, you need to install third-party XSane plug-in which will be available in the → → → menu.
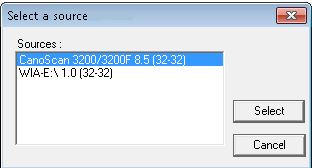
The kinds of devices used to take pictures are too varied to be described here. Fortunately, their use is fairly intuitive. In the example shown (under Windows 7), you can start a scanner or load an image from a camera card.


