
I modelli sono impostazioni di immagini predefinite utilizzabili nella creazione rapida di nuove immagini di dimensioni, risoluzione, ecc. preferiti. GIMP offre diversi modelli predefiniti oltre alla possibilità di crearne di nuovi personalizzati. Quando si crea una nuova immagine, si accede all'elenco dei modelli per selezionarne uno come base della nuova immagine. La finestra di dialogo «Modelli» permette la gestione di questi modelli.
Questa finestra di dialogo è di tipo agganciabile; vedere la sezione sulle Finestre agganciabili per le istruzioni su come gestire questo tipo di finestre.
È accessibile:
-
dal menu principale: → → .
-
da un menu scheda di un qualsiasi pannello agganciabile facendo clic sul pulsante menu scheda
 e selezionando → .
Si seleziona un modello facendo clic sull'icona corrispondente. Il clic destro del mouse rivela invece un menu che offre le stesse funzioni dei pulsanti.
Nel menu scheda per la finestra «Modelli», è possibile scegliere tra e . In modalità griglia, i modelli sono disposti in un insieme rettangolare di icone identiche (a meno che non gli sia dato un'icona particolare, come vedremo in seguito) e viene mostrato solo il nome del modello selezionato. In modalità elenco, i modelli sono allineati verticalmente in una lista e le icone sono anch'esse identiche ma questa volta tutti i nomi sono visualizzati.
In questo menu scheda, l'opzione Dimensione anteprima permette di cambiare la dimensione delle miniature.
![[Suggerimento]](images/tip.png)
|
Suggerimento |
|---|---|
|
Ctrl+F in una vista a elenco apre una casella di ricerca. Vedere Mostra come elenco |
La barra dei pulsanti in basso offre le seguenti funzionalità:
-
 Crea una nuova immagine dal modello selezionato
-
Facendo clic su questo pulsante si crea una nuova immagine con le impostazioni definite nel modello selezionato.
-
 Crea un nuovo modello
-
Facendo clic su questo pulsante apre la finestra Nuovo modello, identica alla finestra di modifica del modello, che vedremo tra poco.
-
 Duplica il modello selezionato
-
Facendo clic su questo pulsante si apre la finestra di modifica dei modelli documentata di seguito.
-
 Modifica il modello selezionato
-
Il clic su questo pulsante apre la finestra Modifica modello con la quale è possibile modificare le impostazioni immagine per il modello selezionato.
-
 Rimuovi il modello selezionato
-
Questo elimina il modello selezionato dopo la richiesta di conferma.
Suggerimento Every template is stored in a
templatercfile in your personal GIMP directory. If you want to restore some deleted templates, you can copy or append template entries to your file from the mastertemplatercfile in theetc/gimp/3.0directory of GIMP's system folder.
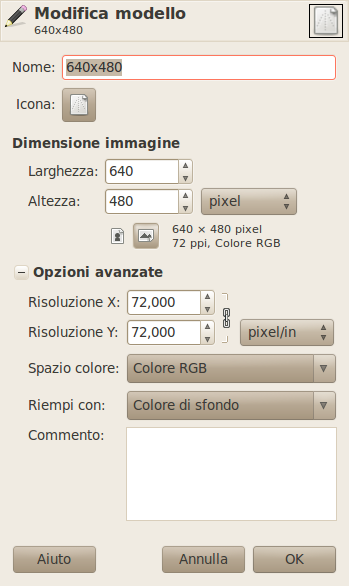
Questa finestra permette di cambiare le impostazioni del modello selezionato.
È possibile accedere a questa finestra di dialogo facendo clic sul pulsante nella parte inferiore della finestra dei modelli
Opzioni
- Nome
-
Questa casella di testo permette di modificare il nome del modello.
- Icona
-
Facendo clic su questa icona, si può selezionare un'altra icona che verrà mostrata davanti al nome di questo modello. L'icona può essere selezionata da un elenco di icone predefinite, da un file sul proprio computer o incollandola dagli appunti.
- Dimensione immagine
-
Qui è possibile impostare la larghezza e altezza della nuova immagine. Le unità di misura predefinite sono in pixel ma è possibile passare ad altre unità di misura se lo si desidera, usando il menu associato. Notare che se si cambia unità di misura, la dimensione in pixel risultante sarà determinata dalla risoluzione X e Y (modificabile tramite le Opzioni avanzate) e l'impostazione «punto per punto», impostabile tramite il menu .
- Pulsanti di orientamento verticale e orizzontale
-
Questi pulsanti passano da una modalità di orientamento verticale all'altra orizzontale (portrait e landscape in inglese, ritratto e paesaggio). L'effetto pratico è quello di scambiare il valore di Altezza con quello di Larghezza. Anche i valori di risoluzione di X e di Y, presenti nelle opzioni avanzate, verranno scambiati. Sulla destra sono mostrati i valori di dimensione, risoluzione e spazio colore dell'immagine.
Opzioni avanzate
Le opzioni avanzate consentono di modificare diverse impostazioni aggiuntive dell'immagine.
- Risoluzione X e Y
-
I valori nei campi Risoluzione X e Risoluzione Y si riferiscono principalmente alla stampa: non influiscono sulla dimensione dell'immagine in pixel, ma possono determinarne le dimensioni fisiche al momento della stampa. I valori di risoluzione X e Y possono determinare come i pixel vengono convertiti in altre unità di misura, come millimetri o pollici.
Suggerimento Se si desidera visualizzare l'immagine sullo schermo con le dimensioni corrette, selezionare → . Impostare il fattore di zoom al 100% per visualizzare l'immagine alle sue reali dimensioni sullo schermo. La calibrazione delle dimensioni dello schermo viene normalmente eseguita quando si installa GIMP, ma se l'immagine non viene visualizzata alle dimensioni corrette, potrebbe essere necessario regolare i parametri dello schermo in GIMP. È possibile farlo nella finestra di dialogo Preferenze.
- Spazio colore
-
È possibile creare la nuova immagine in diverse modalità di colore, come immagine RGB o come immagine in scala di grigi.
- Colore RGB
-
L'immagine viene creata nel sistema di colori Rosso, Verde, Blu, che è quello utilizzato dal monitor o dallo schermo di un televisore.
- Scala di grigi
-
L'immagine viene creata in bianco e nero, con diverse tonalità di grigio. Oltre alle motivazioni artistiche, questo tipo di immagine potrebbe essere necessario per il funzionamento di alcuni plug-in. Tuttavia, GIMP consente di convertire un'immagine RGB in scala di grigi, alla bisogna.
Non è possibile creare un'immagine indicizzata direttamente con questo menu, ma ovviamente è sempre possibile convertire l'immagine in modalità indicizzata dopo averla creata. Per farlo, utilizzare il comando → → .
- Precisione
-
Questa impostazione consente di definire la codifica utilizzata per memorizzare le informazioni sui pixel. Per maggiori dettagli, consultare la sezione Codifica delle immagini.
Sono disponibili cinque scelte:
-
Interi 8 bit
-
Interi 16 bit
-
Interi 32 bit
-
Virgola mobile 16 bit
-
Virgola mobile 32 bit
Se ci si chiede qual è la differenza tra intero e virgola mobile (nell'area grafica) ecco un esempio: in un'immagine con precisione intera a 16 bit per canale, ci saranno 65.536 sfumature di diversi toni di colore rosso, verde e blu, tutti con la stessa ampiezza (uguale distanza di colore). Se si usa la virgola mobile, non ci sono intervalli di uguale ampiezza, quindi si può distribuire i possibili valori di colore su intervalli selezionati. Ad esempio: se si ha un'immagine molto scura con molte sfumature di rosso scuro, la virgola mobile sarà vantaggiosa perché si potrà ridurre l'importanza dei toni di colore più luminosi e ottenere il massimo dettaglio cromatico solo dai rossi più scuri.
Figura 15.54. Esempio di precisione
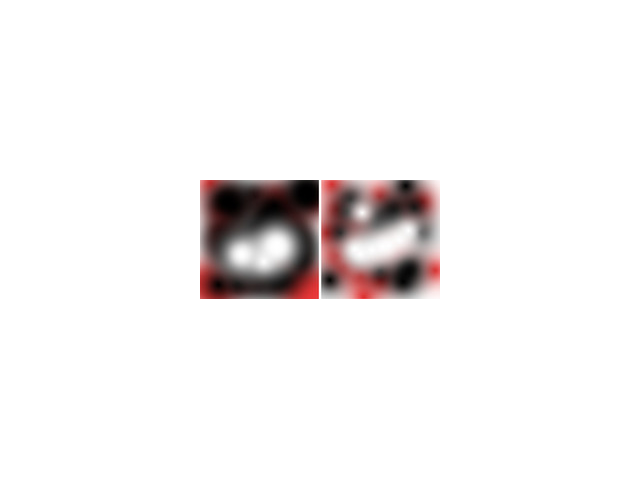
L'immagine a sinistra è a 8 bit, quella a destra a 32 bit. Come si può notare, nell'immagine a destra ci sono molti più colori disponibili tra le transizioni di colore.
-
- Gamma
-
Qui si può scegliere la codifica di canale per l'immagine. Le opzioni disponibili sono Non lineare e Luce lineare. Per la precisione intera a 8 bit, l'impostazione predefinita è Non lineare, mentre per la precisione in virgola mobile a 32 bit è Luce lineare. Per ulteriori informazioni, consultare la sezione quali opzioni di precisione scegliere.
- Profilo colore
-
Qui si può scegliere un profilo colore da usare per l'immagine. Il profilo colore predefinito è quello standard di GIMP basato su Spazio colore, Precisione e Gamma. Se si preferisce utilizzare un profilo colore diverso, si può selezionare un file di profilo colore ICC prelevandolo dal proprio computer scegliendo Seleziona profilo colore da disco….
- Profilo provino video
-
Con questa opzione è possibile allegare un profilo colore CMYK all'immagine. Questo profilo verrà utilizzato per creare una visualizzazione del provino a video dell'immagine quando l'opzione Colori provino è abilitata nel menu Visualizza. Come per il Profilo colore, se si preferisce utilizzare un profilo colore diverso, è possibile selezionare un file di profilo colore ICC sul computer scegliendo Seleziona profilo colore da disco….
- Intento di rendering provino video
-
Questa opzione consente di selezionare l'intento di rendering che verrà utilizzato per convertire i colori dall'immagine sottoposta a provino video al dispositivo di visualizzazione quando → → è abilitato. I quattro intenti sono «Percettivo», «Colorimetrico relativo», «Saturazione» e «Colorimetrico assoluto». Per ulteriori informazioni, consultare Sezione 6.4, «Gestione del colore» e Sezione 6.8, ««Color Management» Submenu».
- Usa compensazione del punto nero
-
Se abilitato, l'algoritmo BPC tenta di regolare la visualizzazione delle aree più scure nell'immagine quando l'opzione Colori provino è abilitata nel menu Visualizza.
- Riempi con
-
Qui si può specificare il colore di sfondo da utilizzare per la nuova immagine. È ovviamente possibile modificare lo sfondo di un'immagine anche in un secondo momento. Maggiori informazioni su come farlo si trovano nella parte relativa alla finestra di dialogo Livelli.
Ci sono diverse scelte:
-
Riempi l'immagine con il Colore primo piano corrente, mostrato nella casella degli strumenti.
Si tenga presente che si può modificare il colore di primo piano mentre è aperta la finestra di dialogo «Nuova immagine».
-
Riempi l'immagine con il Colore di sfondo corrente, mostrato nella Casella degli strumenti. (Anche il colore di sfondo è modificabile mentre la finestra di dialogo è aperta.)
-
Riempi l'immagine di Grigio medio (CIELAB). Questo creerà un livello con un colore grigio che corrisponde al 50% della luminosità percettiva nella modalità colore selezionata.
-
Riempi l'immagine con Bianco.
-
Fill the image with Transparency. If you choose this option, the image is created with an alpha channel and the background is transparent. The transparent parts of the image are then displayed with a checkered pattern, to indicate the transparency.
-
Riempi l'immagine con un Motivo. Se si sceglie questa opzione, l'immagine verrà riempita con il motivo attualmente attivo (che è possibile modificare anche mentre questa finestra di dialogo è aperta).
-
- Commenti
-
Qui si può scrivere un commento di descrizione. Il testo viene allegato all'immagine come parassita e salvato insieme all'immagine in alcuni formati di file (PNG, JPEG, GIF).
![[Nota]](images/note.png)
Nota È possibile visualizzare e modificare questo commento nella finestra di dialogo Proprietà dell'immagine.


