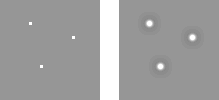
Figur 17.43. Eksempel på bruk av filteret «Gjer skarpare»
Det opphavlege biletet

Filteret «Gjer skarpare» brukt
Bilete som ikkje er i fokus og dei fleste digitale bileta treng ofte å gjerast skarpare. Dette fordi digitaliseringsprosessen som deler ei fargesamansetjing i punkt med litt ulike fargar. Element som er mindre enn prøvetakingsfrekvensen vert gjennomsnittet til ein einsarta farge. Så skarpe kanter vert litt uskarpe. Det same fenomenet oppstår når du skriv ut fargeprikkar på papir.
Filteret «Gjer skarpare» (tidlegare kalla «Uskarpmaske») gjer kantane i elementa skarpare utan å auka støyen eller flekkane.
![[Tips]](images/tip.png)
|
Tips |
|---|---|
|
Dersom skannaren din eller digitalkameraet ditt har innebygd filter for å gjera bileta skarpare, rår vi til at du ikkje brukar dette filteret. Du har mykje betre kontroll når du brukar GIMP sine filter for å gjera biletet skarpare. |
For å unngå fargeforvrengingar når du gjer biletet skarpare, kan du separera biletet til HSV og berre arbeida på Verdi. Gå til → → . Sjå etter at det er merkt av for Separer til lag. Vel HSV og klikk OK. Du vil få eit nytt grånivåbilde med tre lag, eitt for kulør, eitt for metning og eitt for verdi. (Lukk det opphavlege bildet slik at du ikkje vert forstyrra av det). Vel verdilaget og bruk filteret «Gjer skarpare» på det. Når du er ferdig, med det same laget vald, reverser du prosessen ved å bruka Sett saman. Gå til → → . Vel igjen HSV og klikk OK. Du vil få tilbake det opphavlege biletet, bortsett frå at det er vorte skarpare i verdi-komponenten.
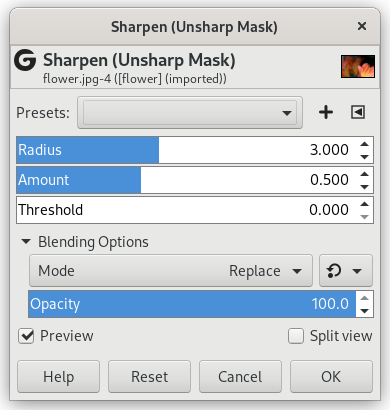
- Forval, «Inngangstype», Klipping, Blandeinnstillingar, Førehandsvising, Flett samman filter, Delt vising
-
![[Notat]](images/note.png)
Notat Desse innstillingane er omtalte i Del 2, «Felles eigenskapar».
- Radius
-
Glidebrytaren og innskrivingsboksane (0,0 - 1500,0) vert brukte for å setja kor mange pikslar på kvar side av ein kant som skal påverkast av skjerpinga. Som oftast er det best å skjerpa biletet med den oppløysinga det skal ha til slutt.
- Mengd
-
Denne glidebrytaren og innskrivingsboksane (0,0 - 300,0) vert brukte for å setja styrken på skjerpinga.
- Terskel
-
Denne glidebrytaren og innskrivingsboksane (0,0 – 1,0) vert brukt for å setja minstegrensa for pikselverdiar som skal oppfattast som ein kant som skal skjerpast. Du kan såleis verna område med jamne tonale overgangar frå å verta skjerpa og unngå flekkar i andlet, himmel eller vatn.
Det kan høyrast underleg ut å bruka ei uskarpmaske for å gjera biletet skarpare. Her er forklaringa på den merkelege ordbruken:
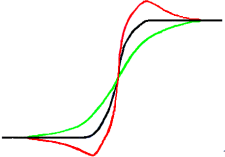
Tenk deg eit bilete med ein kontrast ein eller annan staden. Intensitetskurva for ei linje med pikslar som kryssar denne kontrasten viser eit tydeleg avbrot i intensiteten i kryssingspunktet. Dersom kontrasten er skarp, vil kurva ha form som eit trappesteg (blå), som ein S dersom det er litt sløring (gul).
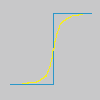
No har vi eit uskarpt bilete som vi ønskjer å laga skarpare (svart kurve). Gjer vi biletet litt meir uskarpt, vil variasjonane i intensitet verta meir gradvise (grøn kurve).
Lat oss dra skilnaden mellom sløringsintesiteten (grøn kurve) og intensiteten i det opphavlege biletet (svart kurve). Vi får då den raude kurva som er meir brå: Kontrasten er større og biletet er skarpare.
Uskarpmaska vart først brukt i mørkerommet. Fotografen laga først ein kontaktkopi av originalnegativet frå ein film og la ei tynn glassplate mellom begge filmane. Dette vil laga ein uskarp kopi på grunn av lysspreiinga. Deretter vart begge filmane lagt i forstørringsapparatet for å laga papirkopi. Dei mørke områda på den positive uskarpe filmen, i motsetnad til dei klare områda på det opphavlege negativet, vil hindra lys i å gå gjennom og vert difor trekte frå lyset som går gjennom den opphavlege filmen.
I digital fotografering vil du, saman med GIMP gå gjennom desse stega:
-
Opna biletet og lag eit duplikat ved å gå inn på biletmenyen på →
-
I kopien opnar du eit duplikat av laget frå menyen → . Gå deretter til filtermenyen og vel → og bruk dette på det dupliserte laget med standardinnstillingane for IIR og radius 5.
-
I lagdialogvindauget for biletkopien endrar du modus til «Trekk frå», i sprettoppmenyen som kjem fram når du høgreklikkar, vel du «Flett saman nedover».
-
Klikk og dra det laget du enda opp med over i det opphavlege biletet. Det vert lagt til der som eit nytt biletlag.
-
Endra modus i lagdialogvindauget til «Addisjon».
Voilà. Kanskje kjekt å vite at programtillegget Uskarpmaske gjer akkurat det same.
Heilt i byrjinga av kurva er det ein liten dipp. Dersom sløringa er svært sterk, kan det henda at resultatet av subtraksjonen vert negativt. Dette kan i tilfelle gje ei stripe i kontrastfargen langs kontrastkanten eller ein svart glorie rundt ei stjerne på den lyse bakgrunnen (fargefeil ved for mykje skjerping).