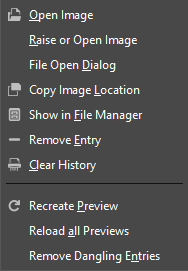
O diálogo de histórico mostra a lista de documentos (imagens) que você abriu no GIMP, tanto nessa sessão, quanto nos usos anteriores. É mais completo que a lista que você vê no submenu de “Abrir recente”.
O diálogo de “Buffers” é um diálogo de encaixe;veja a seção Seção 2.3, “Caixas de diálogo e de encaixe” para mais informações sobre como gerenciá-lo.
Você pode acessa-lo:
-
From the main menu: → → .
-
From the Tab menu in any dockable dialog by clicking on
and selecting → .
-
From the main menu: → → .
A barra de rolagem permite que você navegue por todas as imagens que você já abriu antes.
No menu de Guia para o diálogo de “Histórico de documentos”, você pode escolher entre e . No modo de grade, você ve ícones ou miniaturas das imagens já abertas em um arranjo regularde miniaturas. Apenas o nome do arquivo da imagem selecionada é exibido. No modo de Lista, elas são alinhadas uma abaixo da outra,e o nome de cada arquivo, bem como suas dimensões em pixels, são exibidos.
![[Dica]](images/tip.png)
|
Dica |
|---|---|
|
Ctrl+F abre uma caixa para pesquisas por nome. Para maiores informações sobre o modo de lista, veja View as List. |
Use the Open the selected entry
button or command of the dialog's
context menu, to open the image you have selected. With the
Shift key pressed, it raises an image hidden behind
others. With the Ctrl key pressed, it opens the Open
Image dialog.
Use the Remove the selected entry
button or command of the dialog's
context menu, to remove an image from the History dialog. The image
is removed from the recently open images list also. But the image itself
is not deleted.
Use the Clear the entire file history
button or command of the
dialog's context menu, to remove all the files from the history.
Use the Recreate Preview
button or command of the
dialog's context menu, to update preview in case of change.
With Shift key pressed, it acts on all previews.
With Ctrl key pressed, previews that
correspond to files that can't be found out, are deleted.
- Visão geral
-
You can get the document history context menu by right clicking on a file in the document history dialog, or by clicking the tab menu button
and opening the submenu. Several of the operations are also available through buttons at the bottom of the dialog. Those operations are documented above. The remaining ones are listed below.


