GIMP provides a comprehensive toolbox in order to quickly perform basic tasks such as making selections or drawing paths. The many tools contained within GIMP's toolbox are discussed in detail here.
(In case you're curious, in GIMP lingo a "tool" is a way of acting on an image that requires access to its display, either to let you indicate what you want to do by moving the pointer around inside the display, or to show you interactively the results of changes that you have made. But if you want to think of a tool as a saw, and an image as a piece of wood, it probably won't do you a great deal of harm.)
![[Notă]](images/note.png)
|
Notă |
|---|---|
|
See Main Windows: The Toolbox for an overview of the toolbox and its components. |
GIMP has a diverse assortment of tools that let you perform a large variety of tasks. The tools can be thought of as falling into the following categories:
-
Selection tools, which specify or modify the portion of the image that will be affected by subsequent actions;
-
Paint tools, which alter the colors in some part of the image;
-
Transform tools, which alter the geometry of the image;
-
Color tools, which alter the colors in the image as a whole;
-
Other tools, which don't fall into the other categories.
Most tools can be activated by clicking on an icon in the Toolbox. By default, some tools are accessible only via the menus. Every tool can be activated from the menu (or the menu for some color tools). Most tools can also be activated from the keyboard using an accelerator key.
In the default setup, created when GIMP is first installed, not all tools show icons in the Toolbox: some tools are omitted. You can customize the set of tools that are shown in the Toolbox in the Toolbox Preferences.
There are two reasons you might want to do this: first, if you only rarely use a tool, it might be easier to find the tools you want if the distracting icon is removed; second, if you use tools that are not found in the toolbox by default, you might find it convenient to have icons for them easily available. In any case, you can always access any tool at any time using the or menu from the main menu.
Tool icons are grouped by default. Tool groups are marked with a small dark triangle at the bottom right corner of the icon. The group icon displayed is the last used tool in the group. Right click on the group icon to display the list of tools in the group.
You can get all tools displayed by unchecking the Use tool groups option in Secțiune 6.13, „Trusă cu unelte”.
By default, the shape of the pointer changes when it is inside an image, to a shape that indicates which tool is active. You can change this behavior in the Pointers section of the Input Devices settings.
Fig. 14.2. Foreground/Background Colors Area in the Toolbox
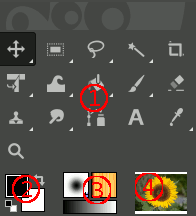
The Foreground/Background Colors area, marked with (3)
- Color area
-
The color area shows GIMP's current foreground and background colors, which are used for painting, filling, and many other operations. Clicking on either one of them brings up a color selector dialog that allows you to change to a different color.
- Default colors
-
Clicking on the small symbol in the lower left corner resets the foreground and background colors to black and white. Pressing the D key has the same effect.
- Swap Foreground/Background colors
-
Clicking on the double-headed arrow symbol swaps the foreground and background colors. Pressing the X key has the same effect.
![[Indicație]](images/tip.png)
Indicație You can click-and-drag one of these colors directly into a layer: it will fill the whole layer.
Fig. 14.3. Active Brush, Pattern and Gradient Area in the Toolbox
The Active Brush, Pattern and Gradient area, marked with (4)
By default, this area is not displayed. You can add this area through → → : Secțiune 6.13, „Trusă cu unelte”.
This part of the Toolbox shows the currently selected brush, pattern, and gradient. Clicking on any of them brings up a dialog that allows you to change it.
By default, this area is not displayed. You can add this area through → → : Secțiune 6.13, „Trusă cu unelte”.
A thumbnail of the active image is displayed in this area. If you click on this thumbnail, the Images dialog is opened. This can be useful if you have many images on your screen.
If you use GIMP on a Unix-like operating system with the X Window System, you can also drag and drop the thumbnail to an enabled XDS file manager to directly save the corresponding image.
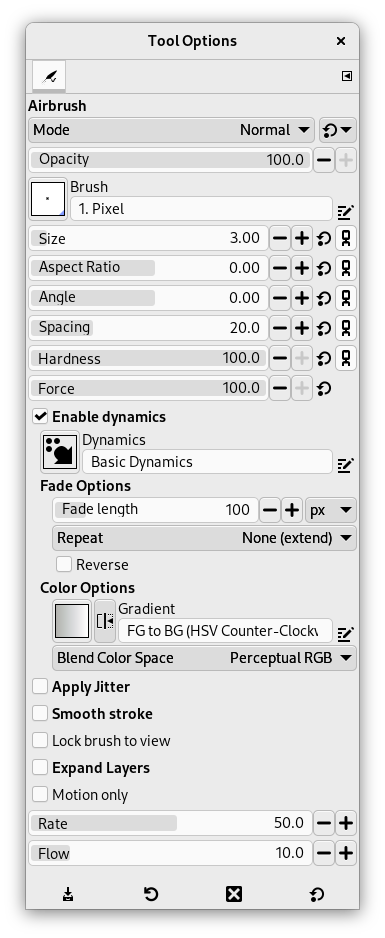
If you have things set up like most people do, activating a tool causes its Tool Options dialog to appear below the Toolbox. If you don't have things set up this way, you probably should: it is very difficult to use tools effectively without being able to manipulate their options.
|
|
Indicație |
|---|---|
|
The Tool Options appear beneath the Toolbox in the default setup. If you lose it somehow, you can get it back by creating a new Tool Options dialog using → → and then docking it below the Toolbox. See the section on Dialogs and Docking if you need help. |
Each tool has its own specific set of options. The choices you make for them are kept throughout the session, until you change them. In fact, the tool options are maintained from session to session. The persistence of tool options across sessions can sometimes be an annoying nuisance: a tool behaves very strangely, and you can't figure out why until you remember that you were using some unusual option the last time you worked with it, two weeks ago.
At the bottom of the Tool Options dialog, four buttons appear:
-
 Save Tool Preset…
-
This button allows you to save the settings for the current tool, so that you can restore them later. It brings up the Secțiune 7.2, „Dialog presetări instrument” allowing you to give a name for the new preset. When you Restore options, only saved presets for the active tool are shown, so you need not worry about including the name of the tool when you assign a name here.
-
 Restore Tool Preset…
-
This button allows you to restore a previously saved preset of options for the active tool. If no presets have ever been saved for the active tool, the button will be disabled. Otherwise, clicking it will bring up a menu showing the names of all saved option sets: choosing a menu entry will apply those settings.
-
 Delete Tool Preset
-
This button allows you to delete a previously saved set of options for the active tool. If no option-sets have ever been saved for the active tool, the button will simply repeat the tool name. Otherwise, clicking it will bring up a menu showing the names of all saved presets: the selected preset will be deleted.
-
 Reset to default values
-
This button resets the options for the active tool to their default values. If you hold the Shift key while pressing the Reset button, the options for all tools will be reset to their default values.
In addition to the commands for the above buttons, the Tool Options tab menu has an extra submenu:
- Edit Tool Preset
-
This submenu shows a list of presets for the active tool that you can edit. Selecting one of them will open the Tool Presets Editor with that tool preset loaded. From there you can edit the preset, unless it is one of the default presets that come with GIMP.
Below we will explain the interaction with sliders and the mouse scroll-wheel.
- New sliders
-
You can use multiple modifiers with either left-click or mouse wheel scrolling:
Tabel 14.1. Interaction with the Slider Widget
Mouse / key combination
Action 
Change the value to what's under the pointer 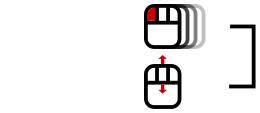
Change the value using the default increment 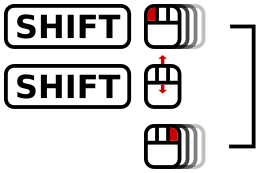
Shift + or
Change the value using smaller increment 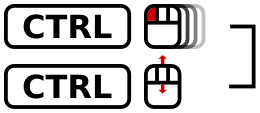
Ctrl +
Change the value using larger increment 
Enter numeric input mode, do not select the value 
Enter numeric input mode, select the value Hint: Any left-click interaction enables numeric input mode.
Once you have set the value approximately, you can tune it precisely using the two small arrow buttons at the right of the slider.
The value area in the slider area works as a text editor: there, you can edit the value or enter a new value directly.
For some options, you can drag the pointer outside the tool dialog. For example with the size slider, you can get the maximum value (10000) so.
- Mouse Scroll-Wheel actions on canvas
-
When using tools, you can use the mouse scroll-wheel, in combination with various modifiers, to do useful things with the tool options of the selected tool:
-
Alt + Mouse-wheel: increase/decrease opacity
-
Shift+Primary + Mouse-wheel: increase/decrease aspect ratio
-
Shift+Alt + Mouse-wheel: increase/decrease angle
-
Primary+Alt + Mouse-wheel: increase/decrease size
-
Shift+Primary+Alt + Mouse-wheel: increase/decrease spacing
Note: the Primary modifier is usually Ctrl or Cmd, depending on your platform.
-


