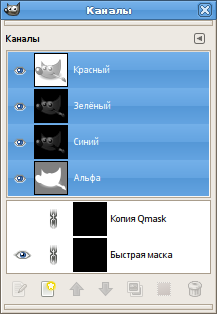
Этот диалог является основным инструментом для редактирования и управления каналами изображения. Каналы используются в двух целях, поэтому диалог каналов разделён на две части: первая часть для цветовых каналов и вторая для масок выделения.
Цветовые каналы применяются ко всему изображению, а не к конкретному слою. По существу, для передачи всего широкого спектра естественных цветов необходимы три основных цвета. Как и другие программы, GIMP использует красный, зелёный и синий в качестве основных. Первый и основной каналы отображают значения Красного, Зелёного и Синего для каждого пикселя изображения.
Рядом с именем канала находится миниатюра, отображающая представление каждого канала в градациях серого, где белый цвет составляет 100%, а чёрный — 0% от основного цвета. Кроме того, если ваше изображение не цветное, а в градациях серого, то существует только один основной канал под названием Серый. Для индексированного изображения с фиксированным числом известных цветов также существует только один основной канал под названием Индексированный.
Также имеется дополнительный канал под названием Альфа. Этот канал отображает значения прозрачности каждого пикселя (см. Альфа-канал в глоссарии). Перед этим каналом находится миниатюра, отображающая представление прозрачности в градациях серого, где белый цвет — непрозрачный и видимый, а чёрный — прозрачный и невидимый. Если вы создаёте изображение без прозрачности, то альфа-канал отсутствует, но его можно добавить из контекстного меню диалога слоёв. Кроме того, если в вашем изображении более одного слоя, GIMP автоматически создаст альфа-канал.
![[Примечание]](images/note.png)
|
Примечание |
|---|---|
|
GIMP не поддерживает цветовые модели CMYK или YUV. |
Рисунок 15.7. Представление изображения с помощью каналов
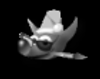
Красный канал
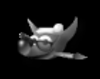
Зелёный канал
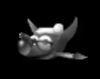
Синий канал
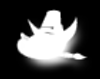
Альфа-канал

Все каналы
Рисунок, который вы видите справа, состоит из трёх цветовых каналов (красный, зелёный, синий) и альфа-канала. Прозрачные области рисунка отображаются в виде серых клеток. В цветовых каналах белый всегда является белым, поскольку он состоит из всех основных цветов в их максимальном значении, а чёрный — чёрным, т. к. значение всех основных цветов в нем равно нулю. Красная шляпа видна в красном канале, но совсем не видна в других. То же самое происходит и с другими чистыми зелёным и синим цветами, которые видны только в своих каналах и невидимы в других.
Этот диалог можно прикрепить на панель. Более подробно об этом написано в разделе Раздел 2.3, «Диалоговые окна и стыкуемые панели».
Его можно открыть следующими способами:
-
через меню изображения: → → ;
-
из меню вкладок любого стыкуемого диалога, нажав на
 и выбрав → .
В меню есть список откреплённых окон, который существует только пока открыт хотя бы один диалог. В этом случае диалог «Каналы» можно вызвать из главного меню: → .
- Общая информация
-
Диалог «Каналы» состоит из списка цветовых каналов и дополнительного альфа-канала. Ниже расположен список каналов маски выделения. Щелчком правой кнопкой мыши по списку каналов открывается контекстное меню каналов.
Цветовые каналы всегда расположены в одном и том же порядке. Их невозможно удалить. Можно только изменить их видимость, выделить или снять выделение. По умолчанию все эти каналы видны и выделены.
Чтобы выбрать канал, щёлкните по цветовому каналу в списке. Это действие выделяет или снимает выделение с канала. Выбранные цветовые каналы подсвечиваются в диалоге.
![[Внимание]](images/caution.png)
Внимание Снятие выделения с одного из цветовых каналов — красного, синего или зелёного — может иметь серьёзные последствия. Например, если отключить синий канал, то все пиксели, добавленные в изображение, не будут иметь синего компонента, и поэтому белый пиксель имеет дополнительный жёлтый цвет.
Если сделать один из каналов невидимым, это не повлияет на работу инструментов, и только изменит то, что в данный момент отображается на экране. Например, кисть будет продолжать рисовать как обычно, а ластик будет изменять альфа-значение пикселей, даже если альфа-канал установлен невидимым.
Выбранные цветовые каналы определяют, какие части действия инструмента применяются к слою. Например, ластик не изменит изображение, если альфа-канал не выбран.
Примечание Команды дублирования и выбора, описанные ниже, также можно использовать для цветовых каналов. Однако это работает только при вызове команды из контекстного меню и только для одного канала за раз.
- Выбор нескольких каналов
-
GIMP позволяет выбрать несколько каналов масок выделения и выполнять с ними действия. Например, их можно переместить в другое место в стеке каналов и преобразовать в выделения. Выбор нескольких каналов осуществляется с помощью мыши и клавиши Shift для добавления диапазона каналов или Ctrl — для добавления или удаления выбранного канала.
- Имя списка каналов
-
Непосредственно над списком масок выделения находится строка заголовка. Слева расположены значки, которые показывают, какой столбец используется для видимости и блокировки. Посередине находится текстовая надпись, указывающая, сколько каналов выбрано в данный момент, если их больше одного.
- Атрибуты канала
-
Каждый отображаемый в списке канал имеет свои атрибуты. Эти атрибуты очень похожи на те, что описаны в главе о диалоге слоёв Раздел 2.1, «Диалог слоёв».
-
 Видимость канала
-
По умолчанию все цветовые каналы видны, а цветовые каналы маски — невидимы. Щелчок по символу глаза или пустому месту, если канал не виден, переключит видимость канала. Щелчок по значку при нажатой клавише Shift скроет все остальные каналы.
-
 Атрибуты запрета изменения канала
-
Каждый канал маски выделения имеет атрибуты запрета изменения. Если задан один из атрибутов, то перед миниатюрой появится соответствующий значок замка.
Если задано несколько атрибутов, здесь будет отображаться двойной значок замка. Щёлкнув в этом столбце, можно изменить эти атрибуты.
-
 Запретить изменения пикселей
-
Этот значок отображается, когда включён запрет изменения пикселей для текущего канала. Если эта опция включена, канал блокируется для любого действия, которое изменяет пиксели, то есть изменения не будут внесены в этот канал.
-
 Запретить изменение положения и размера
-
Этот значок отображается, когда включён запрет изменения положения и размера для текущего канала. Если эта опция включена, канал блокируется для любого действия, которое изменяет его положение и размер.
-
 Запретить изменение видимости
-
Эта кнопка переключения управляет параметром «Запретить изменения» для видимости канала. Если она включена, видимость канала не может быть изменена, пока вы не отключите блокировку.
-
- Миниатюра
-
Значок с миниатюрой показывает эффект, производимый на канал. Миниатюру можно увеличить, удерживая нажатие левой кнопкой мыши на нём.
- Имя канала
-
Имя канала, которое должно быть уникальным в пределах одного изображения. Чтобы изменить имя канала маски выделения, щёлкните на нём дважды. Имена основных каналов (красного, зелёного, синего и альфа) не могут быть изменены. Двойной щелчок по значку миниатюры откроет диалог, в котором можно задать все атрибуты канала.
-
- Управление каналами
-
Панель кнопок внизу предлагает следующие функции:
-
 Создать канал
-
Позволяет создать новый канал. Откроется диалоговое окно, в котором можно задать Имя канала, Цветовую метку, атрибуты канала и атрибуты запрета изменения, и, наконец, Непрозрачность и цвет, используемый для маски в окне изображения. При нажатии кнопки цвета появляется диалог выбора цвета, в котором можно изменить цвет маски.
Если нажать клавишу Shift при нажатии кнопки , диалог создания канала не будет открыт. Вместо этого будет создан новый канал с теми же параметрами, которые использовались ранее. Этот новый канал представляет собой маску выделения, наложенную на изображение. Подробнее см. Маска выделения.
-
 Поднять каналы
-
Перемещает выбранные каналы вверх по списку. Нажмите клавишу Shift, чтобы переместить выбранные каналы в верхнюю часть списка.
-
 Опустить каналы
-
Перемещает выбранные каналы вниз по списку. Нажмите клавишу Shift, чтобы переместить выбранные каналы в нижнюю часть списка.
-
 Создать копию каналов
-
Создаёт копию выбранных каналов. Имя новых каналов дополняется номером.
![[Подсказка]](images/tip.png)
Подсказка Также вы можете дублировать цветовой канал или альфа-канал. Это простой способ сохранить их копию для использования позднее в качестве маски выделенной области. Обратите внимание, что за один раз можно дублировать только один цветовой канал и только с помощью контекстного меню.
-
 Заменить это выделение выбранными каналами
-
Вы можете трансформировать канал в выделение области. По умолчанию выделение, полученное из канала, заменяет все предыдущие активные выделения. Такое поведение можно изменить c помощью модифицирующих клавиш.
-
Shift: выделение, полученное из канала, добавляется к активному выделению. Конечное выделение объединяется с обоими.
-
Ctrl: конечное выделение вычитается из выделения, полученного из канала из активного выделения.
-
Shift+Ctrl: полученное выделение является результатом пересечения выделения из канала с предыдущим активным. Сохраняются только общие части.
-
-
 Удалить каналы
-
Удаляет выбранные каналы.
-
- Общая информация
-
Контекстное меню каналов можно вызвать, щёлкнув правой кнопкой мыши по каналу. Некоторые операции с каналами также доступны с помощью кнопок внизу списка каналов. Эти операции рассмотрены здесь.
Эти команды, за исключением Изменить атрибуты канала…, также работают, когда выбрано несколько каналов.
- Изменить атрибуты канала…
-
Доступно только для масок выделения. Здесь можно изменить Имя канала, Цветовую метку, атрибуты канала и атрибуты запрета изменения, и, наконец, Непрозрачность и цвет, используемый для маски в окне изображения. При нажатии кнопки цвета появляется диалог выбора цвета, в котором можно изменить цвет маски.
- Цветовые метки
-
Доступно только для масок выделения. Позволяет назначить цветовую метку одному или нескольким выбранным каналам. Если у вас много каналов, это может облегчить их идентификацию, присвоив связанным каналам одинаковую цветовую метку. Чтобы удалить цветовую метку, выберите Нет.
- Создать канал…, Поднять каналы, Опустить каналы, Создать копию каналов, Удалить каналы
-
Смотрите раздел Управление каналами.
- Каналы в выделение
-
Выделение, полученное из выбранных каналов, заменяет собой ранее активное выделение.
- Добавить каналы в выделение
-
Выделение, полученное из выбранных каналов, добавляется к активному выделению. Конечное выделение объединяется с обоими.
- Вычесть каналы из выделения
-
Конечное выделение представляет собой вычитание выделения, полученного из выбранных каналов, из активного выделения.
- Пересечь каналы с выделением
-
Конечное выделение — это пересечение выделения, полученного из выбранных каналов, с активным выделением. Сохраняются только общие для обоих выделений части.


Выделение областей можно сохранить в канале и загрузить из него. В диалоге канала можно увидеть миниатюру выделения. Маски выделения — это графический способ создания выделения в сером канале, где белые точки полностью выделены, а чёрные — полностью не выделены. Поэтому серые точки выделены частично. Их можно рассматривать как растушёвку выделения, плавный переход между выделенным и невыделенным. Это важно, чтобы избежать некрасивого эффекта пикселизации при заливке выделения или при удалении его содержимого .
- Создание маски выделения
-
Существует несколько способов инициализировать маску выделения.
-
Из главного меню → , если есть активное выделение.
-
При нажатии нижней левой кнопки в окне изображения создаётся Быстрая маска; её содержимое заполнится активным выделением.
-
Из диалога каналов при нажатии кнопки Создать канал или из контекстного меню. При создании эта маска выделения появляется в диалоге «Каналы» под именем «Копия маски выделения» с порядковым номером. Имя можно изменить с помощью того же меню.
-
После того как канал инициализирован, выбран (выделен синим цветом), виден (значок глаза в диалоговом окне) и отображается так, как вы хотите (атрибуты цвета и непрозрачности), можно приступать к работе со всеми инструментами рисования. Используемые цвета очень важны. Если вы рисуете каким-либо цветом кроме белого, серого или чёрного, то для определения серого цвета (средний, светлый или тёмный) будет использоваться значение цвета (светлота). Когда маска нарисована, её можно преобразовать в выделение, нажав кнопку
![]() (Канал в выделение) или с помощью
(Канал в выделение) или с помощью
При редактировании маски выделения необязательно использовать только инструменты для рисования. Например, можно воспользоваться любым инструментом для выделения, а потом заполнить выделенную область заливкой или градиентом. Создавая большое количество масок выделения вы создадите достаточно сложную выделенную область без особого труда. В конечном итоге маска выделения для выделенной области является тем же, чем слой является для всего изображения.
|
|
Внимание |
|---|---|
|
До тех пор, пока маска выделения активна, все изменения происходят только с маской, не касаясь самого изображения. Чтобы перейти к редактированию изображения надо сделать маску неактивной. Не забывайте так же о том, что маску надо сделать невидимой, нажав на иконку глаза слева от иконки маски. Обратите внимание на то, что все RGB и альфа-каналы должны быть активными и видимыми. |
Быстрая маска — это маска выделения, которая временно накладывается на изображение, чтобы нарисовать выделение. «Временно» означает, что, в отличие от обычной маски выделения, она не будет сохранена в списке масок после преобразования в выделение. Возможности инструментов выделения велики, но пределы этих возможностей становятся тем дальше заметнее, чем более сложные выделения вы создаёте. Именно здесь так полезна быстрая маска.
Быстрая маска активируется несколькими способами:
-
Из главного меню: → .
-
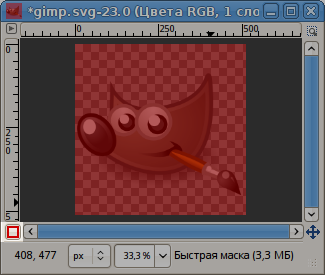
С помощью кнопки, расположенной в левом нижнем углу окна изображения
 (выделена на снимке экрана).
 -
С помощью клавиши быстрого доступа Shift+Q.
Чтобы инициализировать Быструю маску, нажмите нижнюю левую кнопку
![]() окна изображения. Если в изображении присутствовало выделение, то его содержимое не изменится, тогда как по краям оно будет покрыто прозрачным красным цветом. Если не было активного выделения, тогда всё изображение будет покрыто прозрачным красным цветом. Повторное нажатие кнопки деактивирует быструю маску.
окна изображения. Если в изображении присутствовало выделение, то его содержимое не изменится, тогда как по краям оно будет покрыто прозрачным красным цветом. Если не было активного выделения, тогда всё изображение будет покрыто прозрачным красным цветом. Повторное нажатие кнопки деактивирует быструю маску.
Дважды щёлкнув по имени или миниатюре в диалоговом окне каналов можно редактировать свойства Быстрой маски. Затем можно изменить Непрозрачность и цвет заливки. В любой момент можно скрыть маску, щёлкнув по значку глаза
![]() перед Быстрой маской.
перед Быстрой маской.
Маска кодируется серыми тонами, поэтому необходимо использовать белый или серый для уменьшения области под маской и чёрный для увеличения. Область, закрашенная светлым или тёмно-серым, будет областью перехода для выделения, как растушёвка. Когда маска готова, нажатие на кнопку внизу слева окна изображения убирает быструю маску и преобразует её в выделение.
Цель быстрой маски — нарисовать выделение и его переходы при помощи инструментов рисования, не заботясь об управлении масками выделения. Это хороший способ изоляции объекта в изображении, потому что после создания выделения его содержимое легко удалить (или удалить всё, кроме выделения).
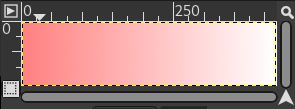
Снимок изображения с включённой быстрой маской. Пока быстрая маска активна, все операции проводятся над ней. Быстрая маска залита градиентом от чёрного (слева) к белому (справа).
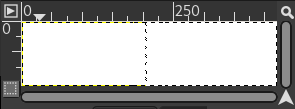
Быстрая маска сейчас отключена. Выделение занимает правую половину изображения (муравьиная дорожка), поскольку граница выделения находится посередине градиента.

Штрих добавлен во время активации выделения. Это происходит потому, что градиент, хоть и невидим, остаётся активным по всему изображению, в выделенных и невыделенных областях!
После нажатия кнопки, активирующей «быструю маску», создаётся временный 8-битный канал (0-255), в котором хранится создаваемая область выделения. Если выделение уже существует, маска инициализируется с содержимым выделения. Сразу после активации «быстрой маски» изображение покрывается полупрозрачной красной пеленой, отвечающей за невыделенные пиксели. Для создания выделения в «быстрой маске» можно использовать любой инструмент рисования. Необходимо использовать только цвета в оттенках серого, в соответствии со свойствами канала, где белый цвет определяет будущее выделение. Выделение будет показано сразу после отключения «быстрой маски» , но временный канал маски больше не будет доступен.
|
|
Подсказка |
|---|---|
|
Чтобы сохранить выделение, созданное быстрой маской, в канале, воспользуйтесь пунктом главного меню → . |
-
Откройте файл или создайте новое изображение.
-
Включите быструю маску при помощи кнопки, находящейся в левом нижнем углу окна изображения. Если в изображении есть выделенная область, она будет отображена в быстрой маске.
-
Выберите инструмент рисования и примените его с цветами в оттенках серого к «быстрой маске».
-
Отключите быструю маску при помощи кнопки, находящейся в левом нижнем углу окна изображения.


