| 2.3. Der Dialog „Pfade“ | ||
|---|---|---|

|
2. Bildaufbau-bezogene Dialoge |  |
| 2.3. Der Dialog „Pfade“ | ||
|---|---|---|
|
|
2. Bildaufbau-bezogene Dialoge | |
The „Paths“ dialog is used to manage paths, allowing you to create or delete them, save them, convert them to and from selections, etc. Please see Abschnitt 4, „ Mit Pfaden arbeiten “ for more information about paths.
Der Dialog „Ablagen“ ist dockbar. Informationen hierzu finden Sie im Abschnitt Abschnitt 2.3, „Docks und Dialoge“.
Er kann auf verschiedene Arten aufgerufen werden:
From the main menu, as → → .
From the Tab menu in any dockable dialog by clicking on
![]() and selecting
→ .
and selecting
→ .
In the menu, there is a list of detached windows which exists only if at least one dialog remains open. In this case, you can raise the „Paths“ dialog from the main menu: → .
This dialog shows a list of all paths present in the current image. For each path you can set their attributes, as explained below, and perform certain actions using the buttons at the bottom of the dialog, or using the context menu.
In multi-window mode, you can show the name of the active image at the top of the dock by choosing „Show Image Selection“ from the Tab menu. This allows you to see at a glance to which image the paths you are working on belong.
Jedes Bild hat einen aktiven Pfad (angezeigt durch eine Markierung), sobald der Pfaddialog eine nichtleere Liste zeigt. Dieser Pfad kann mit Funktionen, die mit dem Knopf am unteren Ende des Dialogs aufgerufen werden können, verändert werden.
Right-clicking on any entry in the list brings up the Paths Menu. You can also access the Paths Menu from the dialog Tab menu.
GIMP allows you to select multiple paths and perform actions on them, like stroking or filling. Selecting multiple paths is done by using the mouse and Shift key, for adding a range of paths, or Ctrl key, for adding or removing the clicked path.
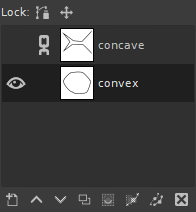
Directly above the list of paths is the header bar. On the left you see the icons that identify the visibility and lock columns. In the middle a text label will tell you how many paths are currently selected if it is more than one.
Every path is shown in the list with its own attributes, which are very similar to the layer attributes:
By default, paths are not visible. This icon is shown when the path is visible. Clicking this toggles between visible and invisible. When a path is „visible“, a border is drawn over each path segment on the image display. This does not change the actual pixel data of the image. Shift-clicking on the icon causes all other paths to be hidden.
Each path has lock attributes. If one of its attributes is set, the respective lock icon will show up in front of the thumbnail.
When multiple attributes are set, a double lock icon will show here. Clicking in this column allows you to change these attributes.
This icon shows when „lock path“ is enabled for the current path. When this is enabled, the path is locked for any action that changes it, meaning there will be no changes done to this path. Clicking the icon toggles between enabled and disabled.
This icon shows when „lock path position“ is enabled for the current path. When this is enabled, the path is locked for any action that changes its position. Clicking the icon toggles between enabled and disabled.
This toggle button controls the „Lock“ setting for the visibility of the path. If this is enabled, the path visibility cannot be changed until you disable the lock.
A small preview icon represents the effect of the path. This preview can be enlarged by holding down the left mouse button on it. If you drag the thumbnail into the Layers dialog, it will create a new layer with a rasterized copy of the path.
Der Name des Pfades kann durch einen Doppelklick verändert werden. Der Name muss eindeutig sein, d.h. er kann nicht zweimal im Pfaddialog vergeben werden.
The button bar at the bottom offers the following functionality:
These buttons correspond to entries in the context menu (accessed by right-clicking on an entry in the list), but some of them have extra options obtainable by holding down modifier keys while pressing the button.
See New Path. Holding down Shift makes a new (empty) path with the last used values, without opening the New Path dialog.
See Raise Paths. Holding down Shift moves the selected paths to the top of the list.
See Lower Paths. Holding down Shift moves the selected paths to the bottom of the list.
See Duplicate Paths.
Converts paths into a selection; see Paths to Selection for a full explanation. You can use modifier keys to set the way the new selection interacts with the existing selection:
| Taste | Aktion |
|---|---|
| Nichts | Aktive Auswahl ersetzen. |
| Umschalt | Zur Auswahl hinzufügen. |
| Strg | Von Auswahl subtrahieren. |
| Umschalt+Strg | Schnittmenge mit Auswahl bilden. |
Shift-clicking this button brings up the Advanced Settings dialog that allows you to adjust how the selection is converted to a path.
See Stroke Paths. Holding down Shift strokes the paths based on the last used values without opening the Stroke Paths dialog.
Delete Paths deletes the currently selected paths.
Das Pfadmenü öffnen Sie im Pfaddialog, entweder mit einem Rechstklick auf einen Pfadeintrag oder über im Reitermenü. Das Menü ermöglicht Ihnen den Zugriff auf die meisten Pfad-bezogenen Operationen.
Edit Path is an alternative way to activate the Paths tool, used for creating and manipulating paths. It can also be activated from the Toolbox, or by using the keyboard shortcut B.
Durch den Klick auf Pfadeigenschaften erscheint ein neuer Dialog zum Verändern des Pfadnamens. Es ist ebenfalls möglich, den Dialog per Doppelklick zu öffnen.
Color Tags brings up a sub menu, similar to the one in the Layers Dialog, that allows you to select a color tag for the selected paths.
New Path creates a new path, adds it to the list in the Paths dialog, and makes it the active path for the image. It brings up a dialog that allows you to give a name to the path. The new path is created with no anchor points, so you will need to use the Path tool to give it some before you can use it for anything.
Raise Paths moves the selected paths one slot higher in the list in the Paths dialog.
The position of a path in the list has no functional significance, so this is simply a convenience to help you keep things organized.
Lower Paths moves the selected paths one slot lower in the list in the Paths dialog.
The position of a path in the list has no functional significance, so this is simply a convenience to help you keep things organized.
Duplicate Paths creates a copy of the selected paths, assigns unique names, adds them to the list in the Paths dialog, and makes them the selected paths for the image. The copies will be visible only if the original paths were visible.
Delete Paths deletes the currently selected paths.
Sichtbare Pfade vereinen vereint alle Pfade, die sichtbar (Augensymbol) sind, in einem Pfad.
These commands all convert the active paths into a selection, and then combine it with the existing selection in the specified ways. (Paths to Selection discards the existing selection and replaces it with one formed from the path.) If necessary, any unclosed components of the path are closed by connecting the last anchor point to the first anchor point with a straight line. The „marching ants“ for the resulting selection should closely follow the path, but don't expect the correspondence to be perfect.
Diese Funktion kann auf verschiedener Weise erreicht werden:
From the main menu, as →
Aus dem Pfaddialogmenü unter .
From the Selection to Path button
![]() at the bottom of the Paths dialog.
at the bottom of the Paths dialog.
Selection to Path creates a new path from the image's selection. In most cases the resulting path will closely follow the „marching ants“ of the selection, but the correspondence will not usually be perfect.
Converting a two-dimensional selection mask into a
one-dimensional path involves some rather tricky algorithms:
you can alter the way it is done using the
Advanced Options, which are accessed by
holding down the Shift key while pressing
the Selection to Path button
![]() at the bottom of the Paths dialog. This brings up the
Advanced
Settings dialog, which allows you to set a lot of different
options. In general, Selection to Path will do
what you expect it to, without the need to adjust the advanced
settings.
at the bottom of the Paths dialog. This brings up the
Advanced
Settings dialog, which allows you to set a lot of different
options. In general, Selection to Path will do
what you expect it to, without the need to adjust the advanced
settings.
Diese Funktion kann auf verschiedener Weise erreicht werden:
From the main menu, as →
From the Paths dialog menu, as .
From the Fill Paths button in the Tool Options for the Paths tool.
Fill Paths fills all areas delimited by the selected paths with the current foreground color or currently selected pattern. See the section about Fill Paths for more information.
Diese Funktion kann auf verschiedener Weise erreicht werden:
From the main menu, as →
From the Paths dialog menu, as .
From the Paint along the path button
![]() at the bottom of the Paths dialog.
at the bottom of the Paths dialog.
From the Stroke Paths button in the Tool Options for the Paths tool.
Stroke Paths renders the selected paths on the active layer of the image, permitting a wide variety of line styles and stroking options. See the sections about Stroke Paths and Stroking for more information.
Copy Paths copies the selected paths to the Paths Clipboard, enabling you to paste it into a different image.
![[Tipp]](images/tip.png)
|
Tipp |
|---|---|
|
You can also copy and paste paths by dragging their icon from the Paths dialog into the target image's display. |
![[Anmerkung]](images/note.png)
|
Anmerkung |
|---|---|
|
When you copy a path to an image, it is not visible. You have to make it visible in the Paths dialog. |
Paste Path creates a new path from the contents of the Path Clipboard, adds it to the list in the Paths dialog, and makes it the active path for the image. If no path has previously been copied into the clipboard, the menu entry will be disabled.
Export Paths… allows you to save a path to a file: it pops up a file save dialog that allows you to specify the file name and location. You can later add this path to any GIMP image using the Import Path command. The format used for saving paths is SVG: this means that vector-graphics programs such as Inkscape will also be able to import the paths you save. See the Paths section for more information on SVG files and how they relate to GIMP paths.
Import Path… creates a new path from an SVG file: it pops up a file chooser dialog that allows you to navigate to the file. See the Paths section for information on SVG files and how they relate to GIMP paths.