Paths are curves (known as Bézier-curves). To understand their concepts and mechanism, look at the glossary Bézier-curve or Wikipedia [WKPD-BEZIER]. The Paths tool allows you to design complex shapes. When designing a shape, you first use the Paths tool in GIMP to create a path. After that you usually stroke or fill the path.
In GIMP, the term « Stroke path » means to apply a specific style to the path (color, width, pattern, etc).
A path can be used in several ways:
-
Un chemin fermé peut être transformé en sélection.
-
Un chemin fermé ou ouvert peut être tracé, c.-à-d. dessiné de multiples façons.
-
A path can be filled with a color or pattern. If the path is not closed, it will try to figure out the shape and then fill it. However, this will not work if the path is a straight line.
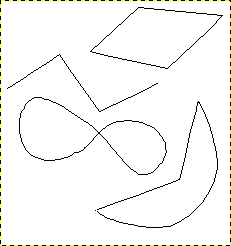
Figure 7.10. Illustration of four different paths

Quatre exemples de chemins GIMP : un fermé et polygonal ; un ouvert et polygonal ; un fermé et courbe ; un avec un mélange de segments droits et courbes.
Commencez par dessiner le contour de votre chemin; il pourra être modifié par la suite. Voir l’outil Chemins tool).Sélectionnez l’outil Chemins de l’une des façons suivantes :
-
Use → from the menu.
-
Use the relevant icon
in toolbox.
-
Use the B keyboard shortcut.
When the Paths tool is selected, the mouse cursor changes into a crosshair with a curve by default. The actual shape depends on your mouse pointer mode setting. Make sure that the Paths Edit Mode in Tool Options is set to Design.
Left click in the image to create the first point of the path. Move the mouse to a new point and left click to create another point linked to the previous point. Although you can create as many points as you desire, you only need two points to learn about Paths.
While adding points, the mouse cursor has a little « + » next to the curve, which indicates that clicking will add a new point.
When the mouse cursor is close to one of the path points, the « + » changes into a cross with arrows; like the move tool. You can then move the existing path point.
To close your path, go with the mouse on top of the point you want to connect to, and then click that point. When you are done designing your path, you can press Enter. This will turn the path into a Selection. You can also keep adding more points, or start changing the curves of the path.
To edit the curves of your path, move the mouse cursor close to a line segment, left-click and drag the line segment. Two events occur.
-
Le segment de ligne se courbe quand il est tiré.
-
Each line segment has two start points and end points marked by little square rectangles, these are called handles. A « direction line » now projects from each start point for the line segment that was moved. This direction line usually has a different color than the lines of the path.
The curved line segment leaves an end point in the same direction that the « direction line » leaves the start point. The length of this line controls how far the line segment projects along the « direction line » before curving towards the other path point.
The handle at the end of each « direction line » can be dragged to change the direction and length of the curve. The handles on the other end, where they connect to the path, can be used to move the position of that path point.
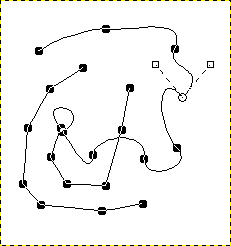
Figure 7.11. Aspect d’un chemin manipulé avec l’outil Chemin.

Appearance of a path while it is manipulated using the Paths tool.
L’image ci-dessus montre un chemin avec deux composants ayant des segments droits et de segments courbes après utilisation de l’outil Chemin. Les carrés noirs sont des points d’ancrage, ou ancres. Le cercle vide indique l’ancre sélectionnée et les deux carrés vides sont les deux poignées associées à cette ancre de part et d’autre de la courbe.


