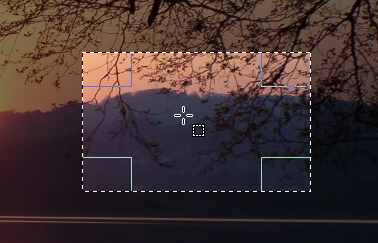
A ferramenta de seleção retangular é projetada para selecionar regiões retangulares da camada ativa: é a mais básica das ferramentas de seleção, mas muito comumente utilizada. Para obter informações sobre as seleções e como elas são usadas no GIMP veja, Seleções para obter informações sobre as características comuns a todas as ferramentas de seleção veja Ferramentas de seleção.
Esta ferramenta também é utilizada para a desenhar um retângulo em uma imagem. Para renderizar um retângulo preenchido, crie uma seleção retangular, e, em seguida, preencha-o usando a ferramenta de Preenchimento. Para criar um contorno retangular, a abordagem mais simples e mais flexível é criar uma seleção retangular e, em seguida, contorná-la.
There are different possibilities to activate the tool:
-
From the main menu: → → .
-
By clicking the tool icon
in the Toolbox.
-
By pressing the R keyboard shortcut.
![[Nota]](images/note.png)
|
Nota |
|---|---|
|
Veja Ferramentas de Seleção para obter ajuda com teclas modificadoras que afetam todas essas ferramentas da mesma forma. Apenas as opções que são específicas para esta ferramenta são explicadas aqui. |
- Ctrl
-
Pressing the Ctrl key after starting your selection, and holding it down until you are finished, causes your starting point to be used as the center of the selected rectangle, instead of a corner. Note that if you press the Ctrl key before starting to make the selection, the resulting selection will be subtracted from the existing selection. The cursor becomes

- Shift
-
If you press the Shift key before starting the selection, the resulting selection will be added to the existing one. The cursor becomes

Pressionar a tecla Shift depois de começar sua seleção, inverte a opção fixa, e mantendo-a pressionada, vai restringir a seleção a um quadrado, se é sua primeira seleção. Se estiver alterando uma seleção, e no menu fixa estiver selecionada a opção Proporção, sua alteração irá respeitar a proporção da seleção anterior.
- Ctrl+Shift
-
Pressing both keys after starting your selection combines the two effects, giving you a square selection centered on your starting point. Note that pressing these keys before starting your selection intersects the resulting selection with the existing one and the pointer change shape accordingly:

When this tool is selected the mouse pointer is displayed like this:
 as soon as it is over the image. A drag and drop allows to get a
rectangular (or square) shape. When the mouse button is relaxed, a
dotted line
(“marching ants”)
outlines the selection. It's not necessary to adjust the selection with
care; you can resize it easily later.
Quando o ponteiro está se movendo na tela, os aspectos do ponteiro de seleção modificam:
- fora da seleção que parece anteriormente, permite criar uma nova seleção, mas irá apagar a existente se esta não for combinada com uma tecla modificadora para adicionar ou subtrair outra seleção conforme descrito acima.
- within selection peripheral parts, the mouse pointer changes into
various shapes when overflying rectangular sensitive and clearly marked
areas. These handles allow you to resize the
selection. In selection corners the pointer changes into a shape
according to the context; for instance in the low right corner it
becomes:
 .
So, by click-and-dragging these areas, you can magnify or shrink the
selection size. Over median selection parts, lateral, low or up,
pointer is changed into appropriate shapes according to the context.
For instance, when the mouse pointer is over the median right side, the
pointer looks like:
 .
So you can click-and-drag to magnify or to shrink the selection size by
moving the chosen boundary.
- inside selection central area the mouse pointer looks like usual for
object manipulation, i.e.:
 .
So you can move the whole selection by a click-and-drag.
Além disso, se você não tiver desmarcado a opção Destaque, o seu trabalho será mais fácil, porque o que está fora da seleção será mais escuro do que o que está na seleção, e então a seleção aparece destacada.
![[Dica]](images/tip.png)
|
Dica |
|---|---|
|
Se você usar as setas do teclado você pode mover a seleção ou modificar seu tamanho com passo de um pixel. Se você usá-las em combinação com Shift você pode movê-la em passos de 25 pixels. |
Figura 14.7. Áreas sensíveis da seleção
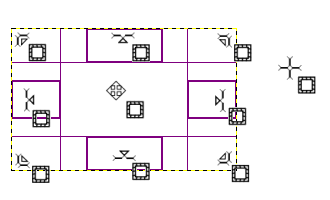
Exibição de todos os ponteiros possíveis em função de sua localização em relação à área da seleção
Depois de criar e modificar a seleção, você vai ter que sair deste modo de edição (e fixar todas as mudanças). Você pode fazer isso com um único clique dentro da seleção ou pressionando a tecla Enter. Ou você pode simplesmente usar uma ferramenta que não seja de seleção e, por exemplo, preencher ou pintar a seleção.
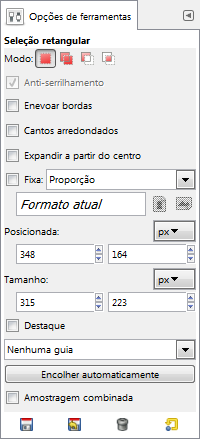
Normally, tool options are displayed in a window attached under the Toolbox as soon as you activate a tool. If they are not, you can access them from the main menu through → → which opens the option window of the selected tool. The available tool options can also be accessed by double clicking the corresponding tool icon in the Toolbox.
- Modo, Anti-serrilhamento, Feather edges
-
![[Nota]](images/note.png)
Nota See Selection Tools Options for help with options that are common to all these tools. Only options that are specific to this tool are explained here.
- Cantos arredondados
-
Se você ativar esta opção, aparece um controle deslizante. Você pode usar isso para ajustar o raio que é usado para arredondar os cantos da seleção.
- Expandir a partir do centro
-
Se você ativar esta opção, a seleção é iniciada pressionando o botão do mouse que é usado como centro da área selecionada.
- Fixa
-
Este menu permite-lhe a opção de restringir a forma do retângulo de várias maneiras.
- Proporção
-
Esta opção permite que você crie e redimensione a seleção, mantendo a proporção fixa conforme descrita na caixa de entrada logo abaixo: você pode escrever a proporção lá e apertar Enter. Por padrão, a proporção é de 1:1 (portanto, temos um quadrado) mas ela pode ser alterada. Com os dois pequenos botões de paisagem e de imagens ícones, você pode inverter essa relação.
- Largura
-
Com esta opção você pode manter fixa a largura da seleção.
- Altura
-
Com esta opção você pode fixar a altura da seleção.
- Tamanho
-
Com esta opção você pode manter fixas a altura e a largura da seleção: a ferramenta passa simplesmente a “Carimbar” retângulos do mesmo tamanho.
- Posição
-
Estes dois campos de texto contém as coordenadas horizontais e verticais atuais do canto superior esquerdo da seleção. Você pode usar esses campos para ajustar a posição de seleção com precisão.
- Tamanho
-
These two text fields contain the current width and height of the selection. You can use these fields to adjust the selection size precisely.
- Destaque
-
Se você ativar esta opção, a área selecionada é realçada com uma máscara em torno para tornar a seleção visual muito mais fácil.
- Guias
-
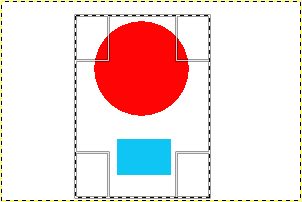
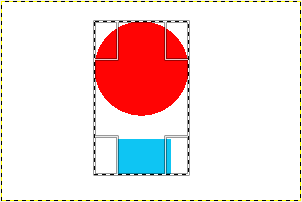
Com este menu, você pode selecionar o tipo de guias que são mostradas dentro da seleção para tornar a criação de uma seleção mais fácil, respeitando regras de composição fotográficas.
Seis opções estão disponíveis:
-
Sem Guias
-
Linha central
-
Regra dos terços
-
Regra de quintos
-
Seções áureas
-
Linhas diagonais
-
- Auto Shrink
-
This option is active when a rectangle selection is drawn. Clicking on the button will make the selection automatically shrink to the nearest rectangular shape including elements in the selection. The algorithm for finding the best rectangle to shrink to is “intelligent”, which in this case means that it sometimes does surprisingly sophisticated things, and sometimes does surprisingly strange things. In any case, if the region that you want to select has a solid-colored surround, auto-shrinking will always pick it out correctly. Note that the resulting selection does not need to have the same shape as the one you sweep out.
- Amostragem combinada
-
If Sample Merged is also enabled, then Auto Shrink will use the pixel information from the visible display of the image, rather than just from the active layer.
For more information, see the Glossary entry.
