Table des matières
Vous pouvez imaginer les calques comme une pile de transparents. Ils vous permettent de construire une image en plusieurs éléments, chacun pouvant être traité indépendamment sans affecter les autres éléments de l’image. Les calques sont placés les uns au dessus des autres. Celui du bas est l’arrière-plan de l’image et les composants du premier plan sont au-dessus.
There is no limit to the number of layers an image can have, only the amount of memory available on the system. It is not uncommon for advanced users to work with images containing dozens of layers. You can group layers to make your work easier, and there are many commands to handle layers.
The organization of layers in an image is shown in the Layers dialog. How it works is described in detail in the Layers Dialog section, but we will touch some aspects of it here, in relation to the layer properties that they display.
Each open image has at any time a single active drawable. A « drawable » is a GIMP concept that includes layers, but also several other items, such as channels, layer masks, and the selection mask. Basically, a « drawable » is anything that can be drawn on with painting tools. If a layer is currently active, it is shown highlighted in the Layers dialog, and its name is shown in the status area of the image window. If not, you can activate it by clicking on it. If none of the layers are highlighted, it means the active drawable is something else than a layer.
In the menu bar, you can find a menu called , containing a number of commands that affect the active layer of the image. The same menu can be accessed by right-clicking in the Layers dialog.
Chaque calque d’une image possède plusieurs attributs importants :
- Nom
-
Every layer has a name. This is assigned automatically when the layer is created, but you can change it. You can change the name of a layer either by double-clicking on it in the Layers dialog, or by right-clicking there, and then selecting the top entry in the menu that appears, .
- Présence ou absence d’un canal alpha
-
An alpha channel encodes information about how transparent a layer is at each pixel. It is visible in the Channels dialog: white is complete opacity, black is complete transparency and gray levels are partial transparencies.
The background layer is special. If you have just created a new image, it only has one layer, which is the background layer. If the image has been created with an opaque Fill type, this one layer has no Alpha channel. To get a background layer with transparency, either create your new image with a transparent Fill type, or you use the Add an Alpha Channel command.
Si vous ajoutez un nouveau calque, même avec type de remplissage opaque, un canal alpha est automatiquement ajouté au calque.
Every layer other than the bottom layer of an image automatically has an Alpha channel, but you can't see a grayscale representation of the alpha values. See Alpha in Glossary for more information.
Figure 8.2. Exemple pour le Canal Alpha : Image de base
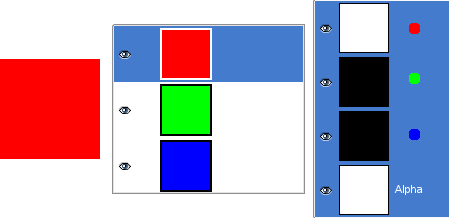
The image on the left has three layers painted with pure 100% opaque Red, Green, and Blue. In the Channels dialog, you can see that an Alpha channel has been added. It is white because the image is not transparent since there is at least one 100% opaque layer. The current layer is the red one: since it is painted with pure red, there is no green and no blue and the corresponding channels are black.
Figure 8.3. Exemple de Canal Alpha : Un calque transparent
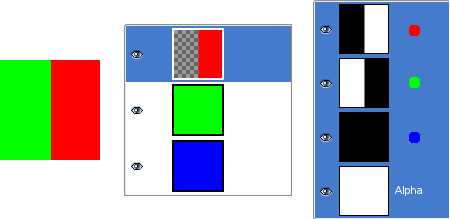
The left part of the first layer has been made transparent (via Section 2.2, « Sélection Rectangulaire », then → ). The second layer, green, is visible. The Alpha channel is still white, since there is an opaque layer in this part of the image.
Figure 8.4. Exemple de canal Alpha : Deux calques transparents
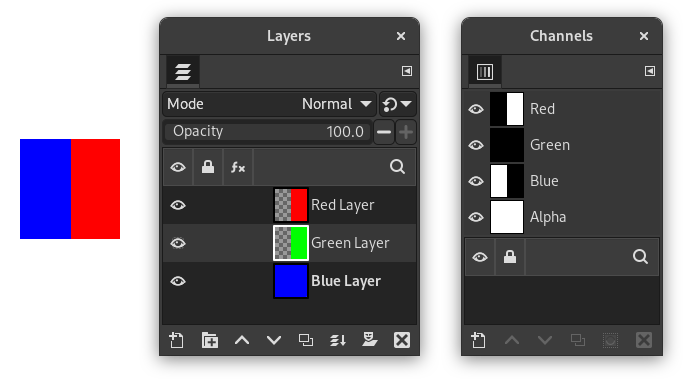
La partie gauche du deuxième calque a été rendue transparente. Le troisième calque, bleu, est visible à travers les premier et deuxième calques. Le canal Alpha est toujours blanc et donc l’image opaque puisque le dernier calque est opaque.
Figure 8.5. Exemple de Canal Alpha : Trois calques transparents
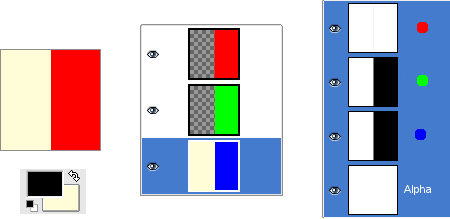
The left part of the third layer has been cleared. The Alpha channel is still white and the left part of the layer is opaque, because the background layer has no Alpha channel. In this case, the Clear command works like the Eraser and uses the Background color of Toolbox.
Figure 8.6. Exemple de canal Alpha : canal Alpha ajouté au calque d’Arrière-plan
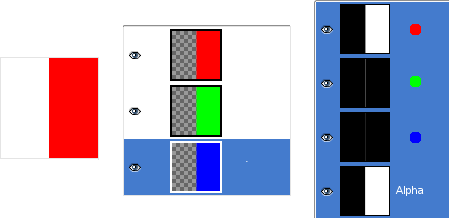
We used the → → command, on the Background layer. Now, the left part of the image is fully transparent and has the color of the page where the image is shown. The left part of the Alpha Channel thumbnail is black (transparent) in the Channels dialog.
- Type de calque
-
The layer type is determined by the image type (see previous section), and the presence or absence of an alpha channel. These are the possible layer types:
-
RVB
-
RVBA
-
Nuances de gris
-
Nuances de gris A
-
Indexé
-
Indexé A
The main reason this matters is that some filters (in the menu) only accept a subset of layer types, and appear disabled in the menu if the active layer does not have a supported type. Often you can rectify this either by changing the mode of the image, or by adding or removing an alpha channel.
-
-
Visibilité
-
Il est possible d’enlever temporairement le calque d’une image sans le détruire, en cliquant sur le symbole
 dans le Dialogue des Calques. On dit qu’on rend le calque visible ou invisible. La plupart des opérations exécutées sur une image considèrent les calques invisibles comme inexistants. Quand vous travaillez sur des images comportant plusieurs calques avec des opacités variables, vous aurez une meilleure vision d’un calque particulier en rendant les autres invisibles.
![[Astuce]](images/tip.png)
Astuce Si vous Shift-cliquez sur le symbole œil d’un calque, cela rendra tous les autres calques invisibles (très pratique quand on ne veut avoir que ce calque de visible).
- Calque actif
-
Habituellement, vous cliquez sur le calque sur lequel vous voulez travailler, dans la liste des calques, pour l’activer. Quand vous avez beaucoup de calque, il n’est pas toujours facile facile de trouver à quel calque un élément de l’image appartient : appuyez sur Alt et cliquez sur cet élément pour activer le calque correspondant. Les calques disponibles vont défiler en partant du haut tant que l’appui sur la touche sera maintenu et le calque recherché s’affichera temporairement dans la barre d’état.
-
Layer Lock Settings
-
If you click to the right of the eye icon, you can select the lock settings for the layer.
-
Layer Effects
-
Directly to the left of the image thumbnail, you will see the Layer Effects icon if that layer has effects added to it.
- Taille et limites
-
In GIMP, the boundaries of a layer do not necessarily match the boundaries of the image that contains it. When you create text, for example, each text item belongs to its own separate layer, and the layer size is automatically adjusted to contain the text and nothing more. Also, when you create a new layer using cut-and-paste, the new layer is sized just large enough to contain the pasted item. In the image window, the boundaries of the currently active layer are shown outlined with a black-and-yellow dashed line.
The main reason why this matters is that you cannot do anything to a layer outside of its boundaries, unless you enabled Expand Layers in the Paint Tool Options. If this causes you problems, you can alter the dimensions of the layer using any of several commands that you can find near the bottom of the menu.
![[Note]](images/note.png)
Note La quantité de mémoire utilisée par un calque dépend de ses dimensions et non de son contenu. Donc si vous travaillez sur de grandes images ou des images avec un grand nombre de calques, cela peut valoir le coup de réduire les calques à leur taille minimum.
- Opacité
-
L’opacité d’un calque détermine le degré avec lequel il laisse voir les couleurs des calques sous-jacents. Elle varie de 0 à 100, 0 étant la transparence complète et 100 l’opacité complète.
- Mode
-
Le Mode d’un calque détermine la façon dont les couleurs du calque sont combinées aux couleurs des calques sous-jacents pour produire la couleur visible sur l’image. Voir le glossaire à la rubrique Modes de calque
- Masque de calque
-
En plus du canal Alpha, il existe une autre manière de contrôler la transparence d’un calque : c’est de lui ajouter un Masque de calque qui est un élément graphique en nuances de gris associé au calque. Un calque n’a pas de masque de calque par défaut, il doit être ajouté spécifiquement. Les Masques de calque et la façon de travailler avec eux, sont décrits dans la section Masque de calque
