Met de volgende dialoogvensters kunt u afbeeldingsstructuren, zoals lagen, kanalen en paden bewerken.
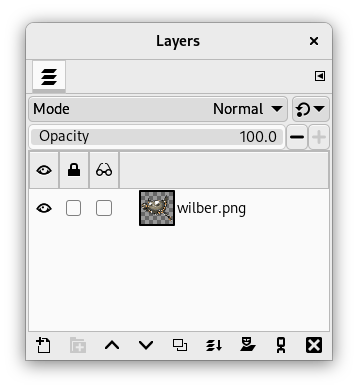
Het dialoogvenster “Lagen” is de hoofdinterface voor het bewerken, wijzigen en beheren van uw lagen.
Dit dialoogvenster is een dokbaar dialoogvenster; zie het gedeelte Paragraaf 2.3, “Koppelen van dialoogvensters” voor hulp bij het manipuleren ervan.
U kunt het openen:
-
uit het hoofdmenu: → → ;
-
in het menu Tab in elk dokbaar dialoogvenster door op de knop voor menu Tab
 te klikken en → te selecteren.
 -
via de (standaard) snelkoppeling: Ctrl+L.
In het menu staat een lijst met dokbare vensters, die alleen bestaat als er ten minste een dialoogvenster geopend blijft. In dat geval kunt u het dialoogvenster “Lagen” oproepen vanuit het hoofdmenu: → .
- Overzicht
-
Elke laag verschijnt in het dialoogvenster in de vorm van een miniatuur. Wanneer een afbeelding meerdere lagen als componenten heeft, verschijnen ze als een lijst. De bovenste laag in de lijst is de eerst zichtbare, en de onderste laag is de laatst zichtbare, de achtergrond. Boven de lijst staan de kenmerken die individueel zijn gerelateerd aan elke laag. Onder de lijst staan knoppen voor het beheren van de lijst. Een klik met rechts op een miniatuur van een laag opent het contextmenu Laag.
- Meerdere lagen selecteren
-
GIMP stelt u in staat om meerdere kanalen voor selectiemaskers te selecteren en daarop acties uit te voeren. U kunt ze bijvoorbeeld verplaatsen naar een andere locatie in de stapel met lagen, ze schalen etc Selecteren van meerdere lagen wordt gedaan met de muis en de Shift-toets, voor het toevoegen van een bereik van lagen, of de Ctrl-toets, voor het toevoegen of verwijderen van de aangeklikte laag.
Weet dat bepaalde actie slechts kunnen worden uitgevoerd op een enkele laag. Als u een dergelijke actie probeert te gebruiken, bijv. met het penseel, zal een waarschuwingsbericht worden weergegeven, dat u vertelt dat u dat niet kunt doen en dat u een enkele laag moet selecteren.
- Kop lagenlijst
-
Direct boven de lagenlijst staat de kopbalk. Aan de linkerkant staan drie pictogrammen die weergeven welke kolom wordt gebruikt voor zichtbaarheid, vergrendelen en laageffecten. In het midden zal een tekstlabel u vertellen hoeveel lagen er momenteel zijn geselecteerd, als dat er meer dan een is. Aan de rechterkant ziet u een pictogram om te zoeken. Klikken in dit gedeelte opent een dialoogvenster om te zoeken, waar u naar lagen kunt zoeken.
-
 Lagen zoeken en Opgeslagen zoekacties
-
Zoeken naar lagen kan nuttig zijn als u heel veel lagen in uw project hebt. Zodra u begint te typen in de zoekbalk, zal het beginnen met het vinden van lagen die overeenkomen met uw zoekactie en ze selecteren. Meerdere lagen zullen worden geselecteerd als ze allemaal overeenkomen.
Onder de zoekbalk zult u een pictogram plus zien. Klikken hierop maakt het mogelijk de huidige zoekactie toe te voegen als een nieuwe benoemde set. Deze zoekactie, en al eerder gedefinieerde, zullen worden weergegeven onder de zoekbalk. Klikken op een van deze opgeslagen zoekacties zal alle lagen selecteren die overeenkomen met de zoektermen. Elke opgeslagen zoekactie heeft een pictogram Sluiten in de rechterhoek, dat kan worden gebruikt om die opgeslagen zoekactie te verwijderen.
-
- Laagattributen
-
Elke laag wordt in de lijst weergegeven met zijn eigen attributen:
-
 Zichtbaarheid van de laag
-
Klikken op dit pictogram schakelt of de laag zichtbaar is of niet. (Shift-klikken op het pictogram zorgt ervoor dat alle andere lagen op hetzelfde niveau worden weergegeven of, als alternatief, worden verborgen. Alt-klikken op het pictogram zorgt ervoor dat alle andere geselecteerde lagen op hetzelfde niveau worden weergegeven of, als alternatief, worden verborgen.)
-
 Vergrendelen
-
Klikken op het lege keuzevak in de kolom Vergrendelen van een laag opent een menu me de volgende opties. (Shift-klikken op het pictogram zorgt ervoor dat alle andere lagen op hetzelfde niveau worden vergrendeld of, als alternatief, worden ontgrendeld. Alt-klikken op het pictogram zorgt ervoor dat alle andere geselecteerde lagen op hetzelfde niveau worden vergrendeld of, als alternatief, worden ontgrendeld.))
-
 Beeldpunten vergrendelen
-
Wanneer deze schakelknop wordt ingeschakeld, kunt u geen enkel op penselen gebaseerd gereedschap gebruiken (Penseel, Potlood, Gum etc), het gereedschap Verfspuit of de Inktpot op de momenteel geselecteerde laag. Dit stelt u in staat ze te beveiligen tegen ongewenste wijzigingen.
-
 Positie en afmeting vergrendelen
-
Deze schakelknop schakelt het beveiligen van lagen, tegen verplaatsen ervan of het transformeren ervan, in of uit. Als dit is ingeschakeld, dan kunt u geen gereedschap voor transformeren gebruiken (Draaien, Hellen, Perspectief en andere) of ze verplaatsen.
-
 Zichtbaarheid vergrendelen
-
Deze schakelknop beheert de instelling “Vergrendelen” voor de zichtbaarheid van de laag. Als dit is ingeschakeld, kan de zichtbaarheid van de laag niet worden gewijzigd, totdat u de vergrendeling uitschakelt.
-
 Alfakanaal vergrendelen
-
Deze schakelknop beheert de instelling “Vergrendelen” voor de transparantie van de laag. Als dit is ingeschakeld is het alfakanaal voor de laag vergrendeld, en hebben bewerkingen daarop geen effect. In het bijzonder, niets van wat u doet op een transparant gedeelte van de laag zal enig effect hebben.
Afbeelding 15.2. Voorbeeld van het vergrendelen van alfakanaal

De actieve laag heeft drie horizontale, ondoorzichtige, groene strepen op een transparante achtergrond. We tekenen een verticale rode streep. “Vergrendelen” niet geselecteerd: Ondoorzichtige en transparante gebieden van de actieve laag worden met rood getekend.

“Vergrendelen” geselecteerd: Alleen ondoorzichtige gebieden van de actieve laag worden met rood getekend. Transparante gebieden worden behouden.
![[Tip]](images/tip.png)
Tip Als een laagnaam in het dialoogvenster Laag vetgedrukt is, heeft deze laag geen alfakanaal.
-
-
 Laageffecten
-
Als dit pictogram zichtbaar is, zijn er Laageffecten aanwezig voor deze laag. Klikken erop zal een dialoogvenster openen, waar u een lijst zult zien, met alle aan deze laag toegevoegde effecten. Voor elk effect kunt u de zichtbaarheid wijzigen, de volgorde van de effecten, alle effecten voor de laag samenvoegen, of ze verwijderen.
Laageffecten zijn filters die de laag niet destructief veranderen, dat is, ze kunnen worden toegevoegd, verwijderd of gewijzigd, zonder de laag zelf te wijzigen. In plaats daarvan voegen ze effecten toe bovenop de laag.
Bekijk Laageffecten voor meer details.
Veel van de filters van GEGL in de menu's Kleuren en Filters kunnen op deze manier worden gebruikt. Het dialoogvenster Laageffecten bestaat uit de volgende delen:
- Lijst laageffecten
-
Aan de bovenkant staat een lijst met alle laageffecten die zijn toegevoegd aan deze laag. Onthoud dat de effecten worden toegepast bovenop de laag, beginnend met het effect aan de onderzijde van de lijst.
Links van elk effect kunt u een pictogram van een oog zien; daarop kan worden geklikt om dat specifieke effect weer te geven of te verbergen. Daarnaast staat het pictogram Filtereffect.
- Knoppen
-
De knoppenbalk aan de onderzijde biedt de volgende functionaliteiten:
-
Zichtbaarheid laageffecten
-
Deze schakelknop beheert de instelling voor de “zichtbaarheid” voor alle effecten van de laag. Standaard zijn alle effecten zichtbaar. Klikken hierop verbergt de effecten, wat u in staat stelt de feitelijke pixelinhoud van de laag te zien.
-
 Het geselecteerde filter bewerken
-
Deze knop stelt u in staat het dialoogvenster te openen van het geselecteerde laageffect, om wijzigingen aan de instellingen ervan te maken. Als alternatief kunt u ook dubbelklikken op het laageffect in de list om het dialoogvenster te openen.
-
 Laageffect hoger
-
Hier kunt u het laageffect naar boven in de lijst verplaatsen.
-
 Laageffect lager
-
Hier kunt u het laageffect naar beneden in de lijst verplaatsen.
-
 Alle actieve filters samenvoegen.
-
Deze knop laat u alle actieve (zichtbare) laageffecten samenvoegen met de inhoud van de laag. Dit verwijdert de laageffecten uit de laag nadat de effecten op de laag zijn toegepast.
-
 Geselecteerd filter verwijderen.
-
Deze knop verwijdert het geselecteerde laageffect.
-
- Laagminiatuur
-
De inhoud van de laag wordt weergegeven door een miniatuur. Ingedrukt houden van een klik met links voor een seconde maakt het miniatuur groter. De randkleur van de laag is afhankelijk van het feit of de laag actief is of niet actief.
- Laagnaam
-
U kunt de naam van de laag wijzigen door erop te dubbelklikken. U kunt ook het dialoogvenster Laagattributen bewerken gebruiken in het contextmenu dat u krijgt door met rechts te klikken op de laag.
![[Opmerking]](images/note.png)
Opmerking Bij het werken aan een animatie kan de naam van de laag worden gebruikt om bepaalde parameters te specificeren. Voor meer details, bekijk Animaties exporteren.
-
- Kenmerken van lagen
-
Boven de lagenlijst is het mogelijk enkele eigenschappen te specificeren voor de geselecteerde lagen. De geselecteerde lagen worden geaccentueerd. De eigenschappen zijn:
- Modus
-
De laagmodus bepaalt hoe de laag interacteert met de andere lagen. In het combinatievak heeft u toegang tot alle door GIMP verschafte modi. De laagmodi worden volledig besproken in Paragraaf 2, “Modi voor de laag”.
- Dekking
-
Door de schuifbalk te verplaatsen geeft u meer of minder ondoorzichtigheid aan de laag. Met een waarde 0 voor dekking is de laag transparant en volledig onzichtbaar. Verwar dit niet met een Laagmasker, dat de transparantie pixel-voor-pixel instelt.
- Laagbeheer
-
Onder de lagenlijst kunt u met een reeks knoppen enkele basisbewerkingen uitvoeren in de lagenlijst.
-
 Nieuwe laag aanmaken
-
Hier kunt u een nieuwe laag maken. Een dialoogvenster wordt geopend, dat wordt beschreven in Nieuwe laag.
Druk intussen op de Shift-toets om een nieuwe laag met laatst gebruikte waarden te openen.
-
 Nieuwe laaggroep maken
-
Hier kunt u een nieuwe laaggroep maken. Een nieuwe laag wordt gemaakt, waar u uw lagen op kunt plaatsen.
Laaggroepen worden beschreven in Laaggroepen.
-
Laag omhoog
-
Hier kunt u de laag een niveau naar boven in de lijst verplaatsen. Druk op de Shift-toets om de laag tot boven in de lijst te verplaatsen.
-
Laag omlaag
-
Hier kunt u de laag een niveau naar beneden in de lijst verplaatsen. Druk op de Shift-toets om de laag tot onder in de lijst te verplaatsen.
Tip Het zou, om een laag naar de onderkant van de lijst te verplaatsen, eerst nodig kunnen zijn om een transparant kanaal (ook wel Alfakanaal genoemd) toe te voegen aan de achtergrondlaag. Klik met rechts, om dit te doen, op de achtergrondlaag en selecteer Alfakanaal toevoegen uit het menu.
-
 Lagen dupliceren
-
Hier kunt u een kopie maken van de geselecteerde lagen. Naam van de nieuwe laag wordt gevolgd door "kopiëren".
-
Lagen samenvoegen
 Zwevende laag of masker verankeren
-
De knop is alleen zichtbaar als er een zwevende selectie aanwezig is. Het verankert de zwevende selectie aan de eerder actieve laag.
Als er geen zwevende selectie is, wordt het pictogram
weergegeven, met verschillende mogelijkheden: -
Deze lagen samenvoegen met de eerste zichtbare laag eronder.
-
Met Shift ingedrukt: voeg de lagen van de laaggroep samen tot één normale laag.
-
Met Ctrl ingedrukt: voeg alle zichtbare lagen samen tot één laag.
-
Met Shift+Ctrl ingedrukt: alle zichtbare lagen samenvoegen met de laatst gebruikte waarden.
-
-
 Maskers aan lagen toevoegen
-
Voeg maskers toe aan de geselecteerde lagen.
-
Lagen verwijderen
-
Hier kunt u de geselecteerde lagen verwijderen.
-
- Meer laagfuncties
-
Andere functies over grootte laag zijn beschikbaar in het contextmenu Laag dat u kunt krijgen door met rechts te klikken op het dialoogvenster Lagen. U kunt ze ook vinden in het submenu van het hoofdmenu.
U vindt functies voor samenvoegen van lagen in het hoofdmenu Afbeeldingen.
- Lagen klikken en slepen
-
Klikken en ingedrukt houden op een miniatuur van een laag of een laagnaam: het miniatuur vergroot en u kunt het verplaatsen met de muis. Selecteren en verplaatsen van meerdere lagen is ook mogelijk.
-
U kunt dus deze laag of lagen ergens anders in de lagenlijst plaatsen.
-
U kunt ook de laag neerzetten in de gereedschapskist: een nieuwe afbeelding wordt gemaakt die alleen deze laag bevat. Dit werkt niet met meerdere geselecteerde lagen.
-
Tenslotte kunt u de laag neerzetten in een andere afbeelding: deze laag zal worden toegevoegd aan de lagenlijst, bovenop bestaande lagen.
-
Door met rechts te klikken in het dialoogvenster Lagen, of door het te openen vanuit het menu Tab, zal een contextmenu voor het dialoogvenster Lagen openen.
De meeste opdrachten in dit menu zijn al hierboven gedocumenteerd, of ergens anders:
- Laagattributen bewerken…
-
Behalve voor Breedte, Hoogte en Vullen met, is dit dialoogvenster hetzelfde als het dialoogvenster Nieuwe laag. Voor informatie over de laagattributen verwijzen we daarom naar de documentatie voor dat dialoogvenster.
- Submenu Mengruimte
-
Bekijk Mengruimte in het dialoogvenster Nieuwe laag.
- Submenu Composietruimte
-
Bekijk Composietruimte in het dialoogvenster Nieuwe laag.
- Submenu Composietmodus
-
Bekijk Composietmodus in het dialoogvenster Nieuwe laag.
- Submenu Kleurlabels
-
Bekijk de documentatie voor Kleurlabels in het dialoogvenster Nieuwe laag.
- Nieuwe laag…, Nieuwe laaggroep, Lagen dupliceren, Neerwaarts samenvoegen, Laag vastzetten, Lagen verwijderen
-
Deze opdrachten worden hierboven uitgelegd, bekijk de kenmerken van lagen.
- Nieuw uit zichtbaar
-
Bekijk de documentatie voor de menu-opdracht Nieuw uit zichtbaar.
- Grensgrootte laag…
-
Bekijk de documentatie voor de menu-opdracht Grensgrootte laag….
- Lagen naar afbeeldingsgrootte
-
Bekijk de documentatie voor de menu-opdracht Lagen naar afbeeldingsgrootte.
- Laag schalen…
-
Bekijk de documentatie voor de menu-opdracht Laag schalen….
- Laagmaskers toevoegen…, Laagmaskers toepassen, Laagmaskers verwijderen, Laagmaskers tonen, Laagmasker bewerken, Laagmaskers uitschakelen, Maskers naar selectie
-
Bekijk de documentatie van het submenu Laagmasker voor deze opdrachten.
- Alfakanaal toevoegen, Alfakanaal verwijderen
-
Slechts een ervan zal worden ingeschakeld. Als de huidige laag geen alfakanaal heeft, kunt u er een toevoegen. Als het dat wel heeft, kunt u het alfakanaal verwijderen.
- Alfa naar selectie
-
Bekijk de documentatie voor de opdracht in het menu Alfa naar selectie.
- Zichtbare lagen samenvoegen
-
Deze opdracht voegt alle zichtbare lagen samen tot een laag.
- Alle lagen samenvoegen
-
Deze opdracht voegt alle zichtbare lagen samen tot een laag en verwijdert transparantie
- Overzicht
-
Een masker voor transparantie kan aan elke laag worden toegevoegd, wat definieert welke delen van de laag transparant of ondoorzichtig zijn. We noemen dit een laagmasker. Een laagmasker heeft dezelfde grootte en hetzelfde aantal pixels als de laag waarmee het wordt gekoppeld. Elke pixel van het masker kan dan worden gekoppeld aan een pixel op dezelfde locatie in de laag. Het masker is een set pixels in grijswaarden. De pixels met de waarde 0 zijn zwart en geven een volledige transparantie aan de gekoppelde pixel in de laag. De pixels met de maximale waarde (ofwel 1,0 of 255) zijn wit en maken de gekoppelde pixel in de laag volledig ondoorzichtig.
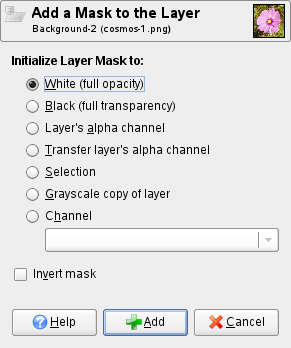
Begin, om een laagmasker te maken, door met rechts te klikken op de laag om het contextmenu op te roepen en selecteer in het menu. Er verschijnt een dialoogvenster waar u de inhoud van het masker kunt initialiseren:
-
Wit (volledig ondoorzichtig): het masker is wit in het dialoogvenster Lagen. Dus, alle pixels van de laag zijn zichtbaar in het afbeeldingsvenster omdat het tekenen van het masker met wit alle laagpixels volledig zichtbaar maakt. U zult met zwart moeten tekenen om laagpixels transparant te maken.
-
Zwart (volledig transparant): het masker is zwart in het dialoogvenster Lagen. Dus, de laag is volledig transparant omdat het tekenen van het masker met zwart de laagpixels transparant maakt. Tekenen met wit zal het masker verwijderen en laagpixels zichtbaar maken.
-
Alfakanaal van laag: het masker wordt geïnitialiseerd overeenkomstig de inhoud van het alfakanaal van de laag.
-
Alfakanaal van laag verplaatsen: doet hetzelfde als de vorige optie, behalve dat het alfakanaal van de laag ook wordt teruggezet naar volledige dekking.
-
Selectie: het masker wordt geïnitialiseerd overeenkomstig pixelwaarden die worden gevonden in de huidige selectie.
-
Grijswaardenkopie van laag: het masker wordt geïnitialiseerd overeenkomstig een weergave in grijswaarden van de pixelwaarden van de laag.
-
Kanaal: het laagmasker wordt geïnitialiseerd met een selectiemasker dat u eerder hebt gemaakt en dat is opgeslagen in het dialoogvenster Kanalen.
-
Masker inverteren: Met dit keuzevak kunt u de waarden omkeren: zwart wordt wit en wit wordt zwart.
Als het masker wordt gemaakt, verschijnt het als een miniatuur naast dat van de laag zelf. U kunt de laag of het masker selecteren om te bewerken door te klikken op hun respectievelijk miniatuur. Het actieve item heeft een witte rand (die niet goed zichtbaar zou kunnen zijn als u een wit masker heeft).
Bij het werken met maskers is het een goed idee om het dialoogvenster Lagen prominent zichtbaar te houden, omdat u niet kunt zien, door naar het canvas te kijken, of de laag of het masker actief is.
Drukken op Alt (of Ctrl+Alt en klikken op de miniatuur van het laagmasker) is equivalent aan de opdracht Laagmaskers tonen: de rand van het laagmasker wordt groen. Als u drukt op Ctrl wordt de rand rood en het resultaat is equivalent aan de opdracht Laagmaskers uitschakelen. Herhaal de laatste bewerking om terug te keren naar de normale weergave. Deze opties zijn voor meer handigheid bij uw werk.
-
- Voorbeeld van laagmasker
-
Afbeelding 15.4. Een laag met laagmasker

Originele afbeelding.

Deze afbeelding heeft een achtergrondlaag met een bloem en een andere blauwe laag, volledig ondoorzichtig. Een wit laagmasker is toegevoegd aan de blauwe laag. De blauwe laag blijft zichtbaar, omdat een wit masker laagpixels zichtbaar maakt.
Afbeelding 15.5. Het laagmasker schilderen

Voorgrondkleur ingesteld op zwart; Resulterende afbeelding.

Het laagmasker is actief. Tekenen met zwart maakt de laag transparant: de onderliggende laag wordt zichtbaar.


