-
Depending on your particular artistic intentions for an image, some images are more likely than others to benefit from being tone mapped using floating point Exposure operation. Your mileage may vary, but typically the procedure described on this page works best for photographs of scenes with a pronounced tonal difference between the highlights and shadows, as per typical sunny day “sky-ground” photographs.
-
For adding just one stop of positive exposure compensation, the procedure described on this page works really well. Depending on the image you might want to blur the mask using an edge-respecting blur algorithm, and/or tweak the mask using the Exposure operation, Curves, etc. But only modify the mask after using Auto Stretch Contrast on the mask. Otherwise results will be unpredictable: Gamma adjustments produce odd results when operating on out of gamut values, and Curves will summarily clip out of gamut values.
-
Para añadir más de una parada de compensación de exposición, puede usar una o más capas de compensación de exposición positiva. De cualquier manera, las máscaras de capa necesitarán ajustes cuidadosos que son muy específicos de la imagen y también específicos del resultado deseado. La Figura 7 muestra un ejemplo del uso de dos capas de compensación de exposición para agregar dos paradas y media de compensación de exposición a las sombras y los tonos medios de una imagen:
Usando los niveles ilimitados de coma flotante de GIMP más máscaras de capa para agregar dos paradas de compensación de exposición positiva a las sombras y los tonos medios de una fotografía de un camión en un huerto de manzanas que se tomó bajo la luz del sol.
Figura 7
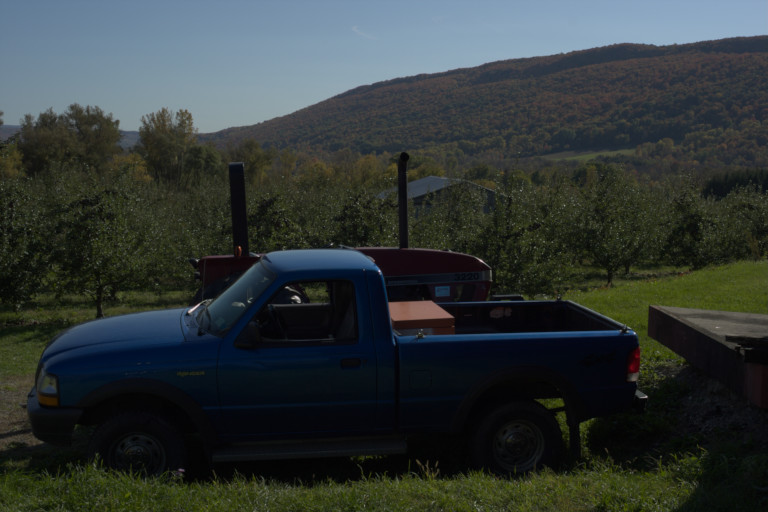
Imagen de la cámara, subexpuesta para evitar perder los reflejos.
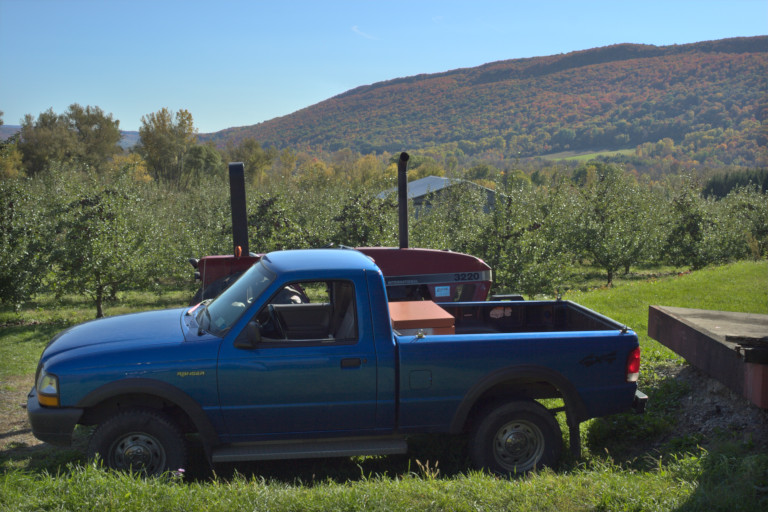
After tone mapping/shadow recovery using high bit depth GIMP's floating point Exposure operation.
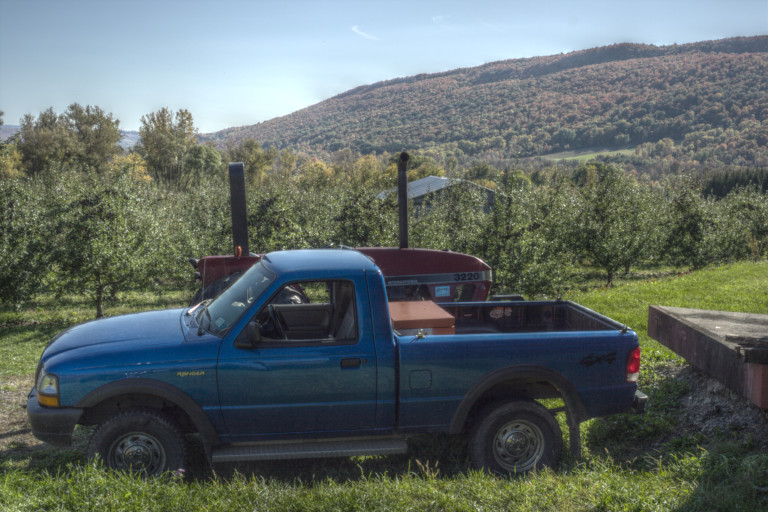
A modo de comparación, la asignación de tonos Mantuik utilizando la configuración predeterminada de GEGL.
Using GIMP’s floating point Exposure operation plus layer masks to add two and a half stops of positive exposure compensation to the shadows and midtones of a “bright sun” photograph of an apple orchard truck.
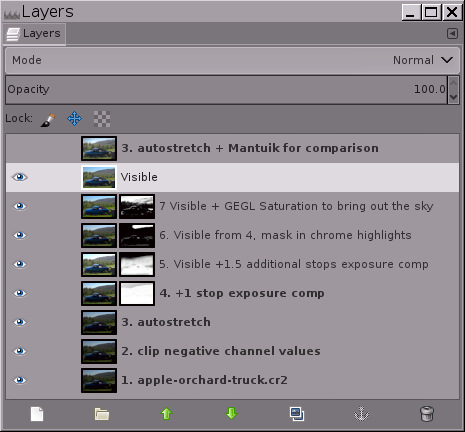
Una captura de pantalla de la pila de capas que usé para asignar tonos a la fotografía del camión en un huerto de manzanas. La asignación de tonos a mano le brinda un control completo sobre la imagen resultante. Mantuik y otros algoritmos de asignación de tonos «automáticos» hacen un uso intensivo de la CPU, son impredecibles y, a menudo, producen resultados de aspecto poco natural.
-
Before using the Exposure operation to add positive exposure compensation, the base layer should already be stretched to its maximum dynamic range. The easiest way to stretch the base layer to its maximum dynamic range is to do → → and make sure that Keep colors is checked.
If you’ve never used an unbounded floating point image editor before, → → can produce an unexpected result: The image might actually end up with a severely reduced dynamic range, having either lighter shadows or darker highlights or both:
Before and after doing → → on the base layer, plus the final image after tone mapping using → :
Figura 8
1. Imagen de la cámara
2. After doing → → .

3. Imagen final de «líneas eléctricas».
-
This scene-referred interpolated raw file from the PhotoFlow raw processor (which provides a GIMP plug-in for easy opening of raw files) has out-of-display-range RGB channel values that will be brought back into the display range by doing → → .
-
After doing → → , shadows are lighter and highlights are darker because the dynamic range has been compressed to fit within the display range. This looks like an editing step in the wrong direction! but actually it’s necessary.
-
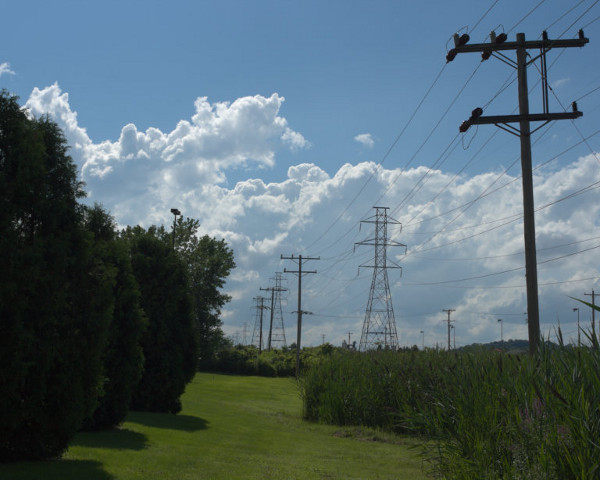
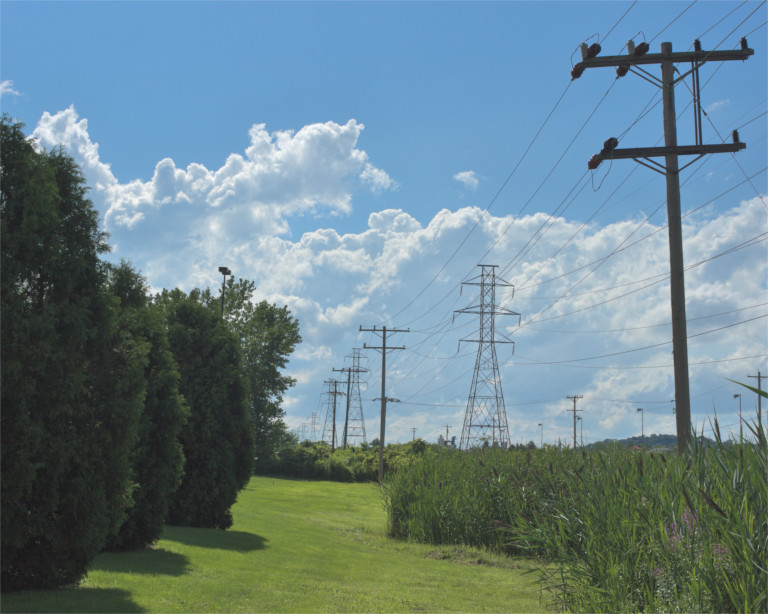
Aquí está la imagen final de «Líneas eléctricas» después de la asignación de tonos del archivo sin procesar interpolado referido a la escena usando el procedimiento descrito en este tutorial.
As captured by the raw file, this picture of power lines marching into the distance is a typical result of taking a photograph at noon on a bright sunny day: The sky and clouds looked pretty good right out of the camera, but the ground was far too dark. So the image could benefit from some tone mapping to raise the shadows and midtones. The first step is to select → → to bring any channel values that are less than 0.0f or greater than 1.0f back within the display range of 0.0 to 1.0 floating point.
Performing → → to bring the channel values back inside the display range doesn’t exactly look like an editing step in the right direction for tone-mapping this particular image! but really it is. Using → to add positive exposure compensation to the shadows and midtones won’t work if the image has channel values that fall outside the display range.
-
-
Dispensing with “useless” shadow and highlight information: Sometimes interpolated raw files of photographs of high dynamic range scenes end up with a sprinkling of highlight and shadow pixels that contains essentially no useful information. The easiest thing to do with such pixels is to use the Exposure operation to set the desired black and white points, and then clip the resulting out of gamut channel information.
-
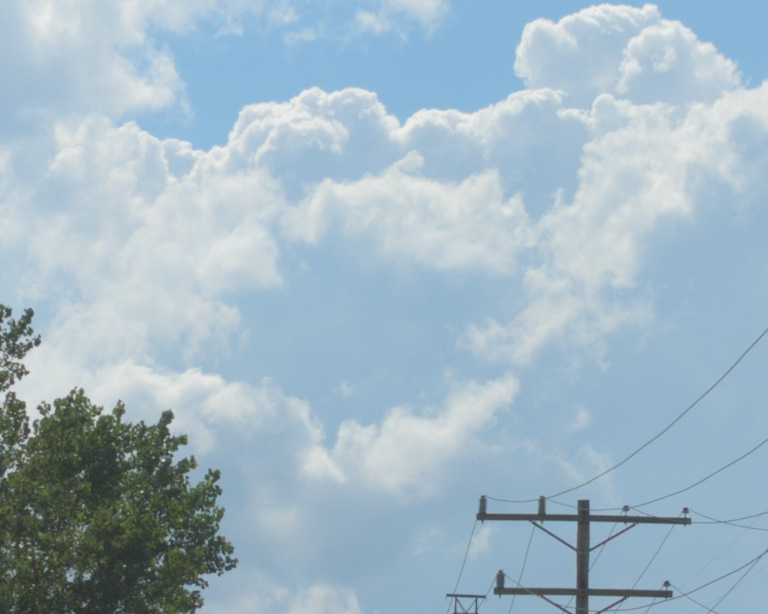
Useless highlight information: For the “Power lines” picture shown in Figure 8 above, after applying → → , a measly 48 pixels occupied nearly half the tonal range (see the histogram to the right). A little investigation with GIMP’s Threshold tool revealed that all 48 pixels are the peak values of specular highlights on the ceramic insulators on the power line pole in the foreground.
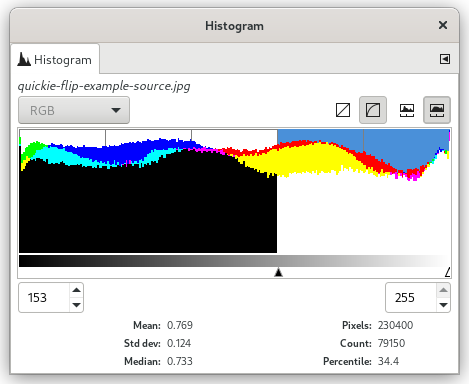
In cases where nearly half the histogram is occupied by a sprinkling of specular highlights, clipping the pixels is often the best and easiest solution. For the “Power lines” image, the 48 pixels in question carried essentially zero information. Use → to raise the white point, and then → to actually clip the channel information in the highlights (this time making sure the Clip high pixel values box was checked).
-
Useless shadow information: Some raw processors can output images with negative channel values. And previous edits using high bit depth GIMP might have produced negative channel values. If doing → → on your base image layer makes the image a whole lot lighter in the shadows, the problem is negative RGB channel values. One solution is to use → to move the black point to where you want it to be, and then clip the negative channel values. Here are two ways to clip negative channel values:
-
Use → , making sure to uncheck the Clip high pixel values box.
-
O bien, cree una capa negra sólida sobre su capa de imagen base, establezca el modo de combinación en «Solo aclarar» y cree una capa «Nueva desde visible».
-
-
-
Desenfocar la máscara para restaurar el micro contraste: poner una máscara inversa en una capa que se usa para agregar una compensación de exposición positiva necesariamente aplana ligeramente el micro contraste. Dependiendo de sus intenciones artísticas para la imagen, es posible que desee desenfocar la máscara para restaurar el micro contraste. El truco consiste en cómo hacer para desenfocar la máscara sin introducir «halos» alrededor de los bordes de los objetos en la imagen. Los desenfoques gaussianos de radio pequeño producen halos pequeños pero preocupantemente obvios alrededor de los bordes oscuros. Un desenfoque gaussiano de gran radio a veces funciona, pero con la misma frecuencia produce un gran halo evidente que separa las partes más brillantes y más oscuras de la imagen. Para muchas imágenes, una mejor solución es desenfocar la máscara usando un filtro que respete los bordes, como el filtro de suavizado bilateral GIMP G’MIC:
Añadir compensación de exposición con y sin suavizado bilateral de la máscara.
Figura 9
Sin aplicar suavizado bilateral a la máscara, el micro contraste se aplana.

Después de aplicar suavizado bilateral a la máscara, se restaura el micro contraste.
Adding exposure compensation combined with an inverse grayscale mask does flatten micro contrast, which might or might not be desirable depending on your artistic intentions for the image. To restore micro contrast, try using an edge-respecting blur such as G’MIC’s bilateral smoothing filter. GIMP G’MIC doesn’t work on layer masks. A workaround is to turn the unblurred mask into a selection, save the selection as a channel, and then drag the channel to the layer stack for blurring.
-
An essential component of the procedure for using the Exposure operation to add positive exposure compensation to images with dark shadows and midtones needs to be explicitly mentioned: Not only is the high bit depth GIMP’s Exposure operation unbounded at floating point precision — layer masks are also unbounded.
Si las máscaras de escala de grises invertidas se recortaran sumariamente (como es el caso al editar con precisión entera), entonces el procedimiento descrito en este tutorial no funcionaría.


