-
En funció de les vostres intencions artístiques particulars sobre una imatge, és probable que algunes es beneficiïn d'un mapa-tonal mitjançant el punt flotant de l'operació Exposició. La vostra experiència pot variar, però normalment el procediment descrit en aquesta pàgina funciona millor per a fotografies d'escenes amb una diferència tonal pronunciada entre llums i ombres, com per exemple en les fotografies típiques assolellades amb cel i terra.
-
Per a afegir només un diafragma de compensació d'exposició positiva, el procediment descrit aquí funciona molt bé. Depenent de la imatge, és possible que vulgueu difuminar la màscara mitjançant un algorisme de desenfocament respectuós amb la vora i/o ajustar la màscara amb l'operació Exposició, Corbes, etc. Però només modifiqueu la màscara després d'utilitzar «Auto estendre el contrast» en aquesta màscara; si no, els resultats seran imprevisibles: els ajustaments de gamma produeixen resultats estranys en operacions fora de gamma i l'eina Corbes eliminarà els valors fora de gamma.
-
Per a afegir més d'un diafragma de compensació de l'exposició, podeu utilitzar una o més d'una capa de compensació d'exposició positiva. De qualsevol forma, la(es) mascar(es) de capa necessitaran un ajust acurat que sigui molt específic de la imatge i també específic del resultat que es desitgi. La figura 7 mostra un exemple d'ús de dues capes de compensació d'exposició per a afegir-hi dos diafragmes i mig de compensació d'exposició als tons foscos i mitjos d'una imatge:
Utilitzant els nivells il·limitats del punt flotant del GIMP i màscares de capa per a afegir dos diafragmes de compensació d'exposició positiva als tons foscos i mitjos de la fotografia d'una camioneta de pomes en un hort amb sol brillant.
Figura 7
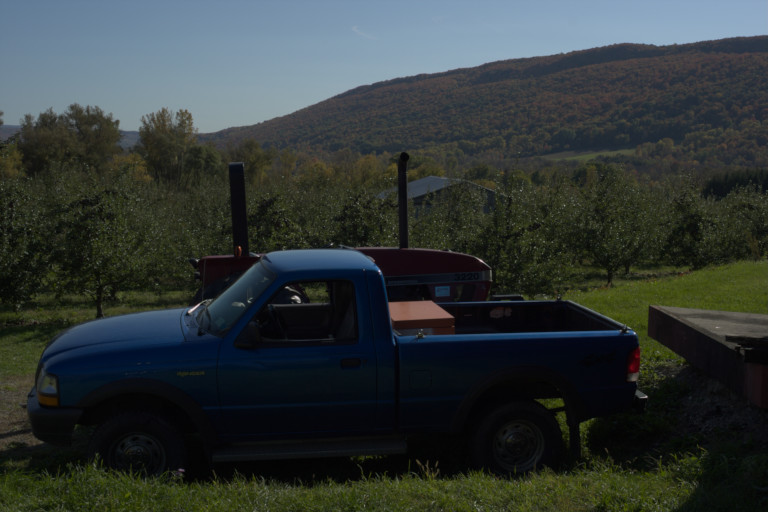
Imatge de la càmera, subexposada per a evitar la desaparició de detalls en zones de llum brillant.
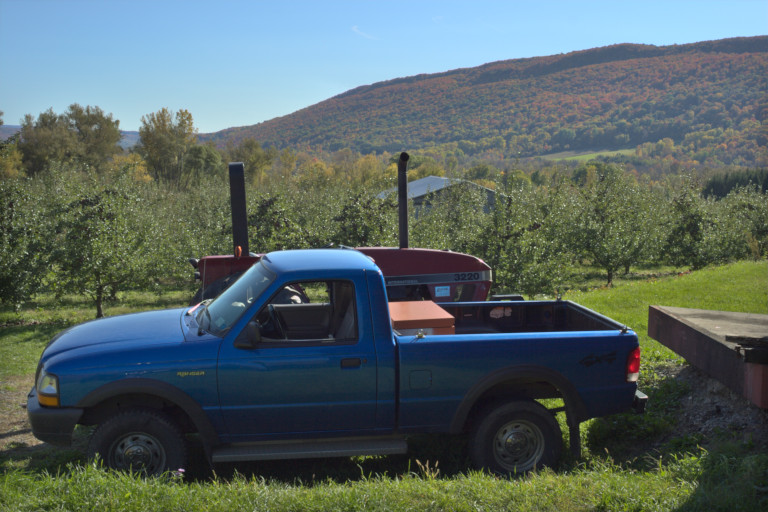
Després de recuperar els tons foscos per mapa-tonal utilitzant l'operació Exposició en punt flotant del Gimp amb gran profunditat de bits.
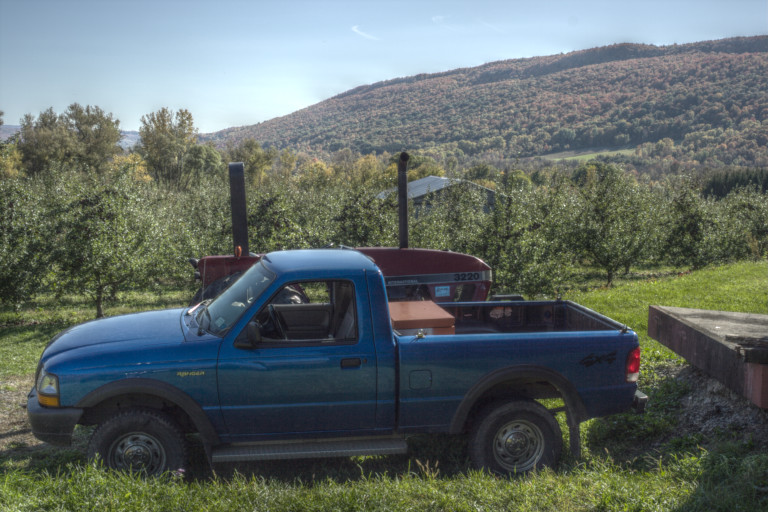
Per comparació, mapa-tonal Mantuik utilitzant la configuració predeterminada GEGL.
Utilitzant l'operació Exposició del punt flotant amb màscares de capa per a afegir-hi dos diafragmes i mig de compensació de l'exposició positiva als tons foscos i mitjos d'una fotografia amb «sol brillant» d'una camioneta de pomes de l'hort .
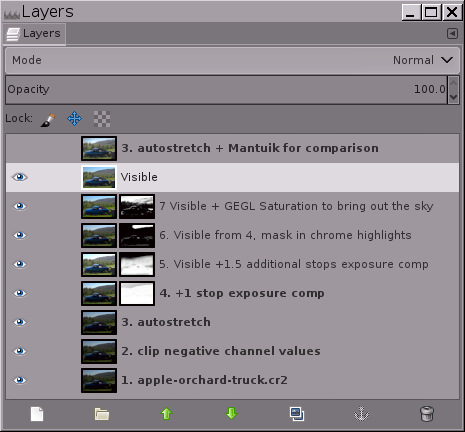
Una captura de pantalla de la pila de capes que he utilitzat per a fer un mapa-tonal de la fotografia de la camioneta de pomes. El mapa-tonal manual us permet un control complet sobre la imatge resultant. Mantuik i altres algorismes de mapa-tonal «auto-màgic» són grans consumidors de recursos de la CPU, imprevisibles i sovint produeixen resultats antinaturals.
-
Abans d'utilitzar l'operació Exposició per a afegir una compensació d'exposició positiva, la capa base ja s'hauria d'estirar al seu màxim interval dinàmic. La manera més senzilla d'estirar la capa base fins al seu màxim interval dinàmic és utilitzar → → i assegureu-vos que Manté els colors estigui marcat.
Si no heu utilitzat mai cap editor d'imatges en punt flotant il·limitat, → → pot produir un resultat inesperat: la imatge pot acabar amb un interval dinàmic molt reduït, amb ombres clares o zones lluminoses enfosquides o ambdues coses:
Abans i després de fer → → a la capa base, més la imatge final després del mapa-tonal utilitzant → :
Figura 8
1. Imatge de la càmera
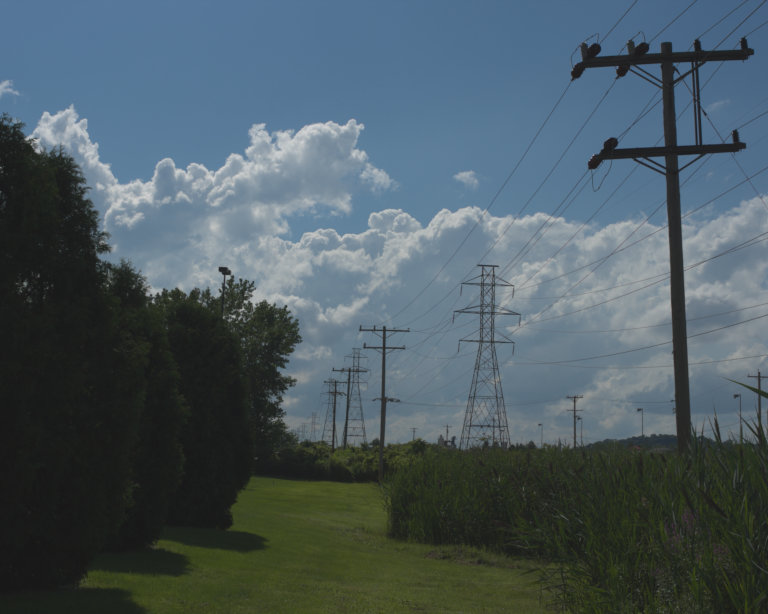
2. Després de fer → → .
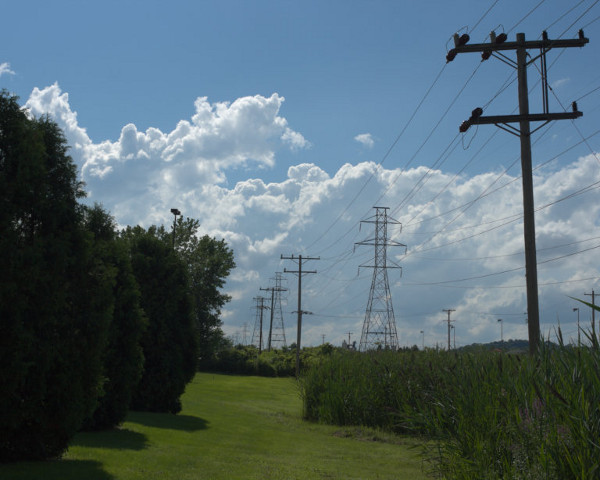
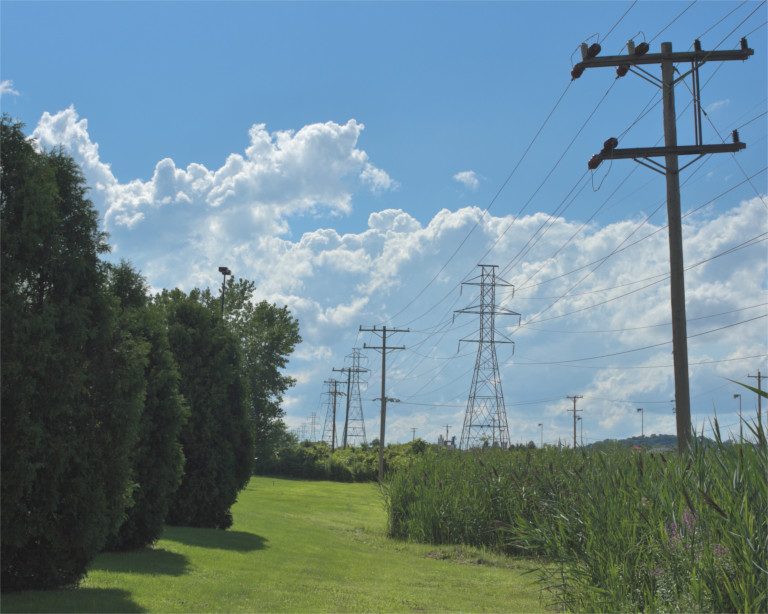
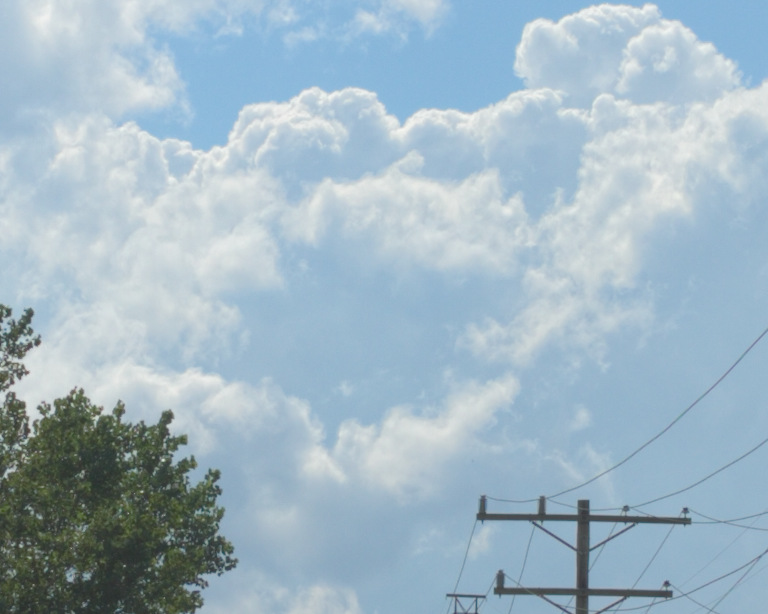
3. Imatge final de «Línies elèctriques».
-
Aquest fitxer RAW interpolat referent a l'escena del processador RAW PhotoFlow (proporciona un connector GIMP que facilita l'obertura de fitxers RAW), té valors de canals RGB fora de l'interval de visualització, se'ls retornarà a l'interval de visualització amb el → → .
-
Després de realitzar → → , les ombres són més clares i els tons clars més foscos perquè l'interval dinàmic s'ha comprimit per a adaptar-se dins l'interval de visualització. Sembla que aneu va pel camí equivocat! Però en realitat és necessari.
-
Aquí teniu la imatge «Línies elèctriques» després de fer un mapa-tonal al fitxer RAW interpolat utilitzant el procediment descrit en aquest tutorial.
Tal com s'ha capturat pel fitxer RAW, aquesta imatge de les línies elèctriques amb punt de fuga és el resultat típic de fer una fotografia al migdia d'un dia assolellat: el cel i els núvols es veuen força bé, però el terra està massa fosc. De manera que la imatge es podria beneficiar d'algun mapa-tonal per a intensificar les ombres i els tons mitjans. El primer pas és fer → → per a tornar a incloure valors del canal inferiors de 0.0f o superiors de 1.0f dins l'interval de visualització de 0,0 a 1,0 en punt flotant.
Si es fa → → per a restablir els valors del canal dins l'interval de visualitzacions, no sembla que hagi d'anar en la direcció correcta per a un mapa-tonal d'aquesta imatge! Però és així. Si utilitzeu → per a afegir una compensació de l'exposició positiva a les ombres i tons mitjans, no funcionarà si la imatge té valors de canals que es troben fora de l'espai de visualització.
-
-
Repartiment d'informació «inútil» sobre les ombres i les zones lluminoses: de vegades, els fitxers de fotografia RAW interpolats amb escenes d'interval dinàmic elevat comporta un ruixat de píxels de tons clars i foscos que no contenen informació útil. El que cal fer amb aquests píxels és utilitzar l'operació per definit els punts blancs i negres desitjats, i després rebutjar la informació resultant de la gamma dels canals.
-
Informació inútil de les zones lluminoses: Per a la imatge de «Línies elèctriques» que es mostra a la figura 8 de dalt, després de fer → → , 48 píxels ridículs ocupaven gairebé la meitat de l'espai tonal. (vegeu l'histograma a la dreta). Una petita investigació amb l'eina Llindar blanc i negre del GIMP va revelar que els 48 píxels són els valors màxims d'esclats lluminosos especulars dels aïllants ceràmics del pal elèctric del primer pla.
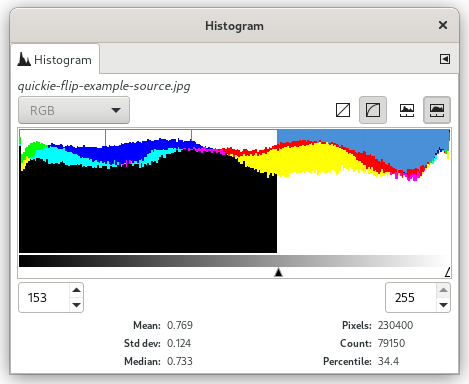
En els casos en què gairebé la meitat de l'histograma està ocupat per esquitxos brillants especulars, el rebuig d'aquests píxels és la solució més simple. A la imatge «Línies elèctriques», els 48 píxels no proporcionen cap informació. Utilitzeu → per augmentar el punt blanc i, a continuació, → per a retallar la informació del canal en els ressaltats (aquest cop s'assegura que s'ha marcat la casella Elimina els valors de píxels alts).
-
Informació inútil de l'ombra: Alguns processadors RAW poden emetre imatges amb valors de canal negatius. I les modificacions anteriors utilitzant el GIMP de gran profunditat de bits poden produir valors de canal negatius. Si es fa → → sobre la capa d'imatge base, farà que les ombres siguin molt més clares, el problema és la presència de valors negatius en el canal RGB. Una de les solucions és utilitzar → per a desplaçar el punt negre al lloc on desitgeu, i després eliminar els valors del canal negatiu. A continuació, es mostren dues maneres d'eliminar els valors del canal negatiu:
-
Utilitzeu → , assegurant-vos de desmarcar la casella Retalla els valors alts del píxel.
-
O bé creeu una capa negra sòlida per sobre de la capa d'imatge base, configureu el mode barreja a «Només aclarir» i feu una capa «Nova des de visible».
-
-
-
La difusió de la màscara per a restaurar el micro-contrast: posar una màscara inversa a una capa que s'utilitza per a afegir una compensació d'exposició positiva necessàriament aplana lleugerament el micro-contrast. Segons les vostres intencions artístiques respecte a la imatge, potser voldreu difuminar la màscara per a restaurar el micro-contrast. El truc és com difuminar la màscara sense introduir «halos» al voltant de les vores dels objectes de la imatge. Una difusió gaussiana de radi petit produeix un halo petit però dolorosament evident al voltant de les vores fosques. De vegades funciona un difuminat gaussià de radi gran, però ben sovint es produeix un halo gran a la unió de les zones clares i fosques de la imatge. Per a moltes imatges, la millor solució és difuminar la màscara utilitzant un filtre respectant les vores, com el filtre bilateral suavitzador GMIC del GIMP:
Afegint una compensació d'exposició amb i sense suavitzador bilateral de la màscara.
Figura 9

Sense aplicar el suavitzador bilateral a la màscara, el micro-contrast està aplanat.
Després d'aplicar el suavitzador bilateral a la màscara, es restableix el micro-contrast.
Si afegiu una compensació d'exposició combinada amb una màscara d'escala de grisos inversa aplana el micro-contrast, cosa que pot ser desitjable o no en funció de les vostres intencions artístiques. Per a restablir el micro-contrast, proveu d'utilitzar un difuminat que respecti les vores, com el filtre suavitzador bilateral G´MIC. El G'MIC del GIMP no funciona en màscares de capa. Una manera de fer-ho és convertir la màscara sense difusió en una selecció, desar la selecció com a canal i arrossegar el canal cap a la pila de capes per a difuminar-se.
-
Un component essencial del procediment per a l'ús de l'operació Exposició per tal d'afegir una compensació d'exposició positiva a les imatges amb tons foscos i mitjos, requereix una menció explícita: no només l'operació Exposició de gran profunditat de bits del GIMP no està il·limitada en la precisió del punt flotant, sinó que — les màscares de capes també ho estan.
Si les màscares d'escala de grisos invertides s'haguessin retallat de forma resumida (com és el cas de modificar amb precisió d'enter), el procediment descrit d'aquest tutorial no funcionaria.


