-
Ανάλογα με τις ιδιαίτερες καλλιτεχνικές σας προθέσεις για μια εικόνα, ορισμένες εικόνες είναι πιο πιθανό να επωφεληθούν από την χαρτογράφηση τόνων με χρήση της λειτουργίας έκθεσης κινητής υποδιαστολής. Η απόδοσή σας μπορεί να ποικίλλει, αλλά συνήθως η διαδικασία που περιγράφεται σε αυτήν τη σελίδα λειτουργεί καλύτερα για φωτογραφίες σκηνών με έντονη τονική διαφορά μεταξύ των φωτεινών σημείων και των σκιών, όπως σε τυπικές φωτογραφίες "ουρανού-εδάφους" μιας ηλιόλουστης ημέρας.
-
Για να προσθέσετε μόνο μια στάση (στοπ) θετικής αντιστάθμισης έκθεσης, η διαδικασία που περιγράφεται σε αυτήν τη σελίδα λειτουργεί πολύ καλά. Ανάλογα με την εικόνα μπορεί να θέλετε να θολώσετε τη μάσκα χρησιμοποιώντας έναν αλγόριθμο θόλωσης που σέβεται τις ακμές ή/και να προσαρμόσετε τη μάσκα χρησιμοποιώντας τη λειτουργία έκθεσης, τις καμπύλες κ.λπ. Αλλά τροποποιήστε τη μάσκα μόνο αφού χρησιμοποιήσετε τη λειτουργία Αυτόματης επέκτασης της αντίθεσης στη μάσκα. Διαφορετικά, τα αποτελέσματα θα είναι απρόβλεπτα: Οι προσαρμογές Γάμμα παράγουν περίεργα αποτελέσματα όταν λειτουργούν σε τιμές εκτός εύρους, και οι Καμπύλες θα αποκόψουν συνοπτικά τιμές εκτός εύρους.
-
Για την προσθήκη περισσότερων από μία στάσεων αντιστάθμισης έκθεσης, μπορείτε να χρησιμοποιήσετε μία ή περισσότερες από τις στρώσεις αντιστάθμισης θετικής έκθεσης. Και στους δύο τρόπους οι μάσκες στρώσεων θα χρειαστούν προσεκτική μικρορύθμιση που είναι πολύ ειδική για κάθε εικόνα και επίσης εξειδικευμένη ως προς το σκοπούμενο αποτέλεσμα. Το σχήμα 7 εμφανίζει ένα παράδειγμα χρήσης δύο στρώσεων αντιστάθμισης έκθεσης για την προσθήκη δυόμιση στάσεων αντιστάθμισης έκθεσης στις σκιές και τους μεσαίους τόνους μιας εικόνας:
Η χρήση κινητής υποδιαστολής απεριόριστων σταθμών του GIMP συν τις μάσκες στρώσης για την προσθήκη δύο στάσεων θετικής αντιστάθμισης έκθεσης στις σκιές και τους μεσαίους τόνους φωτογραφίας που ελήφθη με λαμπρή ηλιοφάνεια ημιφορτηγού μαζί με οπωρώνα από μηλιές.
Σχήμα 7
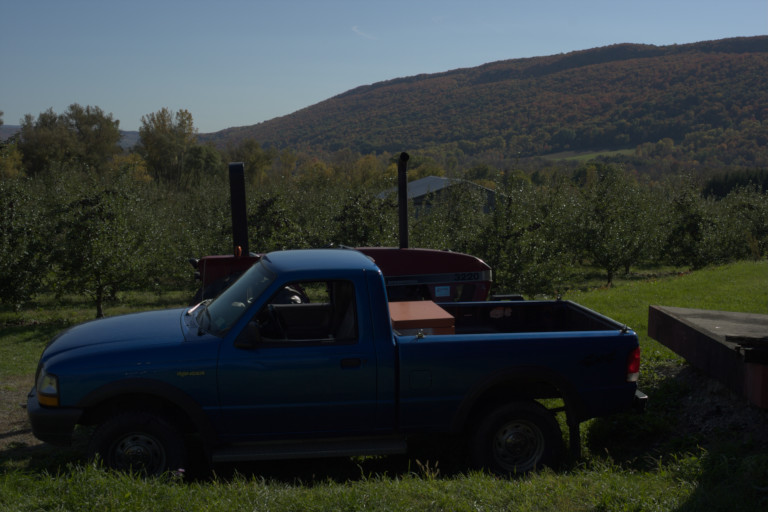
Εικόνα από την κάμερα, υποεκτεθειμένη προς αποφυγή σβησίματος υψηλών φωτισμών.
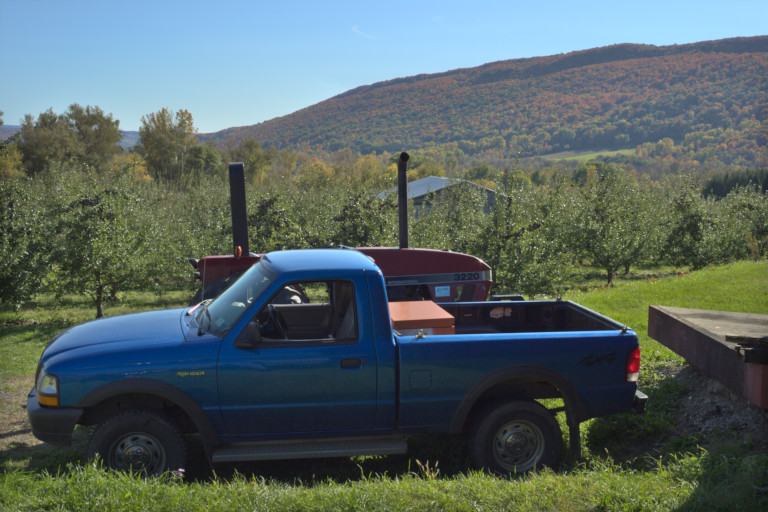
Μετά την ανάκτηση της τονικής απεικόνισης/σκιάς χρησιμοποιήστε τη λειτουργία έκθεσης υψηλού βάθους δυαδικών κινητής υποδιαστολής του GIMP.
Για σύγκριση, τονική απεικόνιση Mantuik χρησιμοποιώντας τις προεπιλεγμένες ρυθμίσεις του GEGL.
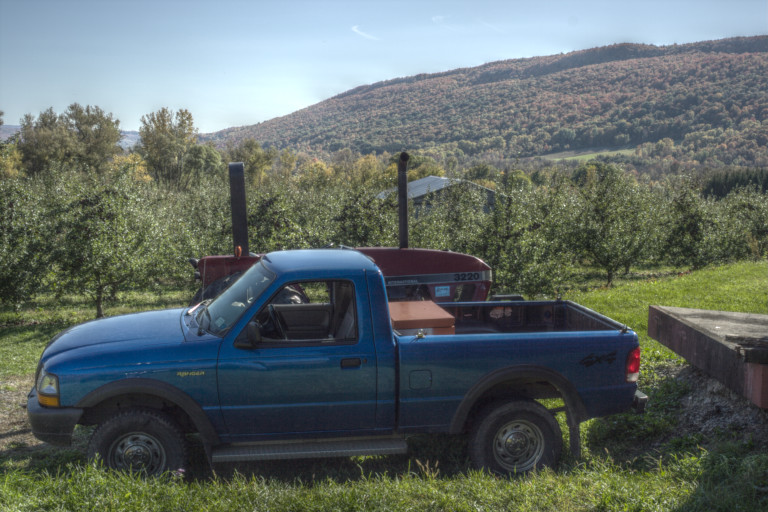
Χρήση της λειτουργίας Έκθεσης με κινητή υποδιαστολή του GIMP καθώς και μάσκες στρώσεων για τη προσθήκη δυόμισι στάσεων θετικής αντιστάθμισης έκθεσης στις σκιές και τους μεσαίους τόνους μιας φωτογραφίας με "φωτεινό ήλιο" ενός φορτηγού σε οπωρώνα μήλων.

Στιγμιότυπο της στοίβας στρώσεων που χρησιμοποίησα για την τονική απεικόνιση της φωτογραφίας του ημιφορτηγού μαζί με οπωρώνα από μηλιές. Η τονική απεικόνιση με το χέρι σας δίνει πλήρη έλεγχο στην τελική εικόνα. Το Mantuik και άλλοι “αυτόματα μαγικοί” αλγόριθμοι τονικής απεικόνισης χρησιμοποιούν πολύ ΚΜΕ, είναι απρόβλεπτοι και παράγουν συχνά αποτελέσματα αφύσικης εμφάνισης.
-
Πριν χρησιμοποιήσετε τη λειτουργία Έκθεσης για να προσθέσετε θετική αντιστάθμιση έκθεσης, η βασική στρώση θα πρέπει να έχει ήδη επεκταθεί στο μέγιστο δυναμικό εύρος της. Ο ευκολότερος τρόπος για να επεκτείνετε τη στρώση βάσης στο μέγιστο δυναμικό της εύρος είναι να κάνετε → → και βεβαιωθείτε ότι έχει επιλεγεί το Διατήρηση χρωμάτων.
Αν δεν έχετε χρησιμοποιήσει ποτέ πριν έναν επεξεργαστή εικόνας με απεριόριστες κινητές υποδιαστολές, το → → μπορεί να παράξει ένα απροσδόκητο αποτέλεσμα: Η εικόνα μπορεί στην πραγματικότητα να καταλήξει με ένα σημαντικά μειωμένο δυναμικό εύρος, έχοντας είτε πιο ανοιχτές σκιές είτε πιο σκούρα φωτεινά σημεία είτε και τα δύο:
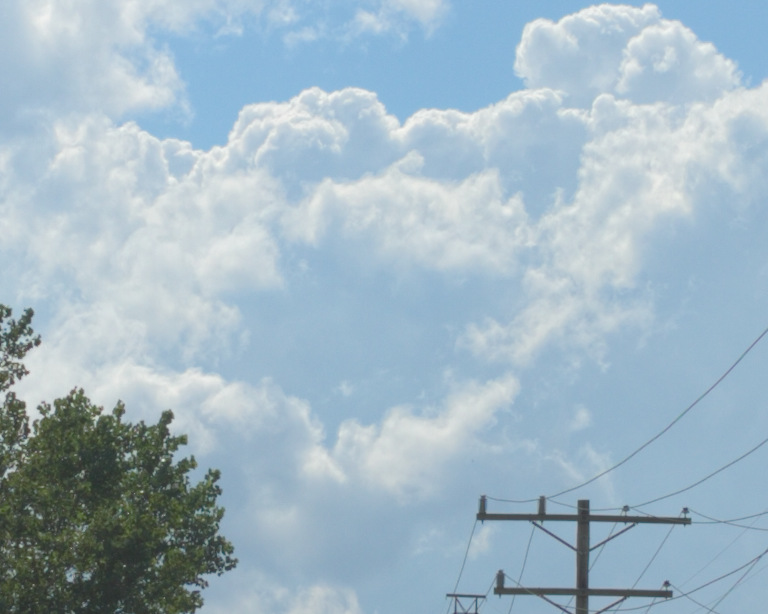
Πριν και μετά την πραγματοποίηση → → στη βασική στρώση, συν την τελική εικόνα μετά την χαρτογράφηση τόνων χρησιμοποιώντας → :
Σχήμα 8
1. Εικόνα από κάμερα

2. Αφού κάνετε το → → .
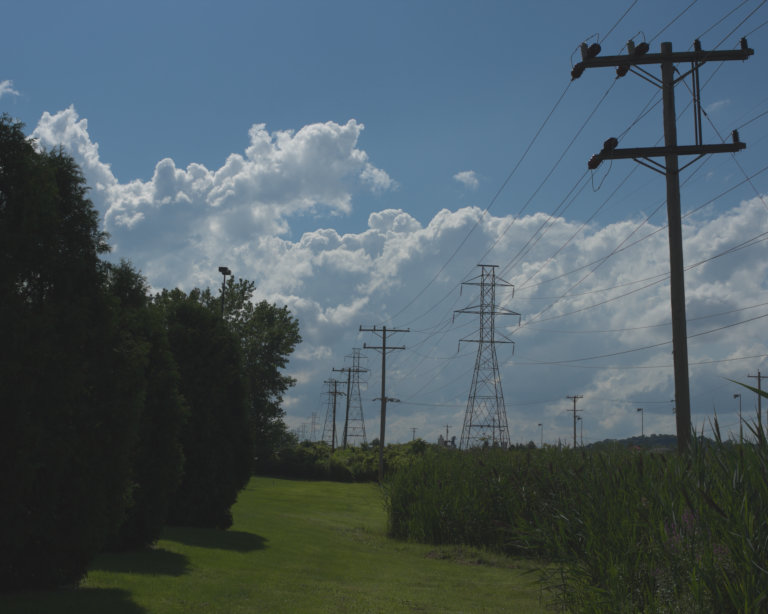
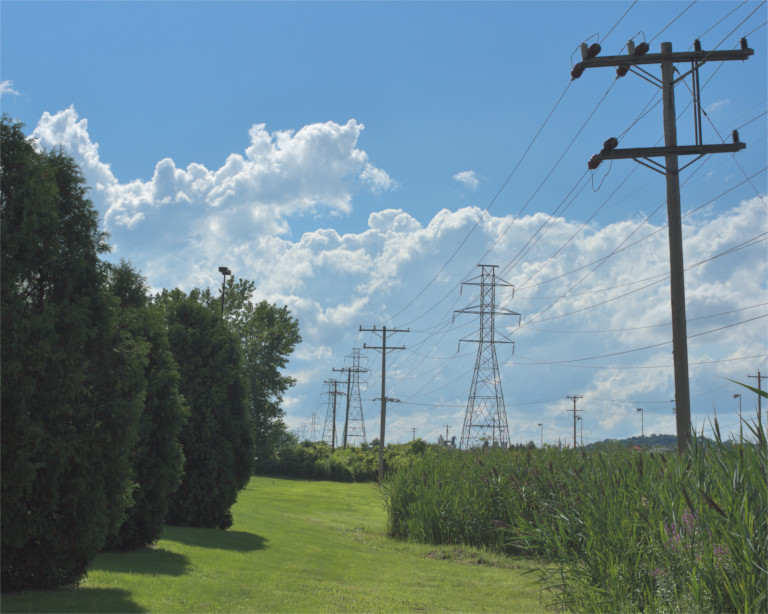
3. Τελική εικόνα "Ηλεκτρικά καλώδια".
-
Αυτό το παρεμβαλλόμενο μη επεξεργασμένο αρχείο που αναφέρεται στη σκηνή από τον ακατέργαστο επεξεργαστή PhotoFlow (που παρέχει ένα πρόσθετο στο GIMP για εύκολο άνοιγμα των ακατέργαστων αρχείων) έχει τιμές καναλιού RGB εκτός εύρους οθόνης που θα επανέλθουν στο εύρος της οθόνης κάνοντας → → .
-
Αφού το → → , οι σκιές είναι πιο ανοιχτές και τα φωτεινά σημεία πιο σκούρα, επειδή το δυναμικό εύρος έχει συμπιεστεί για να χωρέσει στο εύρος της οθόνης. Αυτό μοιάζει με ένα βήμα επεξεργασίας προς τη λάθος κατεύθυνση! αλλά στην πραγματικότητα είναι απαραίτητο.
-
Ιδού η τελική εικόνα “Ηλεκτρικά καλώδια” μετά την χαρτογράφηση τόνου του ακατέργαστου αρχείου με παρεμβολή της σκηνής που αναφέρεται με τη χρήση της διαδικασίας που περιγράφεται σε αυτό το μάθημα.
Όπως αποτυπώνεται από το αρχείο raw, αυτή η εικόνα των γραμμών μεταφοράς ρεύματος που προχωρούν στο βάθος είναι ένα τυπικό αποτέλεσμα της λήψης μιας φωτογραφίας το μεσημέρι μιας φωτεινής ηλιόλουστης ημέρας: Ο ουρανός και τα σύννεφα φαίνονταν αρκετά καλά αμέσως μετά τη λήψη, αλλά το έδαφος ήταν υπερβολικά σκοτεινό. Έτσι, η εικόνα θα μπορούσε να ωφεληθεί από κάποια χαρτογράφηση τόνων για την αύξηση των σκιών και των μεσαίων τόνων. Το πρώτο βήμα είναι να επιλέξετε → → για να επαναφέρετε οποιεσδήποτε τιμές καναλιών που είναι μικρότερες από 0,0f ή μεγαλύτερες από 1,0f εντός του εύρους εμφάνισης από 0,0 έως 1,0 κινητής υποδιαστολής.
Εκτέλεση → → για να επαναφέρετε τις τιμές των καναλιών μέσα στο εύρος εμφάνισης δεν μοιάζει ακριβώς με ένα βήμα επεξεργασίας προς τη σωστή κατεύθυνση για τη χαρτογράφηση των τόνων αυτής της συγκεκριμένης εικόνας! αλλά στην πραγματικότητα είναι. Χρησιμοποίηστε το → για να προσθέσετε θετική αντιστάθμιση έκθεσης στις σκιές και τους μεσαίους τόνους δεν θα λειτουργήσει, εάν η εικόνα έχει τιμές καναλιών που βρίσκονται εκτός του εύρους εμφάνισης.
-
-
Η απαλλαγή από “άχρηστες” σκιές και πληροφορίες υψηλού φωτισμού: Μερικές φορές ακατέργαστα αρχεία με παρεμβολή φωτογραφιών με σκηνές υψηλής δυναμικής περιοχής καταλήγουν σε λίγα εικονοστοιχεία υψηλού φωτισμού και σκιών που δεν περιέχουν στην πραγματικότητα χρήσιμες πληροφορίες. Το πιο απλό πράγμα που μπορεί να γίνει με τέτοια εικονοστοιχεία είναι η χρήση του “Χρώματα/Έκθεση” για να οριστούν τα επιθυμητά σημεία μαύρου και άσπρου και στη συνέχεια να περικοπεί το αποτέλεσμα εκτός των πληροφοριών καναλιών του φάσματος.
-
Άχρηστες πληροφορίες επισήμανσης: Για την εικόνα "Γραμμές ρεύματος" που φαίνεται στην Εικόνα 8 παραπάνω, μετά την εφαρμογή → → , μόλις 48 εικονοστοιχεία καταλαμβάνουν σχεδόν το μισό τονικό εύρος (βλ. ιστόγραμμα στα δεξιά). Μια μικρή έρευνα με το εργαλείο κατωφλίου του GIMP αποκάλυψε ότι και τα 48 εικονοστοιχεία είναι οι μέγιστες τιμές των κατοπτρικών φωτεινών σημείων στους κεραμικούς μονωτήρες στον στύλο της γραμμής ηλεκτροδότησης στο προσκήνιο.
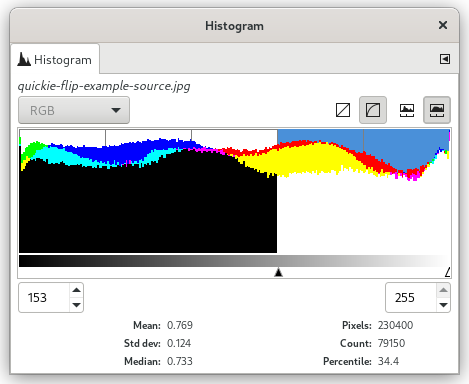
Σε περιπτώσεις όπου σχεδόν το μισό ιστόγραμμα καταλαμβάνεται από ένα ψεκασμό κατοπτρικών φωτεινών σημείων, η αποκοπή των εικονοστοιχείων είναι συχνά η καλύτερη και ευκολότερη λύση. Για την εικόνα "Γραμμές ρεύματος", τα εν λόγω 48 εικονοστοιχεία έφεραν ουσιαστικά μηδενικές πληροφορίες. Χρησιμοποιήστε → για να αυξήσετε το λευκό σημείο και, στη συνέχεια, → για να αποκόψετε πραγματικά τις πληροφορίες του καναλιού στα φωτεινά σημεία (αυτή τη φορά βεβαιωθείτε ότι το πλαίσιο Αποκοπή υψηλών τιμών εικονοστοιχείων ήταν επιλεγμένο).
-
Άχρηστες πληροφορίες σκιάς: Ορισμένοι επεξεργαστές μπορούν να εξάγουν εικόνες με αρνητικές τιμές καναλιού. Και οι προηγούμενες επεξεργασίες που χρησιμοποιούν GIMP υψηλού βάθους bit μπορεί να έχουν δημιουργήσει αρνητικές τιμές καναλιού. Εάν κάνοντας → → στη βασική στρώση της εικόνας σας κάνει την εικόνα πολύ πιο ανοιχτή στις σκιές , το πρόβλημα είναι οι αρνητικές τιμές καναλιού RGB. Μια λύση είναι να χρησιμοποιήσετε το → για να μετακινήσετε το μαύρο σημείο στο σημείο που θέλετε να είναι και, στη συνέχεια, να κόψετε τις αρνητικές τιμές του καναλιού. Ακολουθούν δύο τρόποι για να κόψετε τις αρνητικές τιμές καναλιού:
-
Χρησιμοποιήστε → , φροντίζοντας να αποεπιλέξετε το πλαίσιο Clip high pixel values (Αποκοπή υψηλών τιμών εικονοστοιχείων).
-
Ή αλλιώς δημιουργήστε μια συμπαγή μαύρη στρώση πάνω από τη στρώση βάσης της εικόνας σας, ορίστε την ανάμειξη σε “Μόνο φωτισμός” και κάντε μια στρώση “Νέα από τα ορατά”.
-
-
-
Θόλωση της μάσκας για επαναφορά μικροαντίθεσης: Βάζοντας μια αντίστροφη μάσκα σε μια στρώση που χρησιμοποιείται για να προσθέσετε αντιστάθμιση θετικής έκθεσης ισοπεδώνει αναγκαστικά ελαφρώς την μικροαντίθεση. Ανάλογα με τις καλλιτεχνικές σας προθέσεις για την εικόνα, μπορεί να θέλετε να θολώσετε τη μάσκα για να επαναφέρετε τη μικροαντίθεση. Το κόλπο είναι πώς θα θολώσετε τη μάσκα χωρίς να εισάγετε “άλω” γύρω από τα άκρα των αντικειμένων στην εικόνα. Οι θολώσεις μικρής ακτίνα Γκάους παράγουν μικρή αλλά ενοχλητικά φανερή άλω γύρω από τα σκούρα άκρα. Μεγάλη ακτίνα θόλωσης Γκάους μερικές φορές δουλεύει, αλλά το ίδιο συχνά παράγει μεγάλη εμφανή άλω ξεχωρίζοντας τα πιο φωτεινά και τα πιο σκοτεινά τμήματα της εικόνας. Για πολλές εικόνες μια καλύτερη λύση είναι η θόλωση της μάσκας χρησιμοποιώντας ένα φίλτρο που κρατά τα άκρα όπως το αμφίπλευρο φίλτρο εξομάλυνσης G’MIC του GIMP:
Προσθήκη αντιστάθμισης έκθεσης με και χωρίς αμφίπλευρη εξομάλυνση της μάσκας.
Σχήμα 9

Χωρίς εφαρμογή αμφίπλευρης εξομάλυνσης στη μάσκα η μικροαντίθεση ισοπεδώνεται.
Μετά την εφαρμογή αμφίπλευρης εξομάλυνσης στη μάσκα, η μικροαντίθεση επαναφέρεται.
Η προσθήκη αντιστάθμισης έκθεσης σε συνδυασμό με μια αντίστροφη μάσκα κλίμακας του γκρι επιπεδώνει τη μικροαντίθεση, η οποία μπορεί να είναι ή να μην είναι επιθυμητή ανάλογα με τις καλλιτεχνικές σας προθέσεις για την εικόνα. Για να αποκαταστήσετε τη μικροαντίθεση, δοκιμάστε να χρησιμοποιήσετε μια θόλωση που σέβεται τις ακμές, όπως το φίλτρο διμερούς εξομάλυνσης της G'MIC. Το GIMP G'MIC δεν λειτουργεί σε μάσκες στρώσεων. Μια λύση είναι να μετατρέψετε τη μη θολωμένη μάσκα σε επιλογή, να αποθηκεύσετε την επιλογή ως κανάλι και, στη συνέχεια, να σύρετε το κανάλι στη στοίβα στρώσεων για θόλωση.
-
Πρέπει να αναφερθεί ρητά ένα ουσιαστικό στοιχείο της διαδικασίας για τη χρήση της λειτουργίας Έκθεσης για την προσθήκη θετικής αντιστάθμισης έκθεσης σε εικόνες με σκούρες σκιές και μεσαίους τόνους: Όχι μόνο η λειτουργία έκθεσης του GIMP μεγάλου βάθους bit είναι απεριόριστη σε ακρίβεια κινητής υποδιαστολής — οι μάσκες στρώσεων είναι επίσης απεριόριστες.
Εάν οι αντεστραμμένες μάσκες γκρίζας κλίμακας περικόπηκαν συνοπτικά (όπως συμβαίνει κατά την επεξεργασία με ακρίβεια ακεραίου), τότε η περιγραφόμενη διαδικασία σε αυτό το μάθημα δεν θα δουλέψει.


