-
A seconda dello scopo artistico delle immagini, alcune di queste possono essere più adatte di altre a beneficiare della mappatura tonale usando la funzione in virgola mobile Esposizione. I risultati possono variare ma tipicamente la procedura descritta su questa pagina lavora meglio per fotografie di scene con una pronunciata differenza tonale tra le alteluci e le ombre, come spesso accade quando si fanno foto “cielo-terra” in giorni assolati.
-
Per aggiungere solo uno stop positivo di compensazione dell'esposizione, la procedura descritta in questa pagina funziona molto bene. A seconda dell'immagine, è possibile sfocare la maschera utilizzando un algoritmo di sfocatura che preserva i bordi e/o modificare la maschera utilizzando i comandi Esposizione, Curve, ecc. Tuttavia, è meglio modificare la maschera solo dopo aver utilizzato l'Auto Ampliamento del contrasto sulla maschera. In caso contrario i risultati saranno imprevedibili: Le regolazioni della gamma producono risultati strani quando si utilizzano valori fuori gamut e Curve taglierà sommariamente i valori fuori gamut.
-
Per aggiungere più di uno stop di compensazione dell'esposizione, si può usare uno o più di uno livelli di compensazione positiva dell'esposizione. In ogni modo la o le maschere di livello devono essere regolate con cura perché ciò dipende fortemente dalle immagini e dall'intento artistico desiderato. Figura 7 mostra un esempio di uso di due livelli di compensazione dell'esposizione per aggiungere due stop e mezzo di compensazione dell'esposizione alle ombre ed ai mezzi toni di un'immagine:
Uso dei livelli illimitati di GIMP in virgola mobile, assieme alle maschere di livello, per aggiungere due stop positivi di compensazione dell'esposizione, alle ombre e ai mezzitoni di una fotografia di un camioncino in un meleto, scattata in pieno sole.
Figura 7
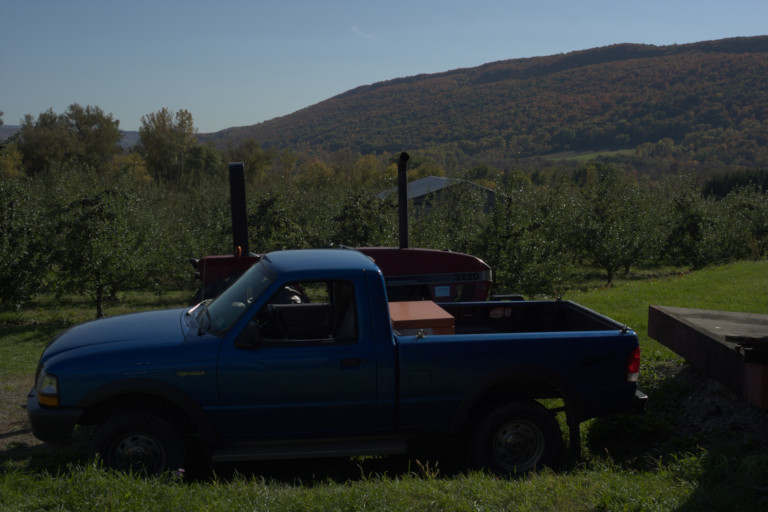
Immagine dalla macchina fotografica, sottoesposta per evitare di bruciare le alteluci.
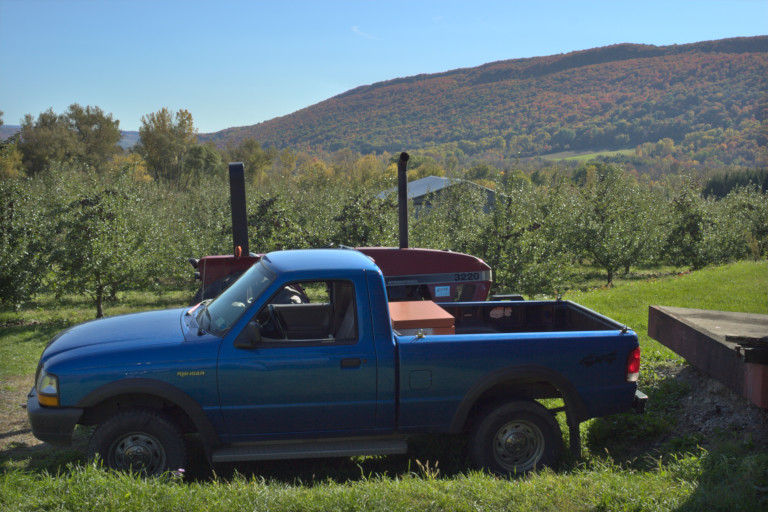
Dopo la mappatura tonale/ripristino delle ombre usando la funzione di GIMP Esposizione ad alta profondità di colore in virgola mobile.
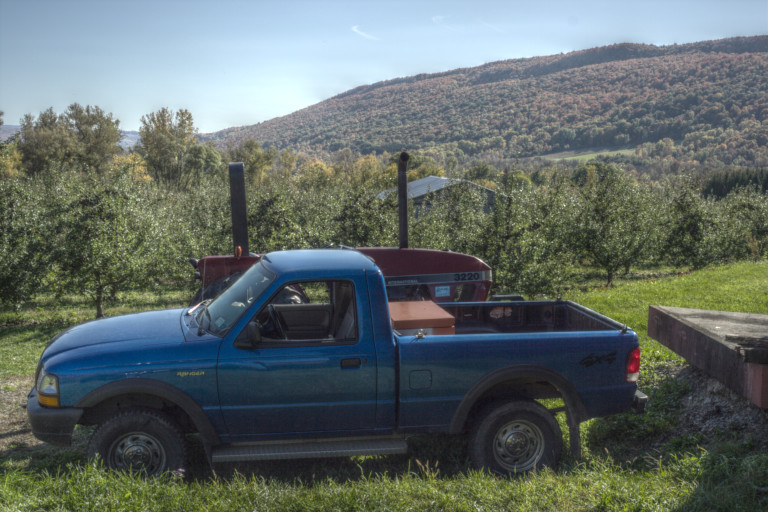
Per confronto, la mappatura tonale Mantuik utilizzando le impostazioni predefinite GEGL.
Uso del comando Esposizione a virgola mobile di GIMP più maschere di livello per aggiungere due stop e mezzo di compensazione positiva dell'esposizione alle ombre e ai mezzitoni di una fotografia in “pieno sole” di un camion in un meleto.
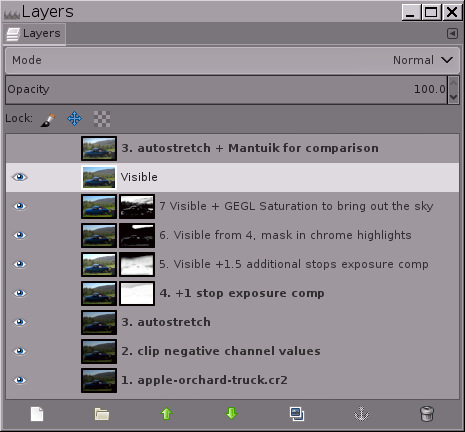
Una schermata della pila di livelli usati per fare la mappatura tonale della fotografia del camion del meleto. La mappatura tonale manuale permette il controllo completo sull'immagine risultante. Mantuik ed altri “automagici” algoritmi di mappatura tonale sono pesanti dal punto di vista computazionale, danno risultati difficili da prevedere, e spesso producono risultati che appaiono innaturali.
-
Prima di usare il comando Esposizione per aggiungere compensazione positiva di esposizione, il livello di base deve essere già stato esteso al suo massimo campo dinamico. Il modo più semplice per far ciò è eseguire → → assicurandosi che l'opzione Mantieni colori sia abilitata.
Se non si è mai usato prima un editor di immagini in virgola mobile illimitato, bisogna considerare che → → potrebbe produrre risultati inaspettati: l'immagine potrebbe risultare fortemente ridotta in dinamica, con ombre chiare o alteluci scure o entrambi:
Prima e dopo aver eseguito → → sul livello di base, più l'immagine finale dopo la mappatura tonale usando → :
Figura 8
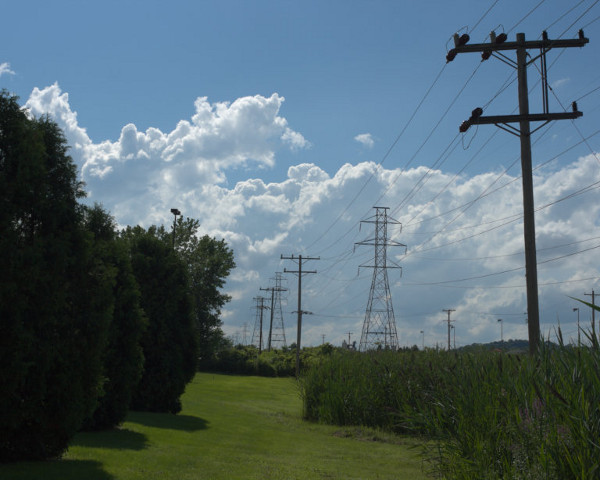
1. Immagine dalla macchina fotografica
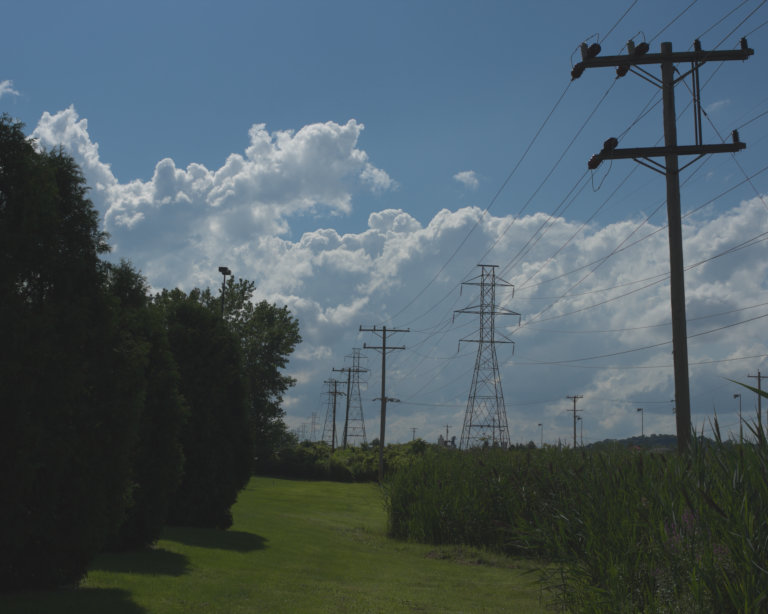
2. Dopo aver eseguito → → .
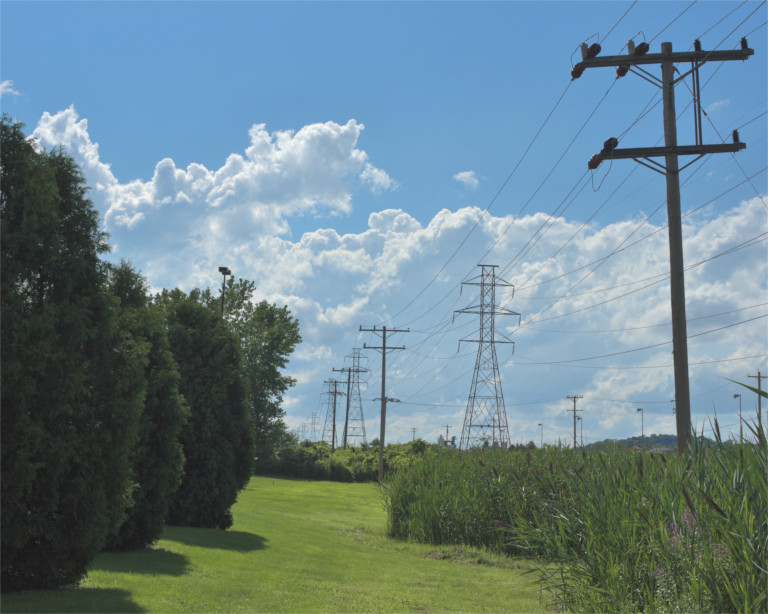
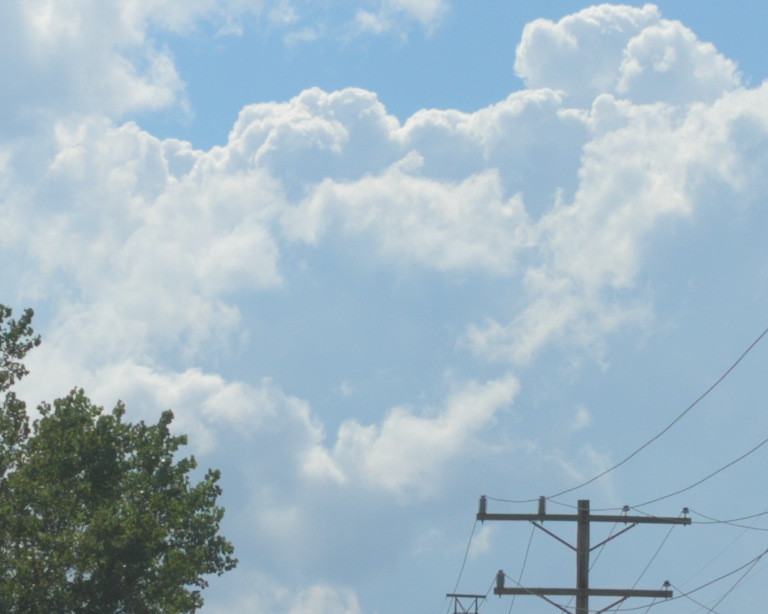
3. L'immagine finale "Linee elettriche".
-
Questo file raw interpolato e riferito alla scena proveniente dal processore di file raw PhotoFlow (che fornisce un plug-in GIMP per semplificare l'apertura dei file raw) ha valori di canale RGB fuori dal campo di visualizzazione che verranno riportati nel campo di visualizzazione effettuando un → → .
-
Dopo aver effettuato → → , le ombre sono schiarite e le alteluci sono inscurite a causa del fatto che il campo di estensione della dinamica è stato compresso per poter entrare nel campo di visualizzazione. Sembrerebbe si stia facendo un passo di modifica nella direzione sbagliata! Invece questo è un passo necessario.
-
Ecco il risultato finale dell'immagine “Linee elettriche” dopo la mappatura tonale della interpolazione riferita alla scena del file raw usando la procedura descritta in questo tutorial.
Presa da file raw, questa immagine di linee elettriche che vanno in lontananza è un risultato tipico; quello che succede solitamente a fare un foto a mezzogiorno in una luminosa giornata di sole: il cielo e le nuvole sono abbastanza belli osservati fuori dalla macchina fotografica, ma il terreno è veramente troppo scuro. L'immagine potrebbe quindi trarre beneficio da una mappatura tonale che alzi ombre e mezzitoni. Il primo passo è eseguire " → → per riportare qualsiasi valore di canale che sia inferiore a 0.0f o maggiore di 1.0f all'interno dell'intervallo di visualizzazione da 0.0 a 1.0 in virgola mobile.
L'esecuzione di → → per portare i valori del canale nuovamente dentro il campo di visualizzazione, non sembra esattamente un passo di editing nella giusta direzione per la mappatura tonale di questa particolare immagine! Ma invece lo è. Usando → per aggiungere una compensazione di esposizione positiva alle ombre e ai mezzitoni, non funzionerà se l'immagine dovesse avere valori di canale ricadenti fuori l'intervallo di visualizzazione.
-
-
Eliminare le informazioni “inutili” di ombreggiatura ed evidenziazione: a volte i file raw interpolati di fotografie di scene ad alta gamma dinamica finiscono con l'avere qua e là pixel di luci ed ombre che non contengono sostanzialmente informazioni utili. La cosa più semplice da fare con tali pixel è usare il comando Esposizione per impostare i punti bianchi e neri desiderati e quindi ritagliar fuori le informazioni di canale fuori gamut.
-
Informazioni di alteluci inutili: per la immagine “Linee elettriche” mostrata sopra in Figura 8, dopo aver applicato → → , lo scarno insieme di 48 pixel occupa quasi metà del campo tonale (vedere l'istogramma sulla destra). Una piccola indagine con lo strumento di GIMP soglia, rivela che tutti e 48 pixel sono i valori di picco delle alteluci dei riflessi degli isolatori ceramici presenti sul palo del traliccio nello sfondo.
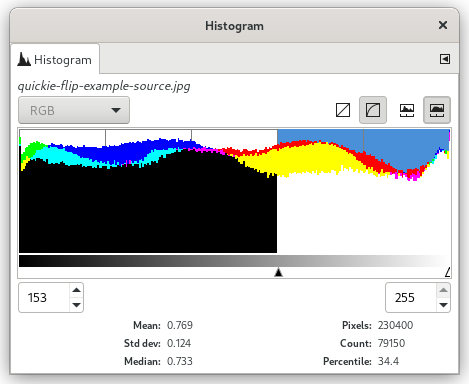
Nei casi in cui quasi la metà dell'istogramma sia occupato da una spruzzata di alteluci dovute a riflessi, il ritaglio dei pixel è spesso la soluzione migliore e più semplice. Per la immagine “Linee di alimentazione”, i 48 pixel in questione portavano essenzialmente zero informazioni. Usare → per alzare il punto di bianco, e poi → per ritagliare effettivamente le informazioni di canale nelle alteluci (questa volta assicurandosi che la casella "Taglia i pixel alti" sia selezionata).
-
Informazioni inutili sulle ombre: alcuni elaboratori di file raw possono emettere immagini con valori di canale negativi. Come per le modifiche precedenti, l'uso dell'alta profondità di colore di GIMP può produrre valori di canale negativi. Anche se effettuando un → → sul livello immagine di base si rende l'immagine molto più chiara nelle ombre, il problema sono i valori di canale RGB negativi. Una soluzione è usare → per riportare i punti neri dove si desidera che siano, e poi tagliare i valori di canale negativi. Ci sono due modi per tagliare i valori negativi dei canali:
-
Usare → , assicurandosi di deselezionare la casella Taglia pixel alti.
-
Oppure creare un livello di nero pieno sopra il livello base dell'immagine, impostare la modalità di fusione a “Solo chiari” e creare un nuovo livello usando “Nuovo dal visibile”.
-
-
-
Sfocatura della maschera per ripristinare il micro contrasto: inserendo una maschera inversa su un livello usato per aggiungere compensazione positiva dell'esposizione necessariamente appiattisce leggermente il micro contrasto. A seconda dell'intento artistico per l'immagine, si potrebbe voler sfocare la maschera per ripristinare il micro contrasto. Il trucco consiste nello sfocare la maschera senza introdurre “aloni” attorno ai bordi degli oggetti nell'immagine. Sfocature gaussiane con piccolo raggio producono piccoli ma ovviamente fastidiosi aloni attorno ai bordi scuri. Una sfocatura gaussiana con grande raggio alle volte funziona ma spesso produce un grande alone che separa le parti luminose da quelle scure dell'immagine. Per molte immagini la soluzione migliore è di sfocare la maschera usando un filtro che preservi i bordi come il filtro bilaterale (bilateral smooth) di GIMP G’MIC:
Aggiunta della compensazione dell'esposizione con e senza il filtro bilaterale (bilateral smooth) della maschera.
Figura 9
Senza l'applicazione della lisciatura bilaterale alla maschera, il micro contrasto viene appiattito.

Dopo l'applicazione della lisciatura bilaterale alla maschera, il micro contrasto viene ripristinato.
Aggiungere la compensazione dell'esposizione combinata con una maschera in scala di grigi inversa appiattisce il micro contrasto, il che può o non può essere desiderabile a seconda del proprio intento artistico per l'immagine. Per ripristinare il micro contrasto, provare ad usare una sfocatura in grado di preservare le transizioni di colore come il filtro di lisciatura bilaterale (bilateral smoothing) di G’MIC. G’MIC di GIMP non lavora sulle maschere dei livelli. Una soluzione alternativa può essere trasformare la maschera non sfocata in una selezione, salvare la selezione come canale, e poi trascinare il canale sulla pila dei livelli per la sfocatura.
-
Una componente essenziale della procedura d'uso per aggiungere compensazione positiva di esposizione ad immagini con ombre e mezzitoni scuri deve essere esplicitamente menzionata: non solo l'operazione ad alta profondità di colore di GIMP Esposizione è illimitata nella precisione a virgola mobile — ma anche le maschere di livello sono illimitate.
Se le maschere invertite in scala di grigi fossero sommariamente tagliate (come nel caso di modifiche in precisione intera), allora la procedura descritta in questo tutorial non avrebbe funzionato.


