- Alpha
-
An Alpha value indicates the transparency of a pixel. Besides its Red, Green and Blue values, a pixel has an alpha value. The smaller the alpha value of a pixel, the more visible the colors below it. A pixel with an alpha value of 0 is completely transparent. A pixel with an alpha value of 255 is fully opaque.
With some image file formats, you can only specify that a pixel is completely transparent or completely opaque. Other file formats allow a variable level of transparency.
- Alpha Channel
-
An alpha channel of a layer is a grayscale image of the same size as the layer representing its transparency. For each pixel the gray level (a value between 0 and 255) represents the pixels's Alpha value. An alpha channel can make areas of the layer to appear partially transparent. That's why the background layer has no alpha channel by default.
The image alpha channel, which is displayed in the Channels dialog, can be considered as the alpha channel of the final layer when all layers have been merged.
See also Example for Alpha channel.
- Anti-aliasing
-
Anti-aliasing is the process of reversing an alias, that is, reducing the jaggies. Anti-aliasing produces smoother curves by adjusting the boundary between the background and the pixel region that is being anti-aliased. Generally, pixel intensities or opacities are changed so that a smoother transition to the background is achieved. With selections, the opacity of the edge of the selection is appropriately reduced.


- Bézier curve
-
A spline is a curve which is defined mathematically and has a set of control points. A Bézier spline is a cubic spline which has four control points, where the first and last control points (knots or anchors) are the endpoints of the curve and the inner two control points (handles) determine the direction of the curve at the endpoints.
In the non-mathematical sense, a spline is a flexible strip of wood or metal used for drawing curves. Using this type of spline for drawing curves dates back to shipbuilding, where weights were hung on splines to bend them. The outer control points of a Bézier spline are similar to the places where the splines are fastened down and the inner control points are where weights are attached to modify the curve.
Bézier splines are only one way of mathematically representing curves. They were developed in the 1960s by Pierre Bézier, who worked for Renault.
Bézier curves are used in GIMP as component parts of Paths.
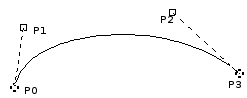
The image above shows a Bézier curve. Points P0 and P3 are points on the Path, which are created by clicking with the mouse. Points P1 and P2 are handles, which are automatically created by GIMP when you stretch the line.
- Bitmap
-
From The Free Online Dictionary of Computing (13 Mar 01) :
bitmap — A data file or structure which corresponds bit for bit with an image displayed on a screen, probably in the same format as it would be stored in the display's video memory or maybe as a device independent bitmap. A bitmap is characterized by the width and height of the image in pixels and the number of bits per pixel which determines the number of shades of gray or colors it can represent. A bitmap representing a colored image (a “pixmap”) will usually have pixels with between one and eight bits for each of the red, green, and blue components, though other color encodings are also used. The green component sometimes has more bits than the other two to cater for the human eye's greater discrimination in this component.
- BMP
-
BMP is an uncompressed image file format designed by Microsoft and mainly used in Windows. Colors are typically represented in 1, 4 or 8 bits, although the format also supports more. Because it is not compressed and the files are large, it is not very well suited for use in the internet.
- Bump mapping
-
Bump mapping is a technique for displaying extremely detailed objects without increasing the geometrical complexity of the objects. It is especially used in 3-dimensional visualization programs. The trick is to put all the necessary information into a texture, with which shadowing is shown on the surface of the object.
Bump mapping is only one (very effective) way of simulating surface irregularities which are not actually contained in the geometry of the model.
- Channel
-
A channel refers to a certain component of an image. For instance, the components of an RGB image are the three primary colors red, green, blue, and sometimes transparency (alpha).
Every channel is a grayscale image of exactly the same size as the image and, consequently, consists of the same number of pixels. Every pixel of this grayscale image can be regarded as a container which can be filled with a value ranging from 0 to 255. The exact meaning of this value depends on the type of channel, e.g. in the RGB color model the value in the R-channel means the amount of red which is added to the color of the different pixels; in the selection channel, the value denotes how strongly the pixels are selected; and in the alpha channel the values denote how opaque the corresponding pixels are. See also Kanali.
- Channel encoding
-
Channel encoding refers to how fast the intensity (more technically correct for grayscale and RGB images, the relative Luminance) of a channel in a digital image progresses from dark to light as the channel values progress from 0.0 to 1.0 floating point (0 to 255 for 8-bit integer, 0 to 65535 for 16-bit integer).
Other ways of referring to "channel encoding" include "companding curve", "gamma" (which is technically not correct unless the channel encoding is an actual gamma curve), "tone reproduction curve" ("TRC" for short), and "tone response curve" (also "TRC" for short).
The linear light channel encoding reflects the way lightwaves combine there in the real world. The linear light channel encoding is also referred to as "gamma=1.0", "linear gamma" or simply "linear".
Perceptually uniform channel encodings reflects the way our eyes respond to changes in luminance.
In ICC profile color managed workflows, the following channel encodings are commonly used:
-
The LAB companding curve, which is exactly perceptually uniform.
-
The linear light channel encoding, which of course is exactly linear.
-
The sRGB channel encoding and the "gamma=2.2" channel encoding, which are both approximately perceptually uniform and approximately equal to each other.
-
The "gamma=1.8" channel encoding, which is neither linear nor approximately perceptually uniform, though it's closer to being perceptually uniform than it is to being linear.
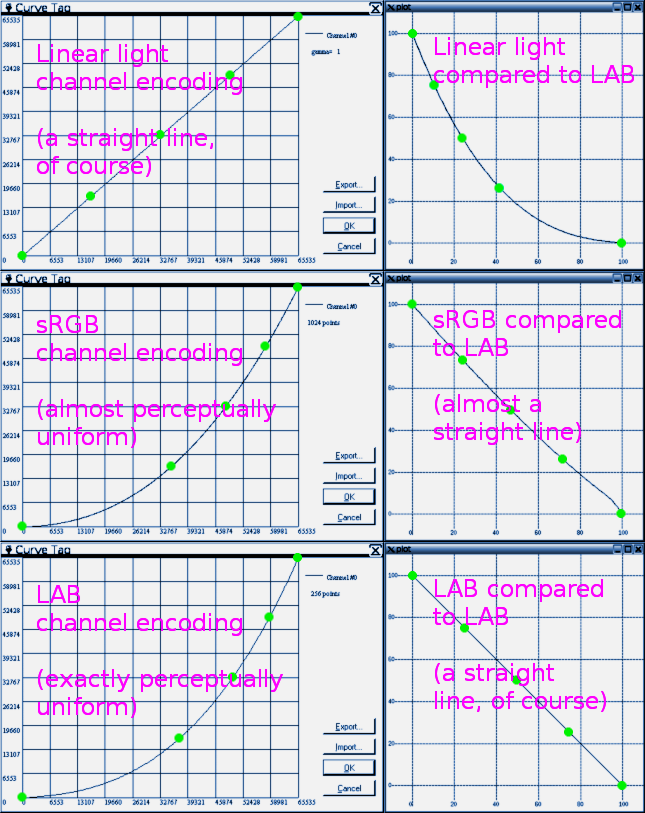
The Linear light, sRGB, and LAB channel encodings compared.
Looking at the above image:
-
The Linear light channel encoding (top row) represents how lightwaves combine out there in the real world.
-
The sRGB channel (non-linear) encoding (middle row) is almost perceptually uniform.
-
The LAB channel encoding (bottom row) is exactly perceptually uniform, which means it represents how our eyes respond to changes in luminance.
Two different channel encodings are used internally in GIMP for various editing operations, these being "Linear light" and "Non-linear" (previously known as Perceptual gamma (sRGB)).
The companding-curves-compared.png shown above is a slightly modified version of an image from Completely Painless Programmer's Guide to XYZ, RGB, ICC, xyY, and TRCs , which is licensed as Creative Commons Attribution-ShareAlike 3.0 Unported License.
-
- Channel Mask
-
A channel mask is a special type of mask which determines the transparency of a selection. See Masks for a detailed description.
- Clipboard
-
The Clipboard is a temporary area of memory which is used to transfer data between applications or documents. It is used when you Cut, Copy or Paste data in GIMP.
The clipboard is implemented slightly differently under different operating systems. Under Linux/XFree, GIMP uses the XFree clipboard for text and the GIMP internal image clipboard for transferring images between image documents. Under other operating systems, the clipboard may work somewhat differently. See the GIMP documentation for your operating system for further information.
The basic operations provided by the clipboard are “Cut”, “Copy”, and “Paste”. Cut means that the item is removed from the document and copied to the clipboard. Copy leaves the item in the document and copies it to the clipboard. Paste copies the contents of the clipboard to the document. GIMP makes an intelligent decision about what to paste depending upon the target. If the target is a canvas, the Paste operation uses the image clipboard. If the target is a text entry box, the paste operation uses the text clipboard.
- CMY, CMYK
-
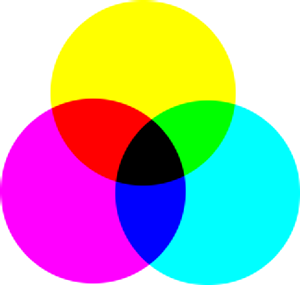
CMYK is a color model which has components for Cyan, Magenta, Yellow and Black. It is a subtractive color model, and that fact is important when an image is printed. It is complementary to the RGB color model.
The values of the individual colors vary between 0% and 100%, where 0% corresponds to an unprinted color, and 100% corresponds to a completely printed area of color. Colors are formed by mixing the three basic colors.
The last of these values, K (Black), doesn't contribute to the color, but merely serves to darken the other colors. The letter K is used for Black to prevent confusion, since B usually stands for Blue.
GIMP does not currently support the CMYK model. (An experimental plug-in providing rudimentary CMYK support can be found [PLUGIN-SEPARATE].)
This is the mode used in printing. These are the colors in the ink cartridges in your printer. It is the mode used in painting and in all the objects around us, where light is reflected, not emitted. Objects absorb part of the light waves and we see only the reflected part. Note that the cones in our eyes see this reflected light in RGB mode. An object appears Red because Green and Blue have been absorbed. Since the combination of Green and Blue is Cyan, Cyan is absorbed when you add Red. Conversely, if you add Cyan, its complementary color, Red, is absorbed. This system is subtractive. If you add Yellow, you decrease Blue, and if you add Magenta, you decrease Green.
It would be logical to think that by mixing Cyan, Magenta and Yellow, you would subtract Red, Green and Blue, and the eye would see no light at all, that is, Black. But the question is more complex. In fact, you would see a dark brown. That is why this mode also has a Black value, and why your printer has a Black cartridge. It is less expensive that way. The printer doesn't have to mix the other three colors to create an imperfect Black, it just has to add Black.
- Color
-
On the one hand, light comes from the sun or other radiant sources, and is refracted by mediums (water, the atmosphere, glass) and diffusely or specularly reflected by surfaces.
On the other hand, color isn't out there in the world in the same tangible way that light is. Rather color is part of how we sense the world around us. Light enters the eyes, is processed by light receptors (cones and rods), and sent via the optic nerves to the brain for further processing and interpretation.
Light varies in wavelengths, which our eyes and brain interpret as varying hues (reds, blues, greens, and so on), and also in intensity (aka "luminance"). So our perception of color is composed of both intensity ("luminance") information and chromaticity information.
The naming of colors carries one out of the narrow realm of color perception, and into the larger realm of cultural and linguistic interpretation and classification of color, and thence into even larger philosophical, aesthetic, theological, and metaphysical considerations.
The above explanation of Color is a slightly modified excerpt from the Completely Painless Programmer's Guide to XYZ, RGB, ICC, xyY, and TRCs , which is licensed as Creative Commons Attribution-ShareAlike 3.0 Unported License.
- Color depth
-
Color depth is simply the number of bits used to represent a color (bits per pixel : bpp). There are 3 channels for a pixel (for Red, Green and Blue). GIMP can support 8 bits per channel, referred as eight-bit color. So, GIMP color depth is 8 * 3 = 24, which allows 256 * 256 * 256 = 16,777,216 possible colors (8 bits allow 256 colors).
- Color model
-
A color model is a way of describing and specifying a color. The term is often used loosely to refer to both a color space system and the color space on which it is based.
A color space is a set of colors which can be displayed or recognized by an input or output device (such as a scanner, monitor, printer, etc.). The colors of a color space are specified as values in a color space system, which is a coordinate system in which the individual colors are described by coordinate values on various axes. Because of the structure of the human eye, there are three axes in color spaces which are intended for human observers. The practical application of that is that colors are specified with three components (with a few exceptions). There are about 30 to 40 color space systems in use. Some important examples are:
- Display-referred
-
The phrase "display-referred" refers to images that can be displayed (either directly or by means of ICC profile color management) on devices. The displaying device might be a monitor, or an image printed on paper, or some other display technology.
Regardless of the technology, when you display an image on a device, that device has a maximum and minimum brightness. The maximum and minimum brightnesses are referred to as display-referred white and display-referred black.
The above explanation is a slightly modified excerpt from Models for image editing: Display-referred and scene-referred. The modified excerpt was written and quoted by permission of the author, who has licensed the modified excerpt under the Creative Commons Attribution-ShareAlike 3.0 Unported License.
- Display-referred black
-
"Display-referred black" (or for simplicity, "black") means the floating point RGB color (0.0, 0.0, 0.0) and its integer equivalents. This color has the very special significance that there's no such thing as "less bright than black". So in display-referred image editing, all RGB channel values are greater than or equal to 0.0 and no color is less bright than "black", (0.0, 0.0, 0.0).
The above explanation is a slightly modified excerpt from Models for image editing: Display-referred and scene-referred. The modified excerpt was written and quoted by permission of the author, who has licensed the modified excerpt under the Creative Commons Attribution-ShareAlike 3.0 Unported License.
- Display-referred white
-
"Display-referred white" (or for simplicity, "white") means the floating point RGB color (1.0, 1.0, 1.0) and the integer equivalents (255,255,255),(65535,65535,65535), etc, for 8-bit integer, 16-bit integer, etc.
"Display-referred white" has the very special significance that in display-referred editing there's no such thing as "brighter than white". So in display-referred image editing, all RGB channel values are less than or equal to 1.0 and no color is brighter than "white", (1.0, 1.0, 1.0).
The above explanation is a slightly modified excerpt from Models for image editing: Display-referred and scene-referred. The modified excerpt was written and quoted by permission of the author, who has licensed the modified excerpt under the Creative Commons Attribution-ShareAlike 3.0 Unported License.
- Dithering
-
Dithering is a technique used in computer graphics to create the illusion of more colors when displaying an image which has a low color depth. In a dithered image, the missing colors are reproduced by a certain arrangement of pixels in the available colors. The human eye perceives this as a mixture of the individual colors.
The Gradient tool uses dithering. You may also choose to use dithering when you convert an image to Indexed format. If you are working on an image with indexed colors, some tools (such as the pattern fill tool) may also use dithering, if the correct color is not available in the colormap.
The Newsprint filter uses dithering as well. You can use the NL Filter (Non Linear filter) to remove unwanted dithering noise from your image.
Also note that although GIMP itself uses 24-bit colors, your system may not actually be able to display that many colors. If it doesn't, then the software in between GIMP and your system may also dither colors while displaying them.
See also the glossary entry on Floyd-Steinberg dithering, which is used in GIMP.
- EXIF
-
Exchangeable image file format (official abbreviation Exif, not EXIF) is a specification for the image file format used by digital cameras. It was created by the Japan Electronic Industry Development Association (JEIDA). The specification uses the existing JPEG, TIFF Rev. 6.0, and RIFF WAVE file formats, with the addition of specific metadata tags.
The latest version of the specification was released in May 2023. The Exif tag structure is taken from that of TIFF files. There is a large overlap between the tags defined in the TIFF, Exif, TIFF/EP and DCF standards [WKPD-EXIF].
- Feathering
-
The process of Feathering makes a smooth transition between a region and the background by softly blending the edges of the region.
In GIMP, you can feather the edges of a selection. Brushes can also have feathered edges.
- File Format
-
A file format or file type is the form in which computer data is stored. Since a file is stored by an operating system as a linear series of bytes, which cannot describe many kinds of real data in an obvious way, conventions have been developed for interpreting the information as representations of complex data. All of the conventions for a particular “kind” of file constitute a file format.
Some typical file formats for saving images are JPEG, TIFF, PNG and GIF. The best file format for saving an image depends upon how the image is intended to be used. For example, if the image is intended for the internet, file size is a very important factor, and if the image is intended to be printed, high resolution and quality have greater significance. See Format types.
- Floating Selection
-
A floating selection (sometimes called a “floating layer”) is a type of temporary layer which is similar in function to a normal layer, except that a floating selection must be anchored before you can resume working on any other layers in the image.
Floating selections are described in Odjeljak 4.5, “Float”.
In early versions of GIMP, floating selections were used for performing operations on a limited part of an image. You can do that more easily now with layers, but you can still use this way of working with images.
- Floyd-Steinberg Dithering
-
Floyd-Steinberg dithering is a method of dithering which was first published in 1976 by Robert W. Floyd and Louis Steinberg. The dithering process begins in the upper left corner of the image. For each pixel, the closest available color in the palette is chosen and the difference between that color and the original color is computed in each RGB channel. Then specific fractions of these differences are dispersed among several adjacent pixels which haven't yet been visited (below and to the right of the original pixel). Because of the order of processing, the procedure can be done in a single pass over the image.
When you convert an image to Indexed mode, you can choose between two variants of Floyd-Steinberg dithering.
- Gamma
-
Gamma or gamma correction is a non-linear operation which is used to encode and decode luminance or color values in video or still image systems. It is used in many types of imaging systems to straighten out a curved signal-to-light or intensity-to-signal response. For example, the light emitted by a CRT is not linear with regard to its input voltage, and the voltage from an electric camera is not linear with regard to the intensity (power) of the light in the scene. Gamma encoding helps to map the data into a perceptually linear domain, so that the limited signal range (the limited number of bits in each RGB signal) is better optimized perceptually.
Gamma is used as an exponent (power) in the correction equation. Gamma compression (where gamma < 1) is used to encode linear luminance or RGB values into color signals or digital file values, and gamma expansion (where gamma > 1) is the decoding process, and usually occurs where the current-to-voltage function for a CRT is non-linear.
For PC video, images are encoded with a gamma of about 0.45 and decoded with a gamma of 2.2. For Mac systems, images are typically encoded with a gamma of about 0.55 and decoded with a gamma of 1.8. The sRGB color space standard used for most cameras, PCs and printers does not use a simple exponential equation, but has a decoding gamma value near 2.2 over much of its range.
In GIMP, gamma is an option used in the brush tab of the GIMPressionist filter and in the Flame filter. The display filters also include a Gamma filter. Also see the Levels Tool, where you can use the middle slider to change the gamma value.
- Gamut
-
In color reproduction, including computer graphics and photography, the gamut, or color gamut (pronounced /ˈgæmət/), is a certain complete subset of colors. The most common usage refers to the subset of colors which can be accurately represented in a given circumstance, such as within a given color space or by a certain output device. Another sense, less frequently used but not less correct, refers to the complete set of colors found within an image at a given time. In this context, digitizing a photograph, converting a digitized image to a different color space, or outputting it to a given medium using a certain output device generally alters its gamut, in the sense that some of the colors in the original are lost in the process. [WKPD-GAMUT]
- GIF
-
GIF™ stands for Graphics Interchange Format. It is a file format with good, lossless compression for images with low color depth (up to 256 different colors per image). Since GIF was developed, a new format called Portable Network Graphics (PNG) has been developed, which is better than GIF in all respects, with the exception of animations and some rarely-used features.
GIF was introduced by CompuServe in 1987. It became popular mostly because of its efficient, LZW compression. The size of the image files required clearly less disk space than other usual graphics formats of the time, such as PCX or MacPaint. Even large images could be transmitted in a reasonable time, even with slow modems. In addition, the open licensing policy of CompuServe made it possible for any programmer to implement the GIF format for his own applications free of charge, as long as the CompuServe copyright notice was attached to them.
Colors in GIF are stored in a color table which can hold up to 256 different entries, chosen from 16.7 million different color values. When the image format was introduced, this was not a much of a limitation, since only a few people had hardware which could display more colors than that. For typical drawings, cartoons, black-and-white photographs and similar uses, 256 colors are quite sufficient as a rule, even today. For more complex images, such as color photographs, however, a huge loss of quality is apparent, which is why the format is not considered to be suitable for those purposes.
One color entry in the palette can be defined to be transparent. With transparency, the GIF image can look like it is non-rectangular in shape. However, semi-transparency, as in PNG, is not possible. A pixel can only be either entirely visible or completely transparent.
The first version of GIF was 87a. In 1989, CompuServe published an expanded version, called 89a. Among other things, this made it possible to save several images in one GIF file, which is especially used for simple animation. The version number can be distinguished from the first six bytes of a GIF file. Interpreted as ASCII symbols, they are “GIF87a” or “GIF89a”.
- GNU
-
The GNU project was started in 1983 by Richard Stallman with the goal of developing a completely free operating system. It is especially well-known from the GNU General Public License (GPL) and GNU/Linux, a GNU-variant with a Linux kernel.
The name came about from the naming conventions which were in practice at MIT, where Stallman worked at the time. For programs which were similar to other programs, recursive acronyms were chosen as names. Since the new system was to be based on the widespread operating system, Unix, Stallman looked for that kind of name and came up with GNU, which stands for “GNU is not Unix”. In order to avoid confusion, the name should be pronounced with the “G”, not like “new”. There were several reasons for making GNU Unix-compatible. For one thing, Stallman was convinced that most companies would refuse a completely new operating system, if the programs they used wouldn't run on it. In addition, the architecture of Unix made quick, easy and distributed development possible, since Unix consists of many small programs that can be developed independently of each other, for the most part. Also, many parts of a Unix system were freely available to anyone and could therefore be directly integrated into GNU, for example, the typesetting system, TeX, or the X Window System. The missing parts were newly written from the ground up.
GIMP (GNU Image Manipulation Program) is an official GNU application [WKPD-GNU].
- Grayscale
-
Grayscale is a mode for encoding the colors of an image which contains only black, white and shades of gray.
When you create a new image, you can choose to create it in Grayscale mode (which you can colorize later, by changing it to RGB mode). You can also change an existing image to grayscale by using the Grayscale, Desaturate, Decompose, Channel Mixer, although not all formats will accept these changes. Although you can create images in Grayscale mode and convert images to it, it is not a color model, in the true sense of the word.
As explained in RGB mode, 24-bit GIMP images can have up to 256 levels of gray. If you change from Grayscale to RGB mode, your image will have an RGB structure with three color channels, but of course, it will still be gray.
Grayscale image files (8-bit) are smaller than RGB files.
- Guides
-
Guides are lines you can temporarily display on an image while you are working on it. You can display as many guides as you would like, in either the horizontal or the vertical direction. These lines help you position a selection or a layer on the image. They do not appear when the image is printed.
For more information see Odjeljak 1.2, “Guides”.
- High Dynamic Range
-
With display-referred data you have roughly two and half stops of head room above middle gray and maybe six and a half usable stops below middle gray, at which point the data is too densely packed into too few tonal steps to accurately display differences between solid black and "just barely gray". So at best you have 9 stops of dynamic range, compared to the 20 or more stops of dynamic range you might find in some (certainly not all!) real world scenes.
The usual solution to the dynamic range limitations of display-referred data is to allow channel values to be however high as is needed to encode the scene data. This means allowing channel values that are above display-referred white.
Several file formats supported by GIMP can be used to import and export high dynamic range images, including floating point tiffs, OpenEXR, and FITS.
When working with high dynamic range data, the channel encoding does need to be linear to avoid gamma artifacts.
Editing high dynamic range data requires that there isn't any clamping code in editing operations and blend modes. At floating point precision:
-
Many (but not all) GIMP blend modes are unclamped, including Normal, Addition, Subtract, Multiply, Lighten Only, Darken Only, Difference, and the LCH and Luminance blend modes. Blend modes such as Screen, Soft Light, and Overlay are not unclamped as these operations are designed to work with display-referred data.
-
Many (too many to list but certainly not all, as some editing operations are designed to work with display-referred data) GIMP editing operations also are unclamped, including Levels, Exposure, transforms such as scaling and rotating, and various filter operations such as Gaussian blur.
Portions of the above explanation of "high dynamic range" are slightly modified excerpts from the Models for image editing: Display-referred and scene-referred. These excerpts are quoted by permission and the modified excerpts are licensed as Creative Commons Attribution-ShareAlike 3.0 Unported License.
-
- Histogram
-
In digital image processing, a histogram is a graph representing the statistical frequency of the gray values or the color values in an image. The histogram of an image tells you about the occurrence of gray values or color values, as well as the contrast range and the brightness of the image. In a color image, you can create one histogram with information about all possible colors, or three histograms for the individual color channels. The latter makes the most sense, since most procedures are based on grayscale images and therefore further processing is immediately possible.
- HSV
-
HSV is a color model which has components for Hue (the color, such as blue or red), Saturation (how strong the color is) and Value (the brightness).
The RGB mode is very well suited to computer screens, but it doesn't let us describe what we see in everyday life; a light green, a pale pink, a dazzling red, etc. The HSV model takes these characteristics into account. HSV and RGB are not completely independent of each other. You can see that with the Color Picker tool; when you change a color in one of the color models, the other one also changes. Brave souls can read Grokking the GIMP, which explains their interrelationship.
Brief description of the HSV components:
- Hue
-
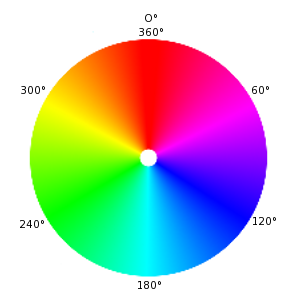
This is the color itself, which results from the combination of primary colors. All shades (except for the gray levels) are represented in a chromatic circle: yellow, blue, and also purple, orange, etc. The chromatic circle (or “color wheel”) values range between 0° and 360°. (The term “color” is often used instead of “Hue”. The RGB colors are “primary colors”.)
- Saturation
-
This value describes how pale the color is. A completely unsaturated color is a shade of gray. As the saturation increases, the color becomes a pastel shade. A completely saturated color is pure. Saturation values go from 0 to 100, from white to the purest color.
- Value
-
This value describes the luminosity, the luminous intensity. It is the amount of light emitted by a color. You can see a change of luminosity when a colored object is moved from being in the shadow to being in the sun, or when you increase the luminosity of your screen. Values go from 0 to 100. Pixel values in the three channels are also luminosities: “Value” in the HSV color model is the maximum of these elementary values in the RGB space (scaled to 0-100).
- HTML notation
-
A hex triplet is a way of encoding a color for a computer. The “#” symbol indicates that the numbers which follow it are encoded in hexadecimal. Each color is specified in two hexadecimal digits which make up a triplet (three pairs) of hexadecimal values in the form “#rrggbb”, where “rr” represents red, “gg” represents green and “bb” represents blue.
- Image Hose
-
An image hose in GIMP is a special type of brush which consists of several images. For example, you could have a brush with footprints, which consists of two images, one for the left footprint and one for the right. While painting with this brush, a left footprint would appear first, then a right footprint, then a left one, etc. This type of brush is very powerful.
An image hose is also sometimes called an “image pipe” or “animated brush”. An image hose is indicated in the Brushes dialog by a small red triangle in the lower right corner of the brush's symbol.
For information concerning creating an image hose, please see the Odjeljak 5.2, “Creating animated brushes” and Odjeljak 5.1, “Adding New Brushes”.
- Incremental, paint mode
-
Incremental mode is a paint mode where each brush stroke is drawn directly on the active layer. When it is set, each additional stroke of the brush increases the effect of the brush, up to the maximum opacity for the brush.
If incremental mode is not set, brush strokes are drawn on a canvas buffer, which is then combined with the active layer. The maximum effect of a brush is then determined by the opacity, and stroking with the brush repeatedly does not increase the effect beyond this limit.


The two images above were created using a brush with spacing set to 60 percent. The image on the left shows non-incremental painting and the image on the right shows the difference with incremental painting.
Incremental mode is a tool option that is shared by several brush tools, except those which have a “rate” control, which automatically implies an incremental effect. You can set it by checking the Incremental checkbox in the tool option dialog for the tool (Paintbrush, Pencil and Eraser).
- Indexed Colors
-
Indexed color mode is a mode for encoding colors in an image where each pixel in the image is assigned an 8-bit color number. The color which corresponds to this number is then put in a table (the palette). Changing a color in the palette changes all the pixels which refer to this palette color. Although you can create images in Indexed Color mode and can transform images to it, it is, strictly speaking, not a color model.
See also the Indexed Palette section and the Convert Image to Indexed Colors command.
- Interpolation
-
Interpolation means calculating intermediate values. When you enlarge (“digitally zoom”) or otherwise transform (rotate, shear or give perspective to) a digital image, interpolation procedures are used to compute the colors of the pixels in the transformed image. GIMP offers three interpolation methods, which differ in quality and speed. In general, the better the quality, the more time the interpolation takes (see Interpolation methods).
GIMP uses interpolation when you Scale an image, Scale a layer, and when you Transform an image.
- IPTC
-
IPTC is an acronym for International Press Telecommunications Council which developed the Information Interchange Model (IIM) for text, image and other media types metadata. Refer to [IPTC].
- JPEG
-
JPEG is a file format which supports compression and works at all color depths. The image compression is adjustable, but beware: Too high a compression could severely reduce image quality, since JPEG compression is lossy.
Use JPEG to create web graphics or if you don't want your image to take up a lot of space. JPEG is a good format for photographs and for computer-generated images (CGI). It is not well suited for:
-
digital line drawings (for example, screenshots or vector graphics), in which there are many neighboring pixels with the same color values, few colors and hard edges,
-
Black and white images (only black and white, one bit per pixel) or
-
half-toned images (newsprint).
Other formats, such as GIF, PNG or JBIG, are far better for these kinds of images.
In general, JPEG transformations are not reversible. Opening and then saving a JPEG file causes a new, lossy compression. Increasing the quality factor later will not bring back the image information which was lost.
-
- L*a*b*
-
The Lab color space (also called the L*a*b* color space) is a color model developed in the beginning of the 1930s by the Commission Internationale d`Eclairage (CIE). It includes all the colors that the human eye can perceive. That contains the colors of the RGB and the CMYK color spaces, among others. In Lab, a color is indicated by three values: L, a and b. Here, the L stands for the luminance component — corresponding to the gray value — and a and b represent the red-green and blue-yellow parts of the color, respectively.
In contrast to RGB or CMYK, Lab is not dependent upon the various input and output devices. For that reason, it is used as an exchange format between devices. Lab is also the internal color model of PostScript Level II.
- Layer
-
You can think of layers as being a stack of slides which are more or less transparent. Each layer represents an aspect of the image and the image is the sum of all of these aspects. The layer at the bottom of the stack is the background layer. The layers above it are the components of the foreground.
You can view and manage the layers of the image through the Layers Dialog.
- Marching Ants
-
Marching ants is a term which describes the dotted line which surrounds a selection. The line is animated, so it looks as if little ants are running around behind each other.
- Masks
-
A mask is like a veil put over a layer (layer mask) or all the layers of an image (selection mask). You can remove this mask by painting with white color, and you can complete it by painting with black color. When the mask is “applied”, non masked pixels will remain visible (the others will be transparent) or will be selected, according to the type of mask.
There are two types of masks:
-
Layer Mask: Every layer can have its own mask. The layer mask represents the Alpha channel of the layer and allows you to manage its transparency. By painting on the layer mask, you can make parts of the layer opaque or transparent: painting with black makes the layer transparent, painting with white makes the layer opaque and painting with shades of gray makes the layer semi-transparent. You can use all paint tools to paint on the mask. You can also apply a filter or copy-paste. You can use the Layer mask for transition effects, volume effects, merging elements from another image, etc. See the Layer Mask section for more details.
-
Channel Mask, also called Selection Mask: Channel Masks determine the transparency of a selection. By painting on a Channel Mask with white, you remove the mask and increase the selection; with black, you reduce the selection. This procedure lets you create a selection very precisely. You can also save your selections to a Channel Mask with the Save to Channel command. You can retrieve it later by using the “Channel to selection” command from the Channel menu. Channel masks are so important in GIMP that a special type has been implemented: the Quick mask. See the Selection mask section for more details.
-
- Moiré Effect
-
The moiré effect (pronounce “Moa-ray”) is an unintended pattern which appears when a regular pattern of grids or lines interferes with another regular pattern placed over it. This can happen, for example, when you are scanning an image with a periodic structure (such as a checkered shirt or a half-toned image), scanning a digital image, taking a digital photograph of a periodic pattern, or even when silkscreening.
If you discover the problem in time, the best solution is to move the original image a little bit in the scanner or to change the camera angle slightly.
If you cannot re-create the image file, GIMP offers some filters which may help you with the problem. For more information, see the Despeckle and NL Filter (Non-Linear) filters.
- Parasite
-
A Parasite is additional data which may be written to an XCF file. A parasite is identified by a name, and can be thought of as an extension to the other information in an XCF file.
Parasites of an image component may be read by GIMP plug-ins. Plug-ins may also define their own parasite names, which are ignored by other plug-ins. Examples of parasites are comments, the save options for the TIFF, JPEG and PNG file formats, the gamma value the image was created with and EXIF data.
- Pass through
-
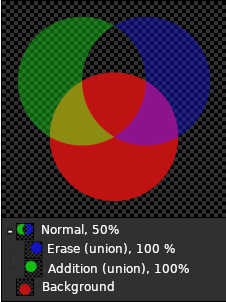
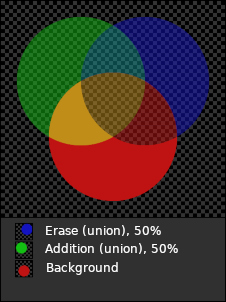
Normally, the layers inside a layer group are isolated from the rest of the image -- the layer group is essentially a separate sub-image, living inside the bigger image; you can merge the group into a single layer, replace the original group with it, and the result would be the same.
In following examples, the names of the relevant layers in the images specify the layer mode, with the composite mode in parentheses where applicable, and the layer's opacity.
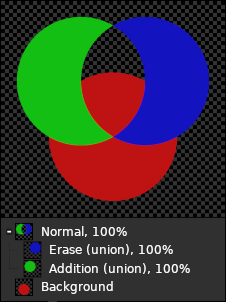
In this example, the group uses Normal mode; note that the green and blue layers don't affect the red layer: the green layer's color isn't added to the red layer's color, and the blue layer only erases the green layer.
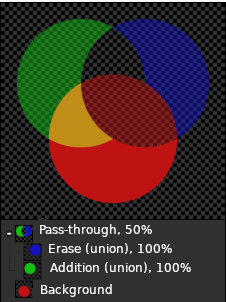
Layer groups using Pass through mode are different: the layers inside them “see” the layers below the group, and interact with them according to their layer mode.
In this example, the group uses Pass through mode. Note that the green layer's color is added to the red layer's color, and the blue layer erases both the green and the red layers.
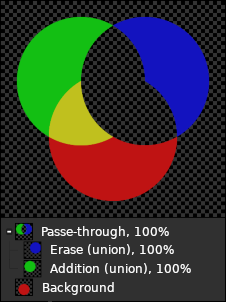
In simple cases, pass-through groups behave as though there is no group involved at all.
The green and blue layers are not inside a group, and the result is the same as in the preceding example.
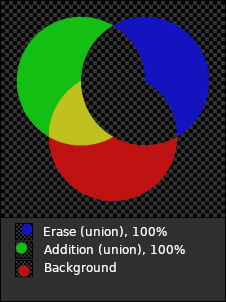
In these cases, the group is primarily an organizational tool: it allows you to group together several layers, achieving some desired effect, and handle them as a unit.
However, in general, pass-through groups are not equivalent to having no group at all. For example, when the group's opacity is less than 100%, pass-through groups still behave as a single unit, applying the opacity to the group as a whole (like a normal group would) rather than to the individual layers, while still letting the group layers interact with the background layers.
Compare these three images, which demonstrate the same compositions as above, with the group (or the individual layers, in the last example) having an opacity of 50%. When using pass-through groups to group together several layers achieving a collective effect, the group's opacity essentially lets you control the “strength” of the effect, which can't be achieved using either normal groups, or individual layers.
- Path
-
A Path is a contour composed of straight lines, curves, or both. In GIMP, it is used to form the boundary of a selection, or to be stroked to create visible marks on an image. Unless a path is stroked, it is not visible when the image is printed and it is not saved when the image is written to a file (unless you use XCF format).
See the Paths Concepts and Using Paths sections for basic information on paths, and the Path Tool section for information on how to create and edit paths. You can manage the paths in your image with the Paths Dialog.
- PDB
-
All of the functions which GIMP and its plug-ins make available are registered in the Procedure Database (PDB). Developers can look up useful programming information about these functions in the PDB by using the Procedure Browser.
-
PDF (Portable Document Format) is a file format which was developed by Adobe to address some of the deficiencies of PostScript. Most importantly, PDF files tend to be much smaller than equivalent PostScript files. As with PostScript, GIMP's support of the PDF format is through the free Ghostscript libraries.
- Pixel
-
A pixel is a single dot, or “picture element”, of an image. A rectangular image may be composed of thousands of pixels, each representing the color of the image at a given location. The value of a pixel typically consists of several Channels, such as the Red, Green and Blue components of its color, and sometimes its Alpha (transparency).
- Plug-in
-
Plug-ins are external programs that run under the control of the main GIMP application and provide specific functions on-demand. See Odjeljak 1, “Plug-Ins” for further information.
- PNG
-
PNG is the acronym of “Portable Network Graphic” (pronounce “ping”. This recent format offers many advantages and a few drawbacks: it is not lossy and gives files more heavy than the JPEG format, but it is perfect for saving your images because you can save them several times without losing data each time (it is used for this Help). It supports True Colors (several millions of colors), indexed images (256 colors like GIF), and 256 transparency levels (while GIF supports only two levels).
- PostScript
-
Created by Adobe, PostScript is a page description language mainly used by printers and other output devices. It's also an excellent way to distribute documents. GIMP does not support PostScript directly: it depends on a powerful free software program called Ghostscript.
The great power of PostScript is its ability to represent vector graphics—lines, curves, text, paths, etc.—in a resolution-independent way. PostScript is not very efficient, though, when it comes to representing pixel-based raster graphics. For this reason, PostScript is not a good format to use for saving images that are later going to be edited using GIMP or another graphics program.
- PSD
-
PSD is Adobe Photoshop's native file format, and it is therefore comparable to XCF in complexity. GIMP's ability to handle PSD files is sophisticated but not perfect: some features of PSD files are not loaded or may look slightly different. Although there is an online specification, it does not cover all details, which makes it difficult to support all features of PSD files.
- Quantization
-
Quantization is the process of reducing the color of a pixel into one of a number of fixed values by matching the color to the nearest color in the colormap. Actual pixel values may have far more precision than the discrete levels which can be displayed by a digital display. If the display range is too small, then abrupt changes in colors (false contours, or banding) may appear where the color intensity changes from one level to another. This is especially noticeable in Indexed images, which have 256 or fewer discrete colors.
One way to reduce quantization effects is to use Dithering. The operations in GIMP which perform dithering are the Gradient tool (if you have enabled the dithering option) and the Convert to Indexed command. However, they only work on RGB images and not on Indexed images.
- Rendering Intent
-
Rendering intents are ways of dealing with colors that are out-of- Gamut colors present in the source space that the destination space is incapable of producing. There are four rendering intents defined by the ICC:
- Perceptual
-
This rendering intent is typically used for photographic content. It scales one gamut to fit into the other while maintaining the relative position of colors.
- Relative colorimetric
-
This rendering intent is typically used for spot colors. Colors that are not out of gamut are left unchanged. Colors outside the gamut are converted to colors with the same lightness, but different saturation, at the edge of the gamut.
- Saturation
-
This method is typically used for business graphics. The relative saturation of colors is mostly maintained, but lightning is usually changed.
- Absolute colorimetric
-
This rendering intent is most often used in proofing. It preserves the native device white point of the source image.
- RGB
-
RGB is a color model which has components for Red, Green and Blue. These colors are emitted by screen elements and not reflected as they are with paint. The resulting color is a combination of the three primary RGB colors, with different degrees of lightness. If you look closely at your television screen, whose pitch is less than that of a computer screen, you can see the red, green and blue elements lit with different intensities. The RGB color model is additive.
GIMP uses eight bits per channel for each primary color. That means there are 256 intensities (Values) available, resulting in 256×256×256 = 16,777,216 colors.
It is not obvious why a given combination of primary colors produces a particular color. Why, for instance, does 229R+205G+229B give a shade of pink? This depends upon the human eye and brain. There is no color in nature, only a continuous spectrum of wavelengths of light. There are three kinds of cones in the retina. The same wavelength of light acting upon the three types of cones stimulates each of them differently, and the mind has learned, after several million years of evolution, how to recognize a color from these differences.
It is easy to see that no light (0R+0G+0B) produces complete darkness, black, and that full light (255R+255G+255B) produces white. Equal intensity on all color channels produces a level of gray. That is why there can only be 256 gray levels in GIMP.
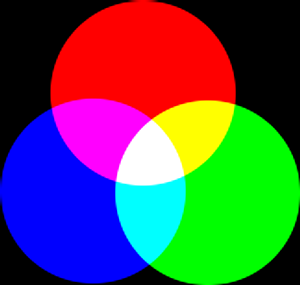
Mixing two Primary colors in RGB mode gives a Secondary color, that is, a color in the CMY model. Thus combining Red and Green gives Yellow, Green and Blue give Cyan, Blue and Red give Magenta. Don't confuse secondary colors with Complementary colors which are directly opposite a primary color in the chromatic circle:
Slika 1170. Colorcircle
Mixing a primary color with its complementary color gives gray (a neutral color).
It is important to know what happens when you are dealing with colors in GIMP. The most important rule to remember is that decreasing the intensity of a primary color results in increasing the intensity of the complementary color (and vice versa). This is because when you decrease the value of a channel, for instance Green, you automatically increase the relative importance of the other two, here Red and Blue. The combination of these two channels gives the secondary color, Magenta, which is the complementary color of Green.
The Color Picker tool lets you find out the RGB values of a pixel and the hextriplet for the color.
- Sample Merged
-
Sample Merged is an option you can set when you use the Bucket Fill tool, the Color Picker tool and various selection tools. It is useful when you are working on an image with several layers and the active layer is either semi-transparent or has a Layer Mode which is not set to Normal. When you check the Sample Merged option, the color which is used for the operation is the composite color of all the visible layers. When the Sample Merged option is not checked, the color used is the color of the active layer itself.
See also the Clone Tool for using Sample Merged in non-destructive image editing.
- Saturation
-
This term refers to color purity. Imagine you add pigment to white paint. Saturation varies from 0 (white, fully toned down, fully diluted) to 100 (pure color).
- Scene-referred
-
When speaking of images captured by a camera, scene-referred means that the intensities in the image RGB channels are proportional to the intensities in the scene that was photographed.
"Scene-referred" is not the same as high dynamic range, as the camera might have been aimed at a low dynamic range scene such as a foggy early morning view. However, adding a light source to the captured frame (eg the moon breaking through the clouds or a street lamp) will turn even a foggy morning into a high dynamic range scene.
As lightwaves do combine linearly, by definition a scene-referred image (whether real or imaginary) must be encoded linearly to preserve the scene-referred nature of the data.
- Supersampling
-
Supersampling is a more sophisticated anti-aliasing technique, that is, a method of reducing jagged and stair-stepped edges along a slanted or curved line. Samples are taken at several locations within each pixel, not just at the center, and an average color is calculated. This is done by rendering the image at a much higher resolution than the one being displayed and then shrinking it to the desired size, using the extra pixels for calculation. The result is a smoother transition from one line of pixels to another along the edges of objects.
The quality of the result depends on the number of samples. Supersampling is often performed at a range of 2× to 16× the original size. It greatly increases the amount of time needed to draw the image and also the amount of space needed to store the image in memory.
One way to reduce the space and time requirement is to use Adaptive Supersampling. This method takes advantage of the fact that very few pixels are actually on an object boundary, so only those pixels need to be supersampled. At first, only a few samples are taken within a pixel. If the colors are very similar to each other, only those samples are used to calculate the final color. If not, more samples are used. This means that the higher number of samples is calculated only where necessary, which improves performance.
- SVG
-
SVG stands for Scalable Vector Graphics. It is a format for two-dimensional vector graphics, both static and animated. You can export GIMP paths to SVG and you can import SVG documents into GIMP from a vector graphic software. See [WKPD-SVG] for more details.
- TGA
-
TGA (TARGA Image File) is a file format which supports 8, 16, 24 or 32 bits per pixel and optional RLE compression. It was originally developed by the Truevision company. “TGA” stands for Truevision Graphics Adapter and “TARGA” stands for Truevision Advanced Raster Graphics Adapter.
- TIFF
-
TIFF (Tagged Image File Format) is a file format which was developed primarily for scanned raster graphics for color separation. Six different encoding routines are supported, each with one of three different image modes: black and white, grayscale and color. Uncompressed TIFF images may be 1, 4, 8 or 24 bits per pixel. TIFF images compressed using the LZW algorithm may be 6, 8 or 24 bits per pixel. Besides PostScript format, TIFF is one of the most important formats for preliminary stages of printing. It is a high quality file format, which is perfect for images you want to import to other programs like FrameMaker or CorelDRAW.
- Tile
-
A Tile is a part of an image which GIMP currently has open. In order to avoid having to store an entire image in memory at the same time, GIMP divides it into smaller pieces. A tile is usually a square of 64×64 pixels, although tiles at the edges of an image may be smaller than that.
At any time, a tile may be in main memory, in the tile cache in RAM, or on disk. Tiles which are currently being worked on are in main memory. Tiles which have been used recently are in RAM. When the tile cache in RAM is full, tiles which have been used least recently are written to disk. GIMP can retrieve the tiles from RAM or disk when they are needed.
Do not confuse these tiles with those in the Tile Filter
- URI
-
A Uniform Resource Identifier (URI) is a string of characters that serves to identify an abstract or a physical resource. URIs are used for the identification of resources in the Internet (such as web pages, miscellaneous files, calling up web services, and for receivers of e-mail) and they are especially used in the Worldwide Web.
- URL
-
URLs (Uniform Resource Locators) are one type of Uniform Resource Identifiers (URIs). URLs identify a resource by its primary access mechanism (commonly http or ftp) and the location of the resource in the computer network. The name of the URI scheme is therefore generally derived from the network protocol used for it. Examples of network protocols are http, ftp and mailto.
Since URLs are the first and most common kinds of URIs, the terms are often used synonymously.
- Value
-
This term often refers to the light intensity, the luminosity of a color. It varies from 0 (black) to 100 (full light).
- XCF
-
XCF is a file format which is special because it is GIMP's native file format: that is, it was designed specifically to store all of the data that goes to make up a GIMP image. Because of this, XCF files may be quite complicated, and there are few programs other than GIMP that can read them.
When an image is stored as an XCF file, the file encodes nearly everything there is to know about the image: the pixel data for each of the layers, the current selection, additional channels if there are any, paths if there are any, and guides. The most important thing that is not saved in an XCF file is the undo history.
The pixel data in an XCF file is represented in a lossless compressed form: the image byte blocks are compressed using the lossless RLE algorithm. This means that no matter how many times you load and save an image using this format, not a single pixel or other image data is lost or modified because of this format. XCF files can become very large, however GIMP allows you to compress the files themselves, using either the gzip or bzip2 compression methods, both of which are fast, efficient, and freely available. Compressing an XCF file will often shrink it by a factor of 10 or more.
The GIMP developers have made a great effort to keep the XCF file format compatible across versions. If you create a file using GIMP 3.0, it ought to be possible to open the file in GIMP 2.10. However, some of the information in the file may not be usable.
Documentation about XCF format can be found at https://developer.gimp.org/core/standards/xcf/.
- XDG
-
Freedesktop.org (also called XDG) is a project to work on interoperability among desktop environments on Linux and Unix-like operating systems.
Such operating systems usually include software which implements XDG specifications to allow an application to open other applications, such as a web browser, an email client, or software to take screenshots.
- XMP
-
XMP is an acronym for Extensible Metadata Platform. It is a metadata format based on XML used in PDF and photographs. Report to [XMP] for detailed explanations.
- YCbCr
-
YCbCr is a color model which was developed for the PAL television standard as a simple modification to the YUV color model. In the meantime, it has become the CCIR-601 standard for image and video recording. For example, it is used for JPEG pictures and MPEG videos, and therefore also on DVDs, video CDs and for most other widespread digital video standards. Note that a color model is still not a color space, since it doesn't determine which colors are actually meant by “red”, “green” and “blue”. For a color space, there must still be a reference to a specific absolute color value.
There are color models which do not express a color by the additive basic colors, red, green and blue (RGB), but by other properties, for example, the brightness-color model. Here, the criteria are the basic brightness of the colors (from black, through gray, to white), the colors with the largest portion (red, orange, yellow, green, blue, violet, or other pure colors that lie between them) and the saturation of the colors (“gaudy” to pale). This color model is based on the ability of the eye to recognize small differences in luminosity better than small color differences, and to recognize those better than small differences in saturation. That makes gray text written on a black background easy to read, but blue text on a red background very hard to read, even with the same basic brightness. Such color models are called brightness-color models.
The YCbCr model is a slight adaptation of such a brightness-color model. An RGB color value is divided into a basic brightness, Y, and two components, Cb and Cr, where Cb is a measurement of the deviation from gray in the blue direction, or if it is less than 0.5, in the direction of yellow. Cr is the corresponding measurement for the difference in the direction of red or turquoise. This representation uses the peculiarity of the eye of being especially sensitive to green light. That is why most of the information about the proportion of green is in the basic brightness, Y, and only the deviations for the red and blue portions need to be represented. The Y values have twice the resolution of the other two values, Cb and Cr, in most practical applications, such as on DVDs.
- YUV
-
YUV is a color model which uses two components to represent the color information, luma (the strength of the light per area) and the chrominance, or proportion of color (chroma), where the chrominance again consists of two components. The development of the YUV color model also goes back to the development of color television (PAL), where ways were sought for transmitting the color information along with the black-and-white signal, in order to achieve backwards compatibility with old black and white televisions without having to increase the available transmission bandwidth. From the YUV color model of the analog television techniques, the YCrCb color model was developed, which is used for most kinds of digital image and video compression. Erroneously, the YUV color model is also often spoken about in those fields, although the YCbCr model is actually used. This often causes confusion.
For the calculation of the luma signals, the underlying RGB data is first adjusted with the gamma value of the output device, and an R'G'B' signal is obtained. The three individual components are added together with different weights, to form the brightness information, which also functions as the VBS signal (Video Baseband Signal, the black-and-white signal) for the old black and white televisions.
Y=R+G+B
The exact calculation is more complicated, however, since some aspects of the color perception of the human eye have to be taken into account. For example, green is perceived to be lighter than red, and this is perceived to be lighter than blue. Furthermore, in some systems gamma correction of the basic color is first performed.
The chrominance signals, and the color difference signals also, contain the color information. They are formed by the difference of blue minus luma or red minus luma.
U=B-Y
V=R-Y
From the three generated components, Y, U and V, the individual color proportions of the basic color can be calculated again later:
Y + U = Y + ( B - Y ) = Y - Y + B = B
Y + V = Y + ( R - Y ) = Y - Y + R = R
Y - B - R = ( R + G + B ) - B - R = G
Furthermore, because of the structure of the retina of the human eye, it turns out that the brightness information is perceived at a higher resolution than the color, so that many formats based on the YUV color model compress the chrominance to save bandwidth during transmission.