The following dialogs let you control and manipulate image structures, such as layers, channels, or paths.
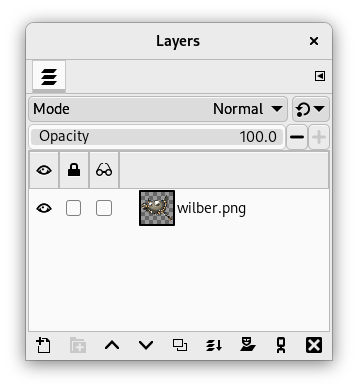
The “Layers” dialog is the main interface to edit, modify and manage your layers.
This dialog is a dockable dialog; see the section Odjeljak 2.3, “Dialogs and Docking” for help on manipulating it.
You can access it:
-
from the main menu: → → ;
-
from the Tab menu in any dockable dialog by clicking the tab menu button
 and selecting
→ ,
and selecting
→ ,
-
from the (default) shortcut: Ctrl+L.
In the menu, there is a list of detached windows which exists only if at least one dialog remains open. In this case, you can raise the “Layers” dialog from the main menu: → .
- Overview
-
Every layer appears in the dialog in the form of a thumbnail. When an image has multiple layers as components, they appear as a list. The upper layer in the list is the first one visible, and the lowest layer the last visible, the background. Above the list one can find characteristics related individually to each layer. Under the list one can find management buttons for the layer list. A right-click on a layer thumbnail opens the Layer context menu.
- Selecting multiple layers
-
GIMP allows you to select multiple layers and perform actions on them. You can e.g. move them to a different location in the layer stack, scale them, etc. Selecting multiple layers is done by using the mouse and Shift key, for adding a range of layers, or Ctrl key, for adding or removing the clicked layer.
Be aware that certain actions can only be done on a single layer. If you try to use such an action, e.g. using the paintbrush, a warning message will show up telling you that you can't do that and that you have to select a single layer.
- Layer list header
-
Directly above the layer list is the header bar. On the left are three icons that show which column is used for visibility, lock, and layer effects. In the middle a text label will tell you how many layers are currently selected if it is more than one. On the right you see a search icon. Clicking in this part opens a search dialog where you can search for layers.
-
 Search layers and Saved searches
-
Searching layers can be useful if you have a lot of layers in your project. As soon as you start typing in the search bar, it will start finding layers that match your search and select them. Multiple layers will be selected if they all match.
Below the search bar you will see a plus icon. Clicking this allows you to add the current search as a new named set. This search, and previously defined ones, will show up below the search bar. Clicking one of these saved searches will select all the layers matching the search term. Each saved search has a close icon in the right corner, which can be used to remove that saved search.
-
- Layer attributes
-
Every layer is shown in the list with its own attributes:
-
 Layer visibility
-
Clicking this icon toggles whether the layer is visible or not. (Shift-clicking on the icon causes all other same-level layers to be shown or hidden alternatively. Alt-clicking on the icon causes all other selected layers on the same level to be shown or hidden alternatively.)
-
 Lock
Lock
-
Clicking on the empty checkbox in the lock column of a layer opens a menu with the following options. (Shift-clicking on an icon causes all other same-level layers to be locked or unlocked alternatively. Alt-clicking on an icon causes all other selected layers on the same level to be locked or unlocked alternatively.)
-
 Lock pixels
-
When this toggle button is enabled, you cannot use any brush-based tool (Paintbrush, Pencil, Eraser etc.), the Airbrush or the Ink tool on the currently selected layer. This allows you to protect them from unwanted changes.
-
 Lock position and size
-
This toggle button enables or disables protection of layers from moving them around or transforming them. When this is enabled, then you cannot use any transform tool (Rotate, Shear, Perspective and others) or move it.
-
 Lock visibility
-
This toggle button controls the “Lock” setting for the visibility of the layer. If this is enabled, the layer visibility cannot be changed until you disable the lock.
-
 Lock alpha channel
-
This toggle button controls the “Lock” setting for the transparency of the layer. If this is enabled, the alpha channel for the layer is locked, and no manipulation has any effect on it. In particular, nothing that you do to a transparent part of the layer will have any effect.
Slika 15.2. Example for Locking Alpha Channel

The active layer has three horizontal, opaque, green stripes on a transparent background. We paint a vertical red stripe. “Lock” unchecked: Opaque and transparent areas of the active layer are painted with red.

“Lock” checked: Only opaque areas of the active layer are painted with red. Transparent areas are preserved.
![[Savjet]](images/tip.png)
Savjet If a layer name in the Layers dialog is in bold, then this layer has no Alpha channel.
-
-
 Layer Effects
-
When this icon is visible, there are Layer Effects present for this layer. Clicking it will open a dialog where you will see a list of all effects added to this layer. For each effect you can change the visibility, the order of the effects, merge all effects with the layer, or remove them.
Layer Effects are filters that change the layer non-destructively, that is, they can be added, removed or changed without changing the layer itself. They instead add effects on top of the layer.
See Using Layer Effects for more details.
A lot of the GEGL filters in the Colors and Filters menu can be used this way. The layer effects dialog consists of the following parts:
- Layer Effects List
-
At the top there is a list of all layer effects that have been added to this layer. Note that the effects are applied on top of the layer starting with the effect at the bottom of the list.
To the left of each effect you can see an eye icon; which can be clicked to hide or show that specific effect. Next to that is the Filter effect icon.
- Buttons
-
The button bar at the bottom offers the following functionality:
-
Layer Effects Visibility
-
This toggle button controls the “visibility” setting for all the effects of the layer. By default all effects are visible. Clicking this hides the effects, allowing you to see the actual pixel contents of the layer.
-
 Edit the selected filter
-
This button allows you to open the dialog of the selected layer effect to make changes to its settings. Alternatively you can also double click on the layer effect in the list to open the dialog.
-
 Raise layer effect
-
Here you can move the layer effect up in the list.
-
 Lower layer effect
-
Here you can move the layer effect down in the list.
-
 Merge all active filters
-
This button lets you merge all active (visible) layer effects with the contents of the layer. This removes the layer effects from the layer after the effects have been applied to the layer.
-
 Remove the selected filter
-
This button removes the selected layer effect.
-
- Layer thumbnail
-
The layer content is represented by a thumbnail. Maintaining left-click for a second on this thumbnail makes it larger. The border color of the layer depends on whether the layer is active or inactive.
- Layer name
-
You can change the name of the layer by double-clicking on it. You can also use the Edit Layer Attributes dialog in the context menu that you get by right-clicking on the layer.
![[Bilješka]](images/note.png)
Bilješka When working on an animation, the name of the layer can be used to specify certain parameters. For more details see exporting animations.
-
- Layers characteristics
-
Above the layer list, it is possible to specify some properties for the selected layers. The selected layers are highlighted. The properties are:
- Mode
-
The layer mode determines how the layer interacts with the other layers. From the combo box you can access all the modes provided by GIMP. The layer modes are fully detailed in Odjeljak 2, “Layer Modes”.
- Opacity
-
By moving the slider you give more or less opacity to the layer. With a 0 opacity value, the layer is transparent and completely invisible. Don't confuse this with a Layer Mask, which sets the transparency pixel by pixel.
- Layer management
-
Under the layer list a set of buttons allows you to perform some basic operations on the layer list.
-
 Create new layer
-
Here you can create a new layer. A dialog is opened, which is described in New Layer.
Press the Shift key to open a new layer with last used values.
-
 Create new layer group
-
Here you can create a new layer group. A new layer is created, where you can put layers down.
Layer groups are described in Layer groups.
-
Raise layer
-
Here you can move the layer up a level in the list. Press the Shift key to move the layer to the top of the list.
-
Lower layer
-
Here you can move the layer down a level in the list. Press the Shift key to move the layer to the bottom of the list.
Savjet To move a layer at the bottom of the list, it may first be necessary to add a transparency channel (also called Alpha channel) to the Background layer. To do this, right click on the Background layer and select Add Alpha channel from the menu.
-
 Duplicate layers
-
Here you can create a copy of the selected layers. Name of new layer is suffixed with "copy".
-
Merge layers
 Anchor layer
-
The button is only visible when a floating selection is present. It anchors the floating selection to the previous active layer.
When there is no floating selection, the icon
is shown, with several possibilities:
-
Merge these layers with the first visible layer below it.
-
Pressing Shift: merge the layer group's layers into one normal layer.
-
Pressing Ctrl: merge all visible layers into one layer.
-
Pressing Shift+Ctrl: merge all visible layers with last used values.
-
-
 Add masks to layers
-
Add masks to selected layers.
-
Delete layers
-
Here you can delete the selected layers.
-
- More layer functions
-
Other functions about layer size are available in the Layer context menu you get by right clicking on the Layers dialog. You can find them also in the submenu of the main menu.
You will find merging layers functions in the Image main menu.
- Clicking-and-dragging layers
-
Click and hold on layer thumbnail or layer name: the thumbnail enlarges and you can move it by dragging the mouse. Selecting and moving multiple layers is also possible.
-
So you can place this layer or layers somewhere else in the layer list.
-
You can also drop the layer into the Toolbox: a new image is created that contains this layer only. This does not work with multiple selected layers.
-
Finally, you can drop the layer into another image: this layer will be added to the layer list, above existing layers.
-
By right-clicking in the Layers dialog, or by opening the from the tab menu, a context menu for the Layers dialog will open.
Most of the commands in this menu have already been documented above, or elsewhere:
- Edit Layer Attributes…
-
Except for Width, Height, and Fill with, this dialog is the same as the New Layer Dialog. For information about the layer attributes we therefore refer to the documentation for that dialog.
- Blend Space submenu
-
See Blend space in the New Layer dialog.
- Composite Space submenu
-
See Composite space in the New Layer dialog.
- Composite Mode submenu
-
See Composite mode in the New Layer dialog.
- Color Tags submenu
-
See the Color tag documentation in the New Layer dialog.
- New Layer…, New Layer Group, Duplicate Layers, Merge Down, Anchor Layer, Delete Layers
-
These commands are explained above, see layer characteristics.
- New from Visible
-
See the New from Visible menu command documentation.
- Layer Boundary Size…
-
See the Layer Boundary Size… menu command documentation.
- Layers to Image Size
-
See the Layers to Image Size menu command documentation.
- Scale Layer…
-
See the Scale Layer… menu command documentation.
- Add Layer Masks…, Apply Layer Masks, Delete Layer Masks, Show Layer Masks, Edit Layer Mask, Disable Layer Masks, Masks to Selection
-
See the Layer Mask submenu documentation for these commands.
- Add Alpha Channel, Remove Alpha Channel
-
Only one of these will be enabled. If the current layer does not have an alpha channel, you will be able to add one. If it does, you can remove the alpha channel.
- Alpha to Selection
-
See the Alpha to Selection menu command documentation.
- Merge Visible Layers
-
This command merges all visible layers into one layer.
- Flatten Image
-
This command merges all layers into one layer and removes transparency.
- Overview
-
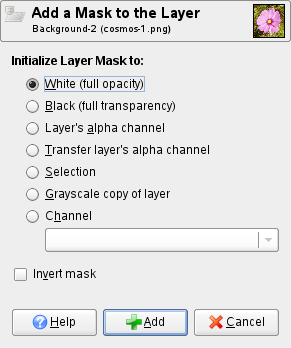
A transparency mask can be added to each layer, which defines what parts of the layer are transparent or opaque. We call this a layer mask. A layer mask has the same size and same number of pixels as the layer to which it is attached. Every pixel of the mask can then be coupled with a pixel at the same location in the layer. The mask is a set of pixels in grayscale. The pixels with a value 0 are black and give a full transparency to the coupled pixel in the layer. The pixels with the maximum value (either 1.0 or 255) are white and give full opacity to the coupled pixel in the layer.
To create a layer mask start with a right click on the layer to call the context menu and select in the menu. A dialog appears where you can initialize the content of the mask:
-
White (full opacity): the mask is white in the Layers dialog. So, all pixels of the layer are visible in the image window since painting the mask with white makes layer pixels fully visible. You will paint with black to make layer pixels transparent.
-
Black (full transparency): the mask is black in the Layers dialog. So, the layer is fully transparent since painting the mask with black makes layer pixels transparent. Painting with white will remove the mask and make layer pixels visible.
-
Layer's alpha channel: the mask is initialized according to the contents of the layer's alpha channel.
-
Transfer layer's alpha channel: Does the same thing as the previous option, except that it also resets the layer's alpha channel to full opacity.
-
Selection: the mask is initialized according to pixel values found in the current selection.
-
Grayscale copy of layer: the mask is initialized according to a grayscale representation of the pixel values of the layer.
-
Channel: The layer mask is initialized with a selection mask you have created before, stored in the Channels dialog.
-
Invert mask: This checkbox allows you to invert: black turns to white and white turns to black.
When the mask is created, it appears as a thumbnail next to that of the layer itself. You can select the layer or the mask for editing by clicking on their respective thumbnails. The active item has a white border (which may not be clearly visible when you have a white mask).
When working with masks, it is a good idea to keep the Layers Dialog prominently visible, because you can't see, by looking at the canvas, whether the layer or the mask is active.
Pressing Alt (or Ctrl+Alt and clicking on the layer mask thumbnail) is equivalent to the Show Layer Mask command: the layer mask border turns to green. If you press Ctrl the border is red and the result is equivalent to the Disable Layer Mask command. To return to normal view repeat the last operation. These options are for greater convenience in your work.
-
- Layer Mask example
-
Slika 15.4. A layer with layer mask

Original image.

This image has a background layer with a flower and another blue layer, fully opaque. A white layer mask has been added to the blue layer. The blue layer remains visible because a white mask makes layer pixels visible.
Slika 15.5. Painting the layer mask

Foreground color set to black; Resulting image.

The layer mask is active. Painting with black makes the layer transparent: the underlying layer becomes visible.


