The Colormap (Indexed Palette is a better name) dialog allows you to edit the colormap of an indexed image. (If the mode of the active image is RGB or Grayscale instead of Indexed, the dialog is empty and unusable.)
This dialog is a dockable dialog; see the section Odjeljak 2.3, “Dialogs and Docking” for help on manipulating it.
You can access it:
-
from the main menu: → → ;
-
from the Tab menu in any dockable dialog by clicking the tab menu button
 and selecting
→ .
and selecting
→ .
In the menu, there is a list of detached windows which exists only if at least one dialog remains open. In this case, you can raise the “Colormap” dialog from the main menu: → .
In an Indexed image, instead of being assigned a color directly (as happens in RGB and Grayscale images), colors are assigned to pixels by an indirect method, using a look-up table called a colormap.
To determine the color that should be shown for that pixel, GIMP looks up the index in the image's colormap. Each indexed image has its own private colormap. In GIMP, the maximum number of entries in a colormap is 256. For a maximum-sized colormap, each index from 0 to 255 is assigned an arbitrary RGB color. There are no rules restricting the colors that can be assigned to an index or the order they appear in: any index can be assigned any color.
It is important to realize that the colors in the colormap are the only colors available for an indexed image (that is, unless you add new colors to the colormap). This has a major effect on many GIMP operations: for example, in a pattern fill, GIMP will usually not be able to find exactly the right colors in the colormap, so it will approximate them by using the nearest color available. This is sometimes referred to as Quantization. If the colormap is too limited or poorly chosen, this can easily produce very poor image quality.
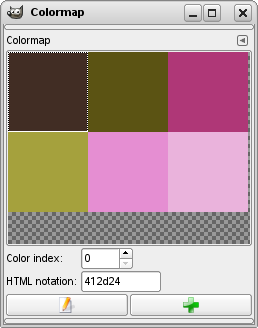
The Colormap dialog allows you to alter the colormap for an image, either by creating new entries, or by changing the colors for the existing entries. If you change the color associated with a given index, you will see the changes reflected throughout the image, as a color shift for all pixels that are assigned that index. The entries are numbered with 0 in the upper left corner, 1 to its right, etc.
Here are the operations you can perform using this dialog:
- Click on a color entry
-
This sets GIMP's foreground color to the color you click on, as shown in the Toolbox color area. As a result, this color will be used for the next painting operation you do.
- Ctrl-click on a color entry
-
This sets GIMP's background color to the color you Ctrl-click on, as shown in the Toolbox color area.
- Double-click on a color entry
-
This sets GIMP's foreground color to the color you click on, and also brings up a Color Editor that allows you to change that colormap entry to a new color.
- Color index
-
You can select a different colormap entry by typing its index here, or clicking the spinbutton to the right.
- HTML notation
-
This area shows a hex-code representation (such as is used in HTML) for the color assigned to the currently selected colormap entry. You can edit the color here, instead of using a Color Editor, if you want to. See HTML notation
- Buttons
-
The button bar at the bottom offers the following functionality:
-
 Edit color
-
This button (in the lower left corner of the dialog) brings up a Color Editor that allows you to change the color for the currently selected colormap entry. The effect is similar to double-clicking on the entry, except that it does not set GIMP's foreground color.
-
 Delete color
-
This button (in the lower left corner of the dialog) allows you to delete a color which is not used in the image from the colormap.
-
 Add color
-
This button (at the bottom of the dialog) allows you to add new colors to the colormap. If you click on the button, the current foreground color, as shown in the Toolbox, will be added to the end of the colormap. If instead you hold down Ctrl and click, the background color from the Toolbox will be added.
![[Bilješka]](images/note.png)
Bilješka The colormap can not contain more than 256 entries. If it already has 256 entries, trying to add a color will have no effect.
-
 Select all pixels with this color
-
This button allows you to select all pixels with this color. To add to the selection, use Shift buttonclick, to subtract use Ctrl buttonclick, and to intersect with the current selection use Shift+Ctrl buttonclick.
-
![[Savjet]](images/tip.png)
|
Savjet |
|---|---|
|
If you make a mistake, you can undo it by focusing the pointer in the image whose colormap you have changed, and then pressing Ctrl+Z or choosing → in the main menu. |
|
|
Bilješka |
|---|---|
|
If you paint an indexed image with a color which is not in the Colormap, GIMP will use the most similar color of the Colormap. |
Right-clicking on a color in the Colormap selects this color and opens a context menu with the following options:
- Edit color
-
This command opens a color selector which allows you to modify the color.
- Add Color from FG
-
This command is enabled only if the indexed palette contains less than 256 colors. The background color of the Toolbox is appended to the color map.
- Add Color from BG
-
This command is enabled only if the indexed palette contains less than 256 colors. The background color of the Toolbox is appended to the color list.
- Select this Color
-
This selects all pixels in the image which have the chosen palette index.
- Add to Selection
-
Adds all pixels in the image which have the chosen palette index to the selection.
- Subtract from Selection
-
Subtracts all pixels in the image which have the chosen palette index from the selection.
- Intersect with Selection
-
Intersect all pixels in the image with the chosen palette index with the current selection.
- Rearrange Colormap
-
Rearrange Colormap: This command is described in Odjeljak 8.34, “Rearrange Colormap”.


