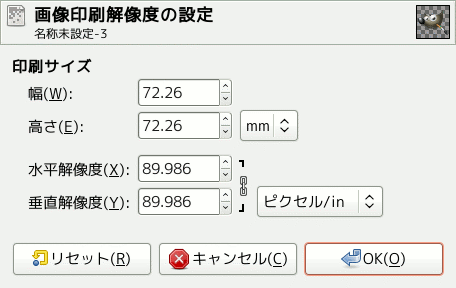
This command opens the 「Set Image Print Resolution」 dialog that allows you to change the dimensions of a printed image and its resolution. This command does not change the number of pixels in the image and it does not resample the image. (If you want to change the size of an image by resampling it, use the Scale Image command.)
出力解像度とは印刷物の単位長さあたりの画素数を定義するものです。 プリンターの解像度と出力解像度を混同しないよう注意しましょう。 こちらの解像度はプリンター特有機能であり、 dpi [ドット毎インチ]で表わされ、 1 画素に数ドットを割り当てることもあります。
このダイアログが開かれたはじめの段階で解像度の欄に表示されている値は元の画像の解像度です。 出力解像度を大きくとると単位あたりの画素数が増すため印刷物は小さくなります。 同じ理由から逆に印刷物の幅や高さを変えると出力解像度も変化します。
出力解像度を増やすにつれ印刷物の精度が上がります。 [印刷される画像は縮まりますが]元の画像をただ縮小するのとは異なり画素は減りません (つまり画像の情報が劣化しません)。
- Width, Height
-
You can set the printing Width and Height by using the text boxes. You can also choose the units for these values from the drop-down list.
As soon as you change the Width or the Height, the X and/or Y resolution values automatically change accordingly. If the two resolution values remain linked, the relationship of the width to the height of the image is also automatically maintained. If you would like to set these values independently of each other, click on the
chain symbol to break the link.
- X resolution, Y resolution
-
印刷される画像の幅や高さを実際に算出するときに利用される実寸での単位距離あたりの画素数をここで指定できます。
Use the text boxes to change these resolution values. They can be linked to keep their relationship constant. The
closed chain symbol between the two boxes indicates that the values are linked together. If you break the link by clicking on the chain symbol, you will be able to set the values independently of each other.
![[注記]](images/note.png)
注記 The default resolution unit used for the X and Y resolution may depend on the type of image you imported. PNG images that have a resolution set, are known to be imported with the unit set to metric, meaning you will see pixels/mm here in that case.
GIMP currently does not have a preference that overrides the unit set in the image. However, if you change it here (and press OK to exit the dialog), it will be remembered for the current session.


