このツールは選択範囲を現行の描画色で塗りつぶします。 Ctrl キーを押しながらだと背景色が使われます。 ツールオプションの指定に拠り、 選択範囲の全体を塗りつぶす場合と、 クリックされた位置と同じ色の部分だけが塗られる場合があります。 ツールオプションは透明度の扱い方に係わるものもあります。
The amount of fill depends on what Fill Threshold you have specified. The fill threshold determines how far the fill will spread (similar to the way in which the Fuzzy Select tool works). The fill starts at the point where you click and spreads outward until the color or alpha value becomes 「too different」.
透明なレイヤーに描かれた形象 (たとえばテキストレイヤー上の文字) をそれまでとは違う色で塗り直したとき、 形象の縁だけ以前の色が残っている場合があります。 これはしきい値 (塗りつぶしツールのオプションダイアログにある) が低かったことによるものです。 しきい値が低いと塗りつぶしツールは半透明の画素を着色しないので、 以前の色が残ってしまい目立ってしまったのです。
完全透明な領域で塗りつぶしをするときは、 「透明保護」オプション (レイヤーダイアログにある) がロックされていないことを確かめてからにしましょう。 このオプションが有効だと半透明及び不透明な領域だけが塗られます。
このツールを起用する方法はつぎのいずれかです。
-
From the main menu: → → .
-
By clicking the tool icon
 in the Toolbox.
-
By pressing the Shift+B keyboard shortcut.
-
Ctrl, similarly to paint tools, allows you to pick surrounding colors on canvas without having to switch to Color Picker tool.
-
Shift キーは塗る対象領域を、 類似色領域から選択範囲に切り替えます。
-
Alt toggles Fill type between FG and BG colors.
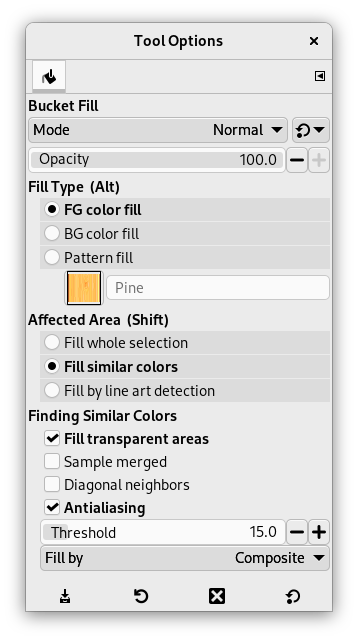
Normally, tool options are displayed in a window attached under the Toolbox as soon as you activate a tool. If they are not, you can access them from the main menu through → → which opens the option window of the selected tool. The available tool options can also be accessed by double clicking the corresponding tool icon in the Toolbox.
- モード, 不透明度
-
描画ツールに共通して使えるオプションについては 描画ツール をお読みください。 ここでは塗りつぶしツールに特有のオプションについてのみ取り上げます。
- 塗りつぶし色
-
GIMP は塗りつぶしに 3 つの方法を提供しています。
- 描画色
-
現在指定されている描画色を塗りつぶしの色とします。
- 背景色
-
現在指定されている背景色を塗りつぶしの色とします。
- パターン
-
sets the fill color to the currently selected pattern. You can select the pattern to use in a drop-down list.
この簡易型パターン選択ウィンドウをクリックするか記入欄にパターン名を書き込めば、 数多ある文様から次回の塗りつぶしに用いる文様をひとつ選び出せます。 簡易ウィンドウの排列選択枠の底部にある左寄り 4 つのボタンを使って見本の並べかたや大きさを調節できます。
- 塗りつぶし範囲
-
-
Fill whole selection makes GIMP fill a pre-existent selection or the whole layer. A quicker approach to do the same thing could be to click and drag the foreground, background or pattern color, leaving it onto the selection. Also, pressing Ctrl key allows you to pick a color on the image as foreground color.
-
Fill similar colors: this is the default setting: the tool fills the area with a color near the pixel onto you have clicked. The color similarity is defined by options in Finding Similar Colors. Click and drag to fill.
-
Fill by line art detection: This allows you to fill areas surrounded by 「line arts」, trying to leave no unfilled pixels near the lines, and closing potential zones.
Line art detection is also known as Smart Colorization. The author describes clearly problems he met in https://girinstud.io/news/2019/02/smart-colorization-in-gimp/. Options are described below.
-
- 類似色の識別
-
These options appear when the Fill similar colors option is checked:
-
透明領域を塗りつぶす オプションで不透明度の低い領域も塗りつぶせます。
-
Sample merged: If you enable this option, sampling is not calculated only from the values of the active layer, but from all visible layers.
For more information, see the Glossary entry.
-
To understand what diagonal neighbors are, please refer to Diagonal-neighbors in Fuzzy Select tool.
-
Please refer to Anti-aliasing in Glossary.
-
The Threshold slider sets the level at which color weights are measured for fill boundaries. A higher setting will fill more of a multi colored image and conversely, a lower setting will fill less area.
-
With the Fill by option you can choose which component of the image GIMP shall use to calculate the similarity and to determine the borders of filling.
The components you can choose from are , , , , , , , , , , .
このオプションを理解することは簡単ではありません。 試しに赤チャンネルを選択したとします。 どこかの画素をクリックすれば、 その画素の 赤チャンネル の値からしきい値を越えない範囲で近い値を、 このツールは隣接する画素を辿って探し出します。 さらに例を挙げましょう。
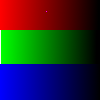
元の画像: 三原色すなわち赤(255,0,0)、 緑(0,255,0)、 青(0,0,255) それぞれの帯にグラデーションをかけたもの。 これからこの画像をしきい値が 15 の設定でマゼンタ色で塗りつぶします。
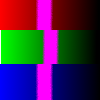
画像その 1: 塗りつぶし手段 = 。 3 色の帯をつぎつぎとクリックしました。 どの帯もしきい値の許す範囲で塗りつぶされています。
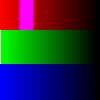
画像その 2: 塗りつぶし手段 = 。 赤の帯をクリックしました。 塗りつぶしツールはクリックした点の赤チャンネル上の値をとり、 そこに隣接する画素から順にしきい値の許す範囲で赤チャンネル上に近似値をもつ領域を探して辿ります。 この基準に見合う領域は狭いものです。 緑と青の帯上の画素の赤チャンネルの値はいずれも 0 なので、 赤チャンネル上ではクリックされた画素の値とはまったく異なります。 したがってマゼンタ色はこちらには拡がりません。
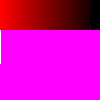
画像その 3: 塗りつぶし手段 = 。 緑の帯をクリックしました。 すると赤チャンネル上のクリックされた画素の値は 0 ですが、 緑と青の帯上のすべての画素も赤チャンネルでの値は 0 ですから、 両者とも塗りつぶされました。
-
- Line Art Detection
-
These options appear when the Fill by line art detection option is checked:
図14.51 「Fill by line art detection」 example

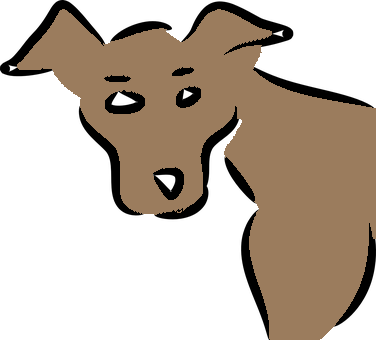
Bucket fill tool applied by click-and-drag with default options. They don't well fit this image, especially on eyebrows that are almost wiped off.
-
Source: by default, information for line art computation is taken from All visible layers. You can also select the Selected layer, the Layer below the selected one, or the Layer above the selected one as the source.
-
Detect opacity rather than grayscale: fills completely transparent regions.
-
Line art detection threshold: threshold to detect contour (higher values will detect more pixels).
-
- Line Art Closure
-
These options appear when the Fill by line art detection option is checked:
-
Automatic closure: When this option is enabled, Maximum gap length defines the maximum gap (in pixels) in line art which can be closed.
-
Manual closure in fill layer: when enabled, consider pixels of the selected line art source layer that are using the selected fill color as line art closure.
This setting is only enabled when the line art source is Layer below the selected one, or Layer above the selected one.
When your line art sketch has holes, you can fill these holes with a brush in the fill color on a layer above or below it, before using bucket fill on your color layer. Especially on larger images this can be faster than selecting All visible layers as source.
Layer below the selected one would be most useful when you are coloring a scanned sketch, while Layer above the selected one can be used when you are sketching yourself and filling the colors below the sketch.
-
- Fill borders
-
These options appear when the Fill by line art detection option is checked:
-
Maximum growing size: maximum number of pixels grown under the line art. Increasing this value makes lines thinner.
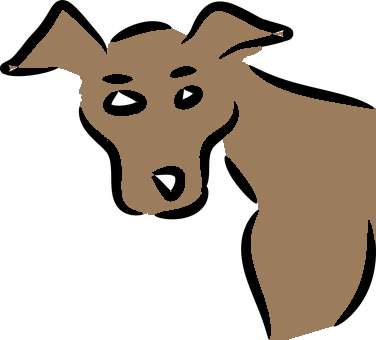
To improve eyebrows in the example, Maximum growing size is reduced to 1.
-
Feather edges: feathers fill edges.

-
Stroke borders: stroke fill borders with the stroke options of the paint tool selected in the dropdown below.
-