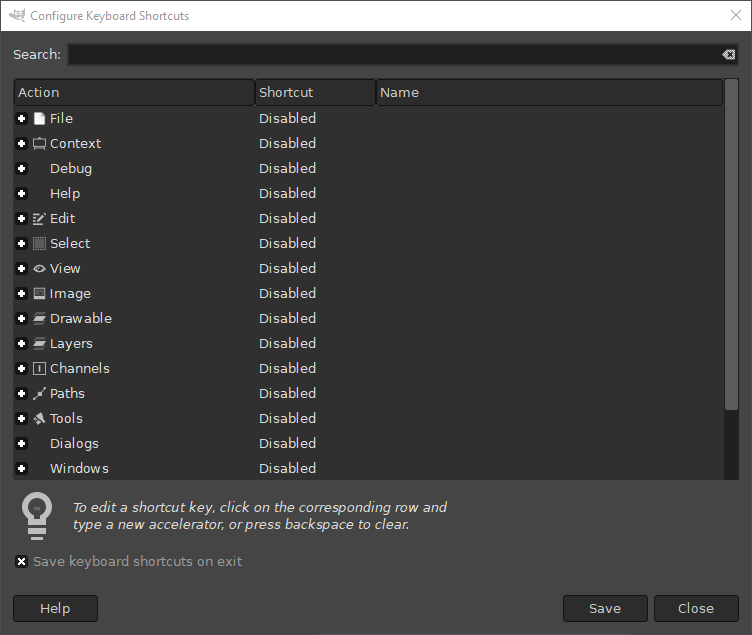
Het dialoogvenster Sneltoetsen stelt u in staat een sneltoets naar een menu-opdracht, een gereedschap, filter, etc. te wijzigen of toe te voegen.
U hebt er toegang toe:
-
uit het hoofdmenu: → ;
-
of, vanuit de voorkeuren Interface: klik op de knop Sneltoetsen configureren… button.
Als u al weet voor welke opdracht u de sneltoets wilt wijzigen, dan kunt u het veld Zoeken gebruiken om het in te voeren. Dat zal de lijst met mogelijke opdrachten beperken tot alleen die welke de tekst bevatten waarnaar u zoekt.
Het gebied in het midden van het dialoogvenster geeft aan de linkerkant de categorieën van de acties weer. U kunt een categorie vergroten door te drukken op het pictogram
ervoor, en verkleinen door opnieuw op het pictogram te drukken. Elke vergrote actiecategorie zal een lijst met beschikbare acties weergeven. De middelste kolom geeft aan welke sneltoets is toegewezen aan elke actie, of “Uitgeschakeld” als de actie geen sneltoets heeft. De kolom “Naam” geeft de naam weer waaronder GIMP de actie kent.
Alle acties die kunnen worden toegewezen aan een sneltoets zijn opgedeeld in categorieën. Elk menu heeft een categorie die correspondeert met zijn naam, en alle scripts en plug-ins zijn in categorieën gesorteerd, gebaseerd op het eerste deel van hun naam.
![[Tip]](images/tip.png)
|
Tip |
|---|---|
|
U kunt, om de hoeveelheid zichtbare acties te verhogen, het dialoogvenster op de grootte brengen die u wilt. |
Afbeelding 15.122. Een sneltoets toewijzen

De tekst “Nieuwe sneltoets…” in de kolom Sneltoetsen geeft aan dat GIMP wacht op invoer voor een nieuwe sneltoets voor de actie Alfakanaal toevoegen.
Wanneer u de actie hebt gevonden waarvoor u een sneltoets wilt instellen, klik op de regel die de details van de actie weergeeft. Klik opnieuw op de kolom Sneltoets om de sneltoets te wijzigen. De kolom Sneltoets voor die regel zal wijzigen naar Nieuwe sneltoets…. GIMP wacht nu op u om een sneltoets te gebruiken. Zodra u een toetscombinatie invoert, wordt de sneltoets toegevoegd aan die actie. Tenzij de sneltoets, die u hebt ingevoerd, al was toegewezen aan een andere actie. In dat geval zal het u vertellen voor welke actie de toetscombinatie wordt gebruikt en u vragen wat te doen. U kunt ofwel kiezen om de sneltoets toch toe te wijzen, of het wijzigen te annuleren.
Als u een fout maakte, en die sneltoets niet wilt wijzigen, druk dan op Esc.
U kunt ook een bestaande sneltoets van een actie verwijderen. Selecteer, om dat te doen, de regel van de actie, klik op de kolom Sneltoets en druk dan op Backspace om de sneltoets leeg te maken.
Onthoud dat de categorieën zelf u een sneltoets laten invoeren. Die zal echter verdwijnen na het drukken op een toets, omdat een categorie geen opdracht aan zich heeft verbonden, het kan dus nooit worden gebruikt. Selecteer een opdracht in de gewenste categorie voordat u probeert een sneltoets toe te wijzen.
Aan de onderzijde van het dialoogvenster staat een optie (standaard geselecteerd) die GIMP vertelt Sneltoetsen opslaan bij afsluiten. Indien ingeschakeld, zullen alle gewijzigde sneltoetsen worden opgeslagen als u GIMP afsluit. Als het is uitgeschakeld zullen de sneltoetsen alleen worden opgeslagen als u de knop hebt gebruikt voordat u het dialoogvenster sloot.
De onderzijde van het dialoogvenster heeft drie knoppen:
-
Hulp: zal deze pagina van Hulp openen.
-
Opslaan: zal wijzigingen die u hebt gemaakt aan de sneltoetsen opslaan zonder het dialoogvenster te sluiten.
-
Sluiten: zal het dialoogvenster sluiten zonder de instellingen op te slaan naar schijf, maar eventuele gewijzigde sneltoetsen zullen actief blijven totdat GIMP sluit. Wat er gebeurt nadat GIMP sluit is afhankelijk van de instelling Sneltoetsen opslaan bij afsluiten, hierboven vermeld.


