Figur 7.15. Exempel på penseldrag
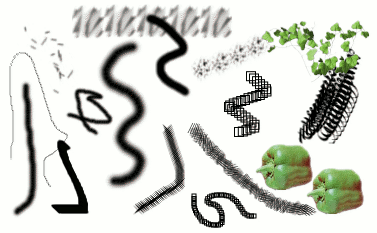
A number of examples of brushstrokes painted using different brushes from the set supplied with GIMP. All were painted using the Paintbrush tool.
A brush is a pixmap or set of pixmaps used for painting. GIMP includes a set of Paint Tools, which not only perform operations that you would normally think of as painting, but also operations such as erasing, copying, smudging, lightening or darkening, etc. All of the paint tools, except the ink tool, use the same set of brushes. The brush pixmaps represent the marks that are made by single ”touches” of the brush to the image. A brush stroke, usually made by moving the pointer across the image with the mouse button held down, produces a series of marks spaced along the trajectory, in a way specified by the characteristics of the brush and the paint tool being used.
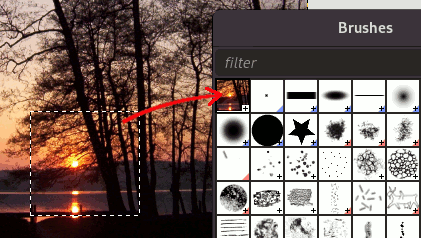
Brushes can be selected by clicking on an icon in the Brushes dialog. GIMP's current brush is shown in the Brush/Pattern/Gradient area of the Toolbox. Clicking on the brush symbol there is one way of activating the Brushes dialog.
When you install GIMP, it comes with a number of basic brushes, plus a few bizarre ones that serve mainly to give you examples of what is possible (i. e., the "green pepper" brush in the illustration). You can also create new brushes, or download them and install them so that GIMP will recognize them.
GIMP can use several different types of brushes. All of them, however, are used in the same way, and for most purposes you don't need to worry about the differences when you paint with them. Here are the available types of brushes:
- Vanliga penslar
-
Most of the brushes supplied with GIMP fall into this category. They are represented in the Brushes dialog by grayscale pixmaps. When you paint using them, the current foreground color (as shown in the Color Area of the Toolbox) is substituted for black, and the pixmap shown in the Brushes dialog represents the mark that the brush makes on the image.
To create such a brush: create a grayscale image in gray levels, where black is fully visible, white is transparent, with gray levels in between. Do not use transparency for these brushes. Save it with the .gbr extension. Click on the Refresh button in the Brushes Dialog to get it in preview without it being necessary to restart GIMP.
- Färgpenslar
-
Brushes in this category are represented by colored images in the Brushes dialog. They can be pictures or text. When you paint with them, the colors are used as shown; the current foreground color does not come into play. Otherwise they work the same way as ordinary brushes.
För att skapa en sådan pensel, skapa en liten RGBA-bild:
Select → from the main menu.
In the Advanced Options, set for example the Color space to RGB color and set Fill with to Transparency.
Draw your image. Contrary to grayscale brushes, transparent areas here will be drawn transparent.
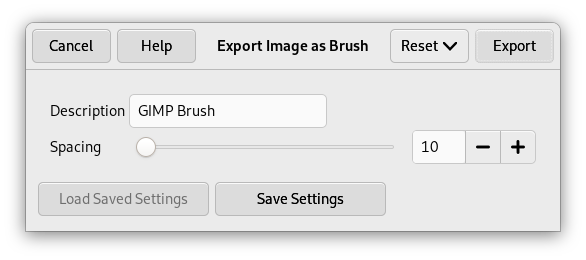
Select → from the main menu to first save your image as an
.xcffile to keep its properties.Select → from the main menu to export the image as a brush with the
.gbrextension.In the Brushes Dialog, click on the button
 .
.
Your brush appears among the other brushes. You can use it immediately, without restarting GIMP.
![[Tips]](images/tip.png)
Tips When you do a Copy or a Cut on a selection, you see the contents of the clipboard (that is the selection) at the first position in the brushes dialog. And you can use it for painting.
- Image hoses / Image pipes
-
Brushes in this category can make more than one kind of mark on an image. They are indicated by small red triangles at the lower right corner of the brush symbol in the Brushes dialog. They are sometimes called "animated brushes" because the marks change as you trace out a brushstroke. In principle, image hose brushes can be very sophisticated, especially if you use a tablet, changing shape as a function of pressure, angle, etc. These possibilities have never really been exploited, however; and the ones supplied with GIMP are relatively simple (but still quite useful).
Du kommer att få ett exempel på hur du skapar sådana penslar i Animerade penslar
- Parametriska penslar
-
These are brushes created using the Brush Editor, which allows you to generate a wide variety of brush shapes by using a simple graphical interface. A nice feature of parametric brushes is that they are resizable. It is possible, using the dialog, to make key presses or mouse wheel rotations cause the current brush to become larger or smaller, if it is a parametric brush.
Now, all brushes have a variable size. In fact, in the option box of all painting tools there is a slider to enlarge or reduce the size of the active brush. You can do this directly in the image window if you have set correctly your mouse wheel; see Varying brush size.
In addition to the brush pixmap, each GIMP brush has one other important property: the brush Spacing. This represents the distance between consecutive brush-marks when a continuous brushstroke is painted. Each brush has an assigned default value for this, which can be modified using the Brushes dialog.
![[Notera]](images/note.png)
|
Notera |
|---|---|
|
GIMP kan använda MyPaint-penslar. Se Avsnitt 3.11, ”MyPaint Brush” för mer information. |
|
|
Notera |
|---|---|
|
Det finns en snabb metod för att lägga till en ny pensel: Avsnitt 5.4, ”Skapa en pensel snabbt”. |
För att lägga till en ny pensel efter att ha antingen skapat eller hämtat den från internet, så behöver du spara den i ett format som GIMP kan använda. Penselfilen behöver placeras i GIMPs penselsökväg, så att GIMP kan indexera och visa den i dialogen Penslar. Du kan trycka på knappen som indexerar penselkatalogen på nytt. GIMP använder tre filformat för penslar:
- GBR
-
Formatet
.gbr(”gimp brush”) används för vanliga penslar och färgpenslar. Du kan konvertera många andra sorters bilder, inklusive många penslar som används av andra program, till GIMP-penslar genom att öppna dem i GIMP och spara dem med filnamn som slutar på.gbr. Detta tar fram en dialogruta i vilken du kan ställa in standardmellanrummet för penseln.En teknisk specifikation för filformatet GBR kan hittas på developer.gimp.org.
- GIH
-
Formatet
.gih(”gimp image hose”) används för animerade penslar. Dessa penslar konstrueras från bilder som innehåller flera lager: varje lager kan innehålla flera penselformer arrangerade i ett rutnät. Då du sparar en pensel som en.gih-fil dyker en dialogruta upp som låter dig beskriva penselns format. Se Avsnitt 5.2, ”Skapa animerade penslar” för mer information om dialogrutan.En teknisk specifikation för filformatet GIH kan hittas på developer.gimp.org.
- VBR
-
Formatet
.vbranvänds för parametriska penslar, det vill säga penslar skapade med penselredigeraren. Det finns egentligen inget annat vettigt sätt att erhålla filer i detta format. - MYB
-
Formatet
.mybanvänds för MyPaint-penslar. Se Avsnitt 3.11, ”MyPaint Brush” för mer information.
För att göra en pensel tillgänglig, placera den i en av mapparna i GIMPs penselsökväg. Som standard innehåller penselsökvägen två mappar, systemets brushes-mapp, vilken du inte bör använda eller ändra, och mappen brushes i din personliga GIMP-katalog. Du kan lägga till nya mappar till penselsökvägen på sidan Penselmappar i dialogrutan Inställningar. Alla GBR-, GIH- eller VBR-filer som finns i en mapp i penselsökvägen kommer visas i dialogen Penslar nästa gång du startar GIMP, eller så fort du trycker på knappen i dialogen Penslar.
|
|
Notera |
|---|---|
|
När du skapar en ny parametrisk pensel med penselredigeraren sparas den automatiskt i din personliga |
Det finns ett antal webbplatser med hämtningsbara samlingar av GIMP-penslar. Snarare än att tillhandahålla en lista med länkar som snart kommer vara inaktuella så är det bästa rådet att göra en sökning med din favoritsökmotor efter ”GIMP brushes”. Det finns också många samlingar med penslar för andra program med målningsfunktionalitet. Några kan lätt konverteras till GIMP-penslar, några kräver speciella konverteringsverktyg, och några kan inte konverteras över huvud taget. De flesta storslagna procedurella penseltyper hamnar i den sista kategorin. Sök på webben om du behöver veta, och om du inte hittar något, leta rätt på en expert att fråga.


