A brush is a pixmap or set of pixmaps used for painting. GIMP includes a set of Paint Tools, which not only perform operations that you would normally think of as painting, but also operations such as erasing, copying, smudging, lightening or darkening, etc. All of the paint tools, except the ink tool, use the same set of brushes. The brush pixmaps represent the marks that are made by single 「touches」 of the brush to the image. A brush stroke, usually made by moving the pointer across the image with the mouse button held down, produces a series of marks spaced along the trajectory, in a way specified by the characteristics of the brush and the paint tool being used.
ブラシは ブラシダイアログ 上のアイコンをひとつクリックして選びます。 GIMP で現在 使用中のブラシ はツールボックス下部の ブラシ / パターン / グラデーション のところを見てもわかります。 (設定 ダイアログの「ツールボックス」のページをご覧ください。) ブラシのところをクリックすれば直ちにブラシダイアログ上の作業に移ります。
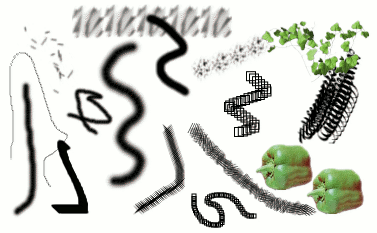
GIMP のインストールには基本的なブラシのほかにただブラシの可能性を示すためだけの奇妙なもの (たとえば例図にも載せた「ピーマン」ブラシ) も入っています。 もっと別の新しいブラシをダウンロードしてきたりご自分で新たに作ったりして GIMP で使えるようにインストールする方法もあります。
GIMP で使えるブラシはいくつかに分類できます。 しかしその使い方はすべて同じですから、 ほぼどんな使い道でも使うブラシの違いを気にする必要はありません。 つぎにブラシの分類をあげます。
- 通常のブラシ
-
Most of the brushes supplied with GIMP fall into this category. They are represented in the Brushes dialog by grayscale pixmaps. When you paint using them, the current foreground color (as shown in the Color Area of the Toolbox) is substituted for black, and the pixmap shown in the Brushes dialog represents the mark that the brush makes on the image.
To create such a brush: create a grayscale image in gray levels, where black is fully visible, white is transparent, with gray levels in between. Do not use transparency for these brushes. Save it with the .gbr extension. Click on the Refresh button in the Brushes Dialog to get it in preview without it being necessary to restart GIMP.
- 色ものブラシ
-
この分類のブラシはブラシダイアログ上では色つきで表示されています。 テキストも含まれます。 その色がこれらのブラシの塗色です。 描画色として指定されている色は使われません。 そのこと以外は通常のブラシと同等です。
To create such a brush, create a small RGBA image:
Select → from the main menu.
In the Advanced Options, set for example the Color space to RGB color and set Fill with to Transparency.
Draw your image. Contrary to grayscale brushes, transparent areas here will be drawn transparent.
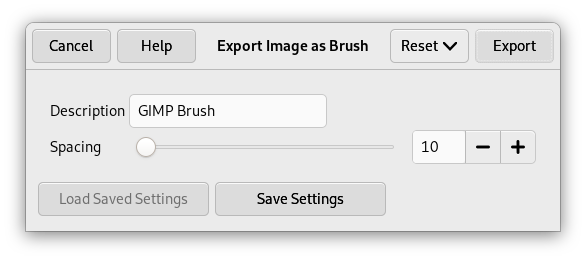
Select → from the main menu to first save your image as an
.xcffile to keep its properties.Select → from the main menu to export the image as a brush with the
.gbrextension.In the Brushes Dialog, click on the button
 .
.
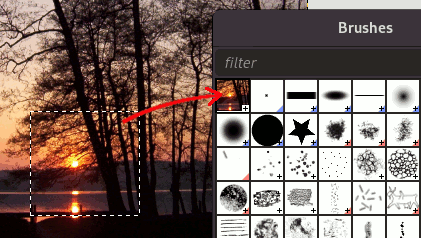
Your brush appears among the other brushes. You can use it immediately, without restarting GIMP.
![[ヒント]](images/tip.png)
ヒント 選択範囲を写し取ったり切り取ったりしたときに、 クリップボードの内容 (すなわち選択範囲のコピー) がブラシダイアログの筆頭に現れます 「クリップボードブラシ」。 これは描画にも使えます。
- ブラシパイプ形式
-
この分類のブラシは画像上に単一ではなく幾種もの形状の刻印をします。 ブラシダイアログ上ではこのブラシの見本の右下隅には赤い三角印が付いています。 これらは「アニメーションするブラシ」との異名があり、 このブラシでなぞってゆく間にその刻印の形が変化してゆきます。 [ブラシパイプ形式とかイメージホースとも呼ばれます。] 根本的にパイプブラシは非常に知能的な側面を与えられます。 タブレットを使用される場合は特に、 圧力や角度などに反応させることが考えられます。 しかしその可能性のすべては開発しきれておりません。 GIMP についてくるブラシは比較的簡素です (でも十分有益です)。
You will find an example on how to create such brushes in Animated brushes
- 媒介変数つきブラシ
-
これらのブラシは ブラシエディター で作られています。 このエディターは簡素なユーザーインターフェースながら多種多様なブラシ造形を可能にします。 媒介変数つきブラシのすばらしい点は 伸長可能 であることです。 それらの媒介変数は 設定 ダイアログの「入力コントローラー」のページで特定キーの押下やマウスホイールの回転によってブラシの大きさが増減するように設定できます。
すべてのブラシには可変高さがあります。 事実、 すべての描画ツールのツールオプションボックスにいま活性化しているブラシの高さを増減できるスライダーがあります。 この調節はマウスホイールをうまく設定しておけば、 画像ウィンドウ上で直に行なうこともできます。 ブラシの大きさの増減 をご覧ください。
ブラシピクスマップに加えて、 もう一つの GIMP ブラシの重要な属性がブラシの 間隔 です。 なぞるように描画されるときの軌道上を連続して並ぶ刻印の互いの距離のことです。 ブラシはそれぞれに既定の値を持っていますが、 ブラシダイアログ上で変更可能です。
![[注記]](images/note.png)
|
注記 |
|---|---|
|
GIMP can use MyPaint brushes. Please refer to 「MyPaint Brush」 for more information. |
|
|
注記 |
|---|---|
|
There is a quick method to add a new brush: 「ブラシの手早い作成」. |
ブラシを追加するには、 新たに作成したものであれダウンロードしてきたものであれ、 GIMP で使えるファイル形式で保存します。 ブラシファイルは GIMP がブラシダイアログの一覧に載せられるようにするため、 GIMP の ブラシ検索パス に置きます。 「ブラシの更新」ボタン  をクリックすればブラシのあるディレクトリー群で再度指標化されます。 GIMP が利用するブラシ用のファイル形式はつぎの 3 つです。
- GBR
-
The
.gbr("gimp brush") format is used for ordinary and color brushes. You can convert many other types of images, including many brushes used by other programs, into GIMP brushes by opening them in GIMP and saving them with file names ending in.gbr. This brings up a dialog box in which you can set the default Spacing for the brush.A technical specification of the GBR file format can be found on developer.gimp.org.
- GIH
-
The
.gih("gimp image hose") format is used for animated brushes. These brushes are constructed from images containing multiple layers: each layer may contain multiple brush-shapes, arranged in a grid. When you save an image as a.gihfile, a dialog comes up that allows you to describe the format of the brush. See 「Creating animated brushes」 for more information about the dialog.A technical specification of the GIH file format can be found on developer.gimp.org.
- VBR
-
.vbr形式は媒介変数つきブラシ、 つまりブラシエディターで作られたブラシに使われています。 それ以外の方法でこの形式のファイルを入手しようとしても無意味です。 - MYB
-
The
.mybformat is used for MyPaint brushes. Please refer to 「MyPaint Brush」 for more information.
追加したブラシを有効にするには GIMP が検索できるブラシ保管パスのフォルダーにそのブラシを置きます。 初期設定ではブラシ検索パスにはフォルダーが 2 つ登録されています。 それぞれ、 ユーザーが手を加えられないシステムパス下の brushes フォルダーと、 個人用 GIMP フォルダー下の brushes フォルダーです。 新たに作ったブラシ保管パスは 設定 ダイアログの「ブラシフォルダー」のページ上でブラシ検索パスに追加登録できます。 GBR 形式、 GIH 形式、 VBR 形式のいずれのブラシファイルもブラシ検索パスに保管すれば、 ブラシダイアログの「ブラシの更新」ボタンを押した直後からブラシダイアログ上に並びますし、 新たにフォルダーをブラシ検索パスに登録した場合はその後に GIMP を再起動したときから、 ブラシダイアログ上で見られるようになります。
|
|
注記 |
|---|---|
|
ブラシエディターで作成した媒介変数つきブラシは、 作成後に自動的に個人用 |
既にネット上では GIMP 用ブラシ集を公開配布するところがたくさんあります。 そのサイトへのリンク集をここに載せてもすぐに古くなってしまうので、 そのかわり、 「GIMP brushes」をお好みの検索サイトで探してください。 他の描画機能つきソフトのためのブラシもたくさんありますが、 その一部は GIMP 用ブラシに容易く変換できます。 それ以外にも特別なユーティリティを通せば変換できるものもありますが、 残念ながらどうしても利用できないものもあります。 面白いプロシージャーブラシもほとんどが最後の範疇に入ってしまいます。 興味がある方はまずウェブで調べて、 どうしても見付からないときは質問を受け付けてくれる達人を探してください。


