Just like for normal brushes, these animated brushes can also be either grayscale or color. For grayscale images, where the actual brush will use the current foreground color, you use white for transparency. For color images, transparent parts are used as such and when making brush strokes, the actual colors will be used instead of the foreground color.
To create a new animated brush, create either a grayscale or color image, based on whether you want the brush to use the user's foreground color, or the actual colors in the image. Then create the images for your animation steps. To save the brush into gih format, select → , name your work with the gih extension, and press the button. The following window is displayed:
Abbildung 7.18. Dialog to export an image as Brush Pipe
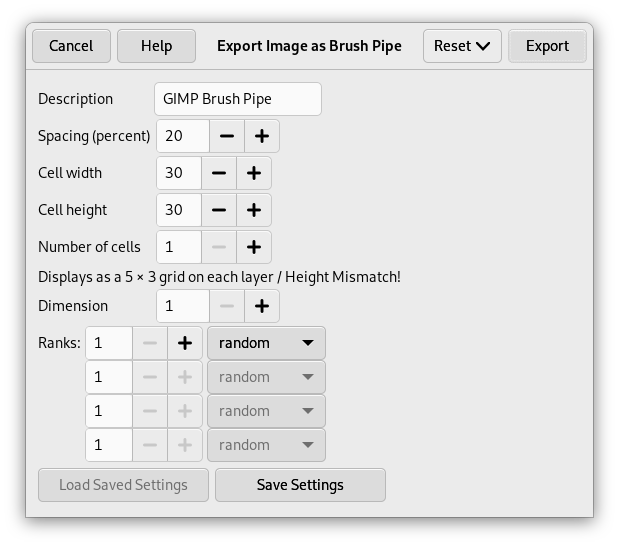
Dialog to export an image as GIMP image hose
This dialog box has several options that allow you to select how your brush is animated.
- Abstand (Prozent)
-
Mit „Abstand“ ist die Entfernung zwischen aufeinanderfolgenden Pinselabdrücken gemeint, wenn Sie mit der Maus einen Pinselstrich malen. Sie müssen sich das Malen, mit welchem Pinsel auch immer, wie Stempeln vorstellen. Wenn der Abstand gering ist, sind die Stempelabdrücke sehr nahe beieinander und der Strich sieht durchgezogen aus. Bei großem Abstand sind die Abdrücke einzeln. Das ist bei einem farbigen Pinsel (wie z.B. „green pepper“) sehr interessant. Der Wert liegt zwischen 1 und 200, und diese Prozentangabe bezieht sich auf den Pinsel-„Durchmesser“, der 100% entspricht.
- Beschreibung
-
Das ist der Pinselname, der oben im Pinseldialog (Gittermodus) erscheint, wenn der Pinsel ausgewählt wird.
- Zellgröße
-
That is size of cells you will cut up in layers. Default is one cell per layer and size is that of the layer. Then there is only one brush aspect per layer.
Wir könnten auch nur eine große Ebene haben und die Zellen abschneiden, die für die verschiedenen Aspekte der animierten Pinselspitze verwendet werden.
For instance, we want a 100×100 pixels brush with 8 different aspects. We can take these 8 aspects from a 400×200 pixels layer, or from a 300×300 pixels layer but with one cell unused.
- Zellanzahl
-
Das ist die Anzahl der Zellen (eine Zelle pro Aspekt), die aus jeder Ebene abschnitten werden. Voreinstellung ist Anzahl der Ebenen, da es nur eine Ebene pro Aspekt gibt.
- Anzeigen als
-
Dies besagt, wie Zellen in der Ebene angeordnet wurden. Wenn Sie beispielsweise zwei Zellen pro Ebene auf vier Ebenen angeordnet haben, gibt GIMP aus:
>1 Zeilen von 2 Spalten auf jeder Ebene. - Dimension, Ranks, Selection dropdown
-
Jetzt wird's kompliziert! Aber die Erklärungen sind notwendig, um zu verstehen, wie man Zellen und Ebenen anordnet.
GIMP starts retrieving cells from each layer and stacks them into a FIFO stack (First In First Out: the first in is at the top of the stack and so can be first out). In our example 4 layers with 2 cells in each, we'll have, from top to bottom: first cell of first layer, second cell of first layer, first cell of second layer, second cell of second layer, …, second cell of fourth layer. With one cell per layer or with several cells per layer, result is the same. You can see this stack in the Layers Dialog of the resulting
.gihimage file.Dann erstellt GIMP aus diesem Stapel ein Feld in den von Ihnen festgelegten Dimensionen. Sie können vier Dimensionen verwenden.
In der Informatik hat ein dreidimensionales (3D) Feld („array“) die Form „feld(x,y,z)“. Es ist leicht, sich ein zweidimensionales Feld vorzustellen: auf einem Blatt Papier ist es ein Feld mit Zeilen und Spalten:
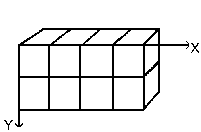
Bei einem 3D-Feld sprechen wir nicht mehr von Zeilen und Spalten, sondern von Dimensionen und Reihen Die erste Dimension verläuft entlang der x-Achse, die zweite entlang der y-Achse, die dritte entlang der z-Achse. Jede Dimension hat Reihen von Zellen:
To fill up this array, GIMP starts retrieving cells from the top of stack. The way it fills the array reminds that of an odometer: right rank digits turn first and, when they reach their maximum, left rank digits start running. If you have some memories of Basic programming you will have, with an array(4,2,2), the following succession: (1,1,1),(1,1,2),(1,2,1),(1,2,2),(2,1,1),(2,1,2),(2,2,2),(3,1,1),…, (4,2,2). We will see this later in an example.
Neben der Reihenanzahl, die Sie jeder Dimension geben können, können Sie ihnen auch einen Auswahl-Modus geben. Sie haben verschiedene Modi, die beim Malen angewendet werden:
- Incremental [inkrementell]
-
GIMP wählt eine Reihe aus der betreffenden Dimension nach ihrer Reihenfolge in dieser Ebene.
- Angular [Winkel]
-
GIMP wählt eine Reihe aus der betreffenden Dimension entsprechend der Winkeländerung des Pinsels.
The first rank is for the direction 0°, upwards. The other ranks are affected, clockwise, to an angle whose value is 360/number of ranks. So, with 4 ranks in the concerned dimension, the angle will move 90° clockwise for each direction change: second rank will be affected to 90° (rightwards), third rank to 180° (downwards) and fourth rank to 270° (-90°) (leftwards).
- Random [zufällig]
-
GIMP wählt eine zufälligen Reihe aus der betreffenden Dimension.
- Velocity, Pressure, X tilt, Y tilt
-
Dies sind Optionen für hochentwickelte Grafiktabletts.
Beispiele
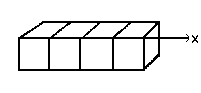
- Ein eindimensionaler Bilderschlauch
-
Na ja, wofür soll das gut sein? Wir werden das nach und nach anhand einiger Beispiele sehen. Sie können tatsächlich in jeder Dimension Fälle eintragen, die eine bestimmte Aktion Ihres Pinsels veranlassen.
Lassen Sie uns mit einem eindimensionalen Pinsel anfangen, der es uns erlaubt, die Aktionen der Auswahlmodi zu studieren. Wir können ihn uns folgendermaßen vorstellen:
Führen Sie jetzt diese Schritte aus:
-
Select → from the main menu.
Set Width and Height for example to 30 pixels.
In the Advanced Options, set the Color space to RGB color and set Fill with to Transparency.
Using the Text tool create 4 layers „1“, „2“, „3“, „4“. Delete the „background“ layer.
-
Select → from the main menu to first save your image as an
.xcffile to keep its properties.Select → from the main menu to export the image as an animated brush with the
.gihextension.Export the image with a
.gbrextension in thebrushesdirectory located inside your personal GIMP configuration folder. -
In the Export Image as Brush Pipe dialog, provide a Description, set the Spacing (percent) to 100, set the Cell size to 30×30, set Dimension to 1, and set Ranks to 4, and the Selection drop-down to incremental. Then click the button.
-
In the Brush Dialog, click on the button
 .
.
Your brush appears among the other brushes. You can use it immediately, without restarting GIMP.
Select your brush. Select pencil tool for instance and click and hold with it on a new image:
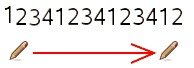
Sie sehen die Ziffern 1, 2, 3, 4 in dieser Reihenfolge.
-
Take your
.xcfimage file back and export it as.gihsetting the Selection drop-down to random: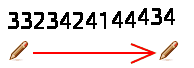
Die Ziffern werden in zufälliger Reihenfolge gemalt.
-
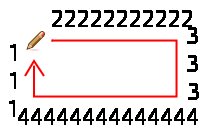
Now set the Selection drop-down to angular:
-
- Ein dreidimensionaler Bilderschlauch
-
Wir werden nun eine dreidimensionale animierte Pinselspitze erstellen: Deren Ausrichtung wird mit der Pinselbewegung variieren, sie wird zwischen rechter und linker Hand abwechseln und ihre Farbe wird nach dem Zufallsprinzip zwischen schwarz und blau wechseln.
The first question we have to answer to is the number of images that is necessary. We reserve the first dimension (x) to the brush direction (4 directions). The second dimension (y) is for Left/Right alternation and the third dimension (z) for color variation. Such a brush is represented in a 3D array „myarray(4,2,2)“:
There are 4 ranks in first dimension (x), 2 ranks in second dimension (y) and 2 ranks in third dimension (z). Thus there are 4×2×2 = 16 cells. We need 16 images.
-
Bilder der Dimension 1 (x) erstellen
Open a new 30×30 pixels image, RGB with Transparent Fill Type. Using the zoom draw a left hand with fingers upwards.[2] Save it as
handL0k.xcf(hand Left 0° Black).Open the Layers Dialog. Double click on the layer to open the Layer Attributes Dialog and rename it to handL0k.
Duplicate the layer. Let visible only the duplicated layer, select it and apply → → . Rename it to handL90k.
Wiederholen Sie dieselben Operationen, um »handL180s« und »handL-90s« (oder »handL270s«) zu erzeugen.
-
Bilder der Dimension 2 (y) erstellen
Diese Dimension hat in unserem Beispiel zwei Reihen, eine für die linke Hand, die andere für die rechte. Die Reihe für die linke Hand existiert bereits. Wir erstellen die Bilder für die rechte Hand, indem wir die Bilder der linken Hand horizontal spiegeln.
Duplicate the handL0k layer. Let it visible only and select it. Rename it to handR0K. Apply → → .
Wiederholen Sie dieselben Operationen mit den anderen linken Händen, um ihre rechten Pendants zu erzeugen.
Re-order layers to have a clockwise rotation from top to bottom, alternating Left and Right: handL0k, handR0k, handL90k, handR90k, …, handR-90k.
-
Bilder der Dimension 3 (z) erstellen
Bilder der Dimension 3 (y) erstellen : Die dritte Dimension hat zwei Reihen, eine für Schwarz und die andere für Blau. Die erste Reihe, Schwarz, existiert bereits. Man sieht schon, dass die übrigen Bilder der Dimension 3 Kopien in Blau der Bilder der ersten Reihe sind. So kommen wir auf 16 Bilder. Aber eine Reihe von 16 Bildern ist nicht leicht zu organisieren, daher werden Ebenen mit zwei Bildern verwendet.
Select the handL0k layer and let it visible only. Use → to change the canvas size to 60×30 pixels.
Duplicate handL0k layer. On the copy, fill the hand with blue using Bucket Fill tool.
Nun wählen Sie das Verschieben-Werkzeug, klicken Sie es an und aktivieren >Aktive Ebene verschieben>. Verschieben Sie die blaue Hand mit Hilfe des Zooms präzise in den rechten Teil der Ebene.
Make sure only handL0k and its blue copy are visible. Right click on the Layers dialog: Apply the command with the option Expand as Necessary. You get a 60×30 pixels layer with the black hand on the left and the blue hand on the right. Rename it to „handsL0“.
Wiederholen Sie dieselbe Operationen für die anderen Ebenen.
-
Ebenen sortieren
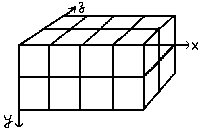
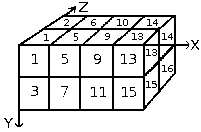
Layers must be set in order so that GIMP can find the required image at some point of using the brush. Our layers are yet in order but we must understand more generally how to have them in order. There are two ways to imagine this setting in order. The first method is mathematical: GIMP divides the 16 layers first by 4; that gives 4 groups of 4 layers for the first dimension. Each group represents a direction of the brush. Then, it divides each group by 2; that gives 8 groups of 2 layers for the second dimension: each group represents a L/R alternation. Then another division by 2 for the third dimension to represent a color at random between black and blue.
Die andere Methode ist visuell mit Hilfe der Arrayrepräsentation. Der Zusammenhang zwischen beiden Methoden wird durch das folgende Bild dargestellt:
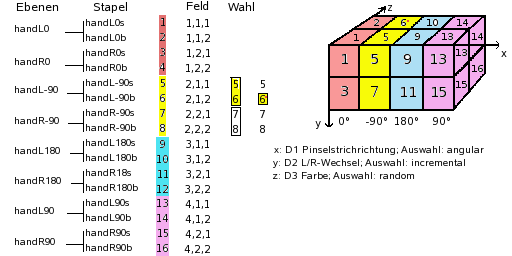
Wie liest GIMP dieses Feld?: GIMP beginnt mit der ersten Dimension, die für „Winkel“ programmiert wurde, z.B. -90°. In dieser -90°-Reihe, im Bild gelb, wählt es in der zweiten Dimension inkrementell einen Links-/Rechtswechsel. Dann wählt es in der dritten Dimension eine zufällige Farbe. Also müssen unsere Ebenen in folgender Reihenfolge vorliegen:

-
Voilà. Your brush is ready. Save it as
.xcffirst, then export as.gihwith the following parameters:-
Abstand: 100
-
Beschreibung: Hände
-
Cell Size: 30×30
-
Anzahl der Zellen: 16
-
Dimensionen: 3
-
Dimension 1: Reihen: 4; Auswahl: Winkel (angular)
-
Dimension 2: Reihen: 2; Auswahl: inkrementell (incremental)
-
Dimension 3: Reihen: 2; Auswahl: zufällig (random)
-
Place your
.gihfile into the GIMP brush directory and refresh the brush box (see steps above). You can now use your brush.Abbildung 7.19. Hier ist das Ergebnis, wenn Sie eine elliptische Auswahl mit dem Pinsel nachziehen:
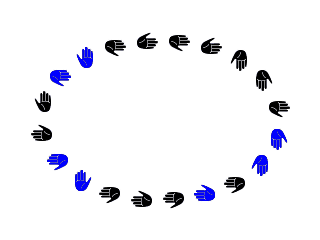
Die Pinsel wechselt regelmäßig rechte und linke Hand, schwarze und blaue Farbe zufällig und die Ausrichtung entsprechend den vier Pinselrichtungen.
-
-
[2] Ok, we are cheating here: our hand is borrowed from https://commons.wikimedia.org/wiki/File:Stop_hand.png.


