Net als voor normale penselen mogen deze geanimeerde penselen ook grijswaarden of kleur zijn. Voor afbeeldingen grijswaarden, waar het feitelijke penseel de huidige voorgrondkleur zal gebruiken, gebruikt u wit voor transparantie. Voor afbeeldingen in kleur worden transparante delen als zodanig gebruikt en bij het maken van penseelstreken, zullen de feitelijke kleuren worden gebruikt, in plaats van de voorgrondkleur.
Een nieuw geanimeerd penseel maken, maak ofwel een afbeelding grijswaarden of kleur, gebaseerd op of u het penseel wilt gebruiken om de voorgrondkleur van de gebruiker te gebruiken, of de feitelijke kleuren in de afbeelding. Maak dan de afbeelding voor de stappen van uw animatie. Selecteer, om het penseel op te slaan in de indeling gih, → , geef uw werk een naam met de extensie gih en druk op de knop . Het volgende dialoogvenster wordt weergegeven:
Afbeelding 7.18. Dialoogvenster om een afbeelding te exporteren als geanimeerd penseel
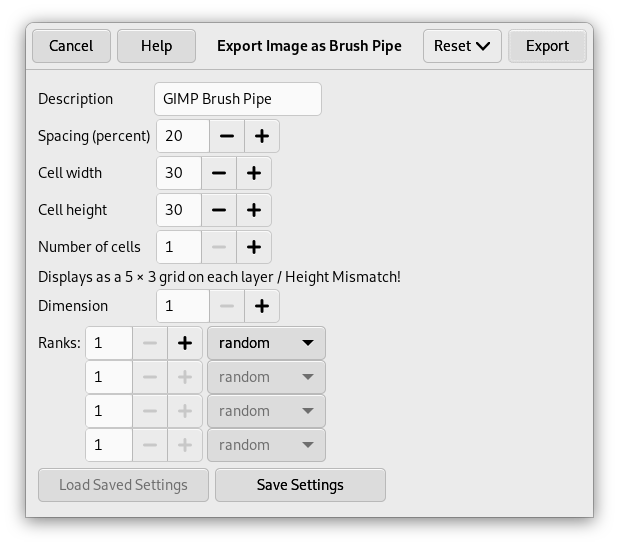
Dialoogvenster om een afbeelding op te slaan als een GIMP image hose
Dit dialoogvenster heeft verschillende opties die u in staat stellen te selecteren hoe uw penseel moet worden geanimeerd.
- Tussenruimte (percentage)
-
“Tussenruimte” is de afstand tussen opeenvolgende penseelmarkeringen, als u een penseelstreek maakt met de muisaanwijzer. U moet het tekenen met een penseel, welk gereedschap u ook gebruikt, zien als stempelen. Als Tussenruimte te laag is, zullen stempels heel dicht op elkaar staan en de streek zal er doorlopend uitzien. Als de tussenruimte te hoog is zullen stempels worden gescheiden: dat is interessant met een kleurpenseel (zoals “green pepper” bijvoorbeeld). De waarde varieert van 1 tot en met 200 en dit percentage verwijst naar de “diameter” van het penseel: 100% is een diameter.
- Omschrijving
-
Het is de naam van het penseel die boven in het dialoogvenster Penselen (rastermodus) zal worden weergegeven als u het penseel selecteert.
- Celgrootte
-
Dat is de grootte van de cellen waarin u lagen wilt opdelen. Standaard is een cel per laag en de grootte is die van de laag. Dan is er slechts een aanzicht per penseel per laag.
We zouden slechts een grote laag kunnen hebben, en die op kunnen delen in de cellen die zullen worden gebruikt voor de verschillende aanzichten van het geanimeerd penseel.
We willen bijvoorbeeld een penseel met 100×100 beeldpunten met 8 verschillende aanzichten. We kunnen deze 8 aanzichten uit een laag met 400×200 beeldpunten nemen, of uit een laag met 300×300 beeldpunten, waarin een cel niet gebruikt is.
- Aantal cellen
-
Dat is het aantal cellen (een cel per aanzicht) waarin elke laag zal worden opgedeeld. Standaard is het aantal lagen, omdat er slechts een laag per aanzicht is.
- Tonen als
-
Dit vertelt u hoe cellen zijn geschikt in lagen. Als u, bijvoorbeeld, de hoogte van de cellen hebt geplaatst op twee cellen per laag op vier lagen, zal GIMP weergeven:
1 rijen van 2 kolommen op elke laag. - Dimensie, Rang, Selectie keuzelijst
-
Daar worden de dingen gecompliceerd! Uitleg is nodig om te begrijpen hoe de cel en lagen te schikken.
GIMP begint met het ophalen van de cellen uit elke laag en stapelt ze in een stapel FIFO (First In First Out: de eerste erin staat aan de bovenkant van de stapel en kan er zo het eerste uitgaan). In ons voorbeeld van 4 lagen met 2 cellen in elk, zullen we dus hebben, van boven naar beneden: eerste cel van de eerste laag, tweede cel van de eerste laag, eerste cel van de tweede laag, tweede cel van de tweede laag, …, tweede cel van de vierde laag. Met een cel per laag of met verscheidene cellen per laag, is het resultaat hetzelfde. U kunt deze stapel bekijken in het dialoogvenster Lagen of het resulterende afbeeldingsbestand
.gih.Daarna maakt GIMP een computerarray uit deze stapel met de Dimensies die u hebt ingesteld. U mag vier dimensies gebruiken.
In computerwetenschappen heeft een array een vorm van “myarray(x,y,z)” voor een array met 3 dimensies (3D). Het is gemakkelijk een 2D-array voor te stellen: op een papier is het een array met rijen en kolommen
Met een 3D-array spreken we niet van rijen en kolommen maar van Dimensies en Rangen. De eerste dimensie is langs de X-as, de tweede dimensie langs de Y-as, de derde langs de Z-as. Elke dimensie heeft rangen voor cellen.
Om deze array te vullen, begint GIMP met het ophalen van de cellen vanaf de bovenkant van de stapel. De manier waarop het de array vult doet denken aan een afstandsmeter: cijfers van de rechter rang draaien eerst en, als zij hun maximum bereiken, beginnen cijfers van de linker rang te draaien. Als u nog enige herinnering hebt aan het programmeren in Basic zult u, met een array(4,2,2), de volgende volgorde hebben: (1,1,1),(1,1,2),(1,2,1),(1,2,2),(2,1,1),(2,1,2),(2,2,2),(3,1,1),…, (4,2,2). We zullen dit later in een voorbeeld zien.
Naast het nummer van de rang dat u aan elke dimensie kunt geven, kunt u ze ook een modus Selectie geven. U heeft verscheidene modi die bij het tekenen zullen worden toegepast:
- Oplopend
-
GIMP selecteert de cellen in deze richting in de volgorde zoals ze zijn opgeslagen.
- Hoek (per richting)
-
GIMP selecteert de cellen in deze richting afhankelijk van de richting waarin het penseel beweegt.
De eerste rang is voor de richting 0°, naar boven. De andere rangen worden beïnvloed, met de klok mee, tot een hoek waarvan de waarde 360/aantal rangen is. Dus, met 4 rangen in de betreffende dimensie, zal de hoek 90° met de klok mee verplaatsen voor elke wijziging in richting: de tweede rang zal worden beïnvloed tot 90° (rechts), de derde naar 180° (naar beneden) en de vierde rang naar 270° (-90°) (links).
- Willekeurig
-
GIMP selecteert de cellen in deze richting willekeurig.
- Snelheid, Druk, Helling X, Helling Y
-
Deze opties zijn voor het werken met een modern tekentablet.
Voorbeelden
- Een een-dimensie afbeelding pipe
-
Waar kan dat dan voor dienen? We zullen nog wat voorbeelden laten zien. U kunt echt in iedere dimensie stempels gebruiken die uw penseel een bepaald soort reactie geven.
We beginnen met een 1-dimensionaal penseel, dat ons de kans geeft om de verschillende selectie-manieren te laten zien. U kunt het zich zo voorstellen:
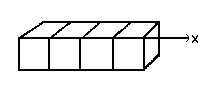
Zo maakt u het:
-
Selecteer → uit het hoofdmenu.
Stel Breedte en Hoogte in op bijvoorbeeld 30 beeldpunten.
Stel in de Geavanceerde opties de Kleurruimte in op RGB-kleur en stel Vullen met in op Transparant.
Maak met het gereedschap Tekst 4 lagen “1”, “2”, “3”, “4”. Verwijder de laag “achtergrond”.
-
Selecteer → uit het hoofdmenu om uw afbeelding eerst op te slaan als een bestand
.xcfom zijn eigenschappen te behouden.Selecteer → uit het hoofdmenu om de afbeelding te exporteren als een geanimeerd penseel met de extensie
.gih.Exporteer de afbeelding met een extensie
.gbrnaar de mapbrushesdie is geplaatst binnen uw persoonlijke configuratiemap van GIMP. -
In het dialoogvenster Afbeelding exporteren als Penseelpijp, geef een Beschrijving op, stel de Tussenruimte (percentage) in op 100, stel de Celgrootte in op 30×30, stel Dimensie in op 1 en stel Rangen in op 4 en de keuzelijst Selectie op oplopend. Klik daarna op de knop .
-
Klik, in het dialoogvenster Penselen, op de knop
 .
.Uw penseel verschijnt naast de andere penselen. U kunt het onmiddellijk gebruiken, zonder GIMP opnieuw te starten.
Selecteer uw penseel. Selecteer bijvoorbeeld het gereedschap Potlood en klik en houd het ingedrukt op een nieuwe afbeelding:
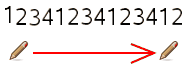
U ziet de cijfers 1, 2, 3, 4 elkaar opvolgen.
-
Neem uw afbeeldingsbestand
.xcfterug en sla het op als.gihen stel de keuzelijst Selectie in op willekeurig: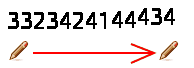
Cijfers worden getekend in een willekeurige volgorde.
-
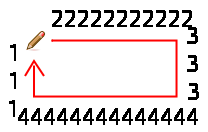
Stel nu de keuzelijst Selectie in op hoek:
-
- Een 3-dimensies image hose
-
We geven nu een voorbeeld van een 3 dimensionaal variërend penseel: zijn oriëntatie zal variëren met de richting van schilderen, het zal linker en rechterhanden regelmatig afwisselen en de kleur zal willekeurig wisselen tussen zwart en blauw.
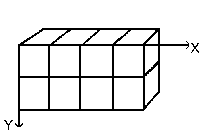
De eerste vraag die we moeten beantwoorden is het aantal afbeeldingen dat nodig is. We reserveren de eerste dimensie (X) voor de richting van het penseel (4 richtingen). De tweede dimensie (Y) is voor het wisselen tussen Links/Rechts en de derde dimensie (Z) voor variëren van de kleur. Een dergelijk penseel wordt weergegeven in een 3D-array “myarray(4,2,2)”:
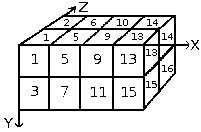
Er zijn 4 rangen in de eerste dimensie (X), 2 rangen in de tweede dimensie (Y) en 2 rangen in de derde dimensie (Z). Er zijn dus 4×2×2 = 16 cellen. We hebben 16 afbeeldingen nodig.
-
Afbeeldingen creëren voor dimensie 1 (X)
Open een nieuwe afbeelding met 30×30 beeldpunten, RGB met Vullen met als Transparant. Teken met de zoom een linkerhand met de vingers naar boven.[2] Sla dat op als
handL0k.xcf(hand Links 0° Zwart).Open het dialoogvenster Lagen. Dubbelklik op de laag om het dialoogvenster Laagattributen te openen en hernoem het naar handL0k.
Dupliceer de laag. Laat alleen de gekopieerde laag zichtbaar, selecteer die en pas → → toe. Hernoem hem naar handL90k.
Herhaal deze bewerkingen om nog twee lagen te maken: handL180z en handL-90z (of handL270z).
-
Afbeeldingen creëren voor dimensie 2 (Y)
Deze dimensie heeft in ons voorbeeld twee rangen, een voor de linkerhand en een voor de rechter. De linkerhand hebben we inmiddels. We voegen nu de rechterhanden toe door horizontaal spiegelen.
Dupliceer de laag handL0k. Laat die zichtbaar en selecteer het. Hernoem hem naar handR0K. Pas toe → → .
Herhaal deze zelfde operatie voor de andere linkerhanden om de zwarte rechterhanden te maken.
Orden de lagen zodat ze een rotatie met de klok mee hebben, afwisselend links en rechts: handL0k, handR0k, handL90k, handR90k, …, handR-90k.
-
Afbeeldingen creëren voor dimensie 3 (Z)
Afbeeldingen maken voor dimensie 3 (Z): De derde dimensie heeft twee rangen, een voor de zwarte kleur en de andere voor de blauwe kleur. De eerste rang, zwart, bestaat al. We zullen zien dat de afbeeldingen van dimensie 3 een kopie zullen zijn, in blauw, van de afbeeldingen van dimensie 2. Dan zullen we dus al onze 16 afbeeldingen hebben. Maar een rij van 16 lagen is niet eenvoudig te beheren: we zullen lagen gebruiken met twee afbeeldingen.
Selecteer de laag handL0k en laat die als enige zichtbaar. Gebruik → om de canvasgrootte te wijzigen naar 60×30 beeldpunten.
Dupliceer de laag handL0k. In de kopie, vul de hand met blauw met het gereedschap Emmer.
Selecteer nu het gereedschap Verplaatsen. Dubbelklik erop om toegang te krijgen tot zijn eigenschappen: selecteer de optie De geselecteerde laag verplaatsen. Verplaats de blauwe hand naar het rechter gedeelte van de laag, heel precies met de hulp van .
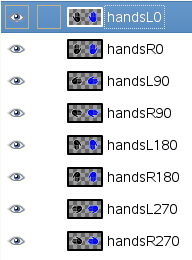
Zorg ervoor dat alleen handL0k en zijn blauwe kopie zichtbaar zijn. Klik met rechts op het dialoogvenster Lagen: Pas de opdracht toe, met de optie Vergroot waar nodig. U krijgt een laag met 60×30 beeldpunten met de zwarte hand links en de blauwe hand rechts. Hernoem die naar “handsL0”.
Herhaal dezelfde bewerkingen voor de andere lagen.
-
Zet de lagen in de goede volgorde
Lagen moeten in volgorde worden ingesteld, zodat GIMP de vereiste afbeelding op enig moment kan vinden bij het gebruiken van het penseel. Onze lagen staan nu in volgorde, maar we moeten meer in het algemeen begrijpen hoe ze in de volgorde te hebben. Er zijn twee manieren om deze instelling voor de volgorde voor te stellen. De eerste methode is wiskundig: GIMP deelt de 16 lagen eerst door 4; dat geeft 4 groepen van 4 lagen voor de eerste dimensie. Elke groep geeft een richting voor het penseel aan. Daarna deelt het elke groep door 2; dat geeft 8 groepen van 2 lagen voor de tweede dimensie: elke groep geeft een wisseling L/R aan. Daarna volgt nog een deling door 2 voor de derde dimensie om een willekeurige kleur weer te geven tussen zwart en blauw.
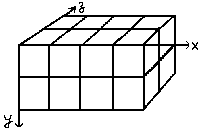
De andere manier is visueel. Het verband tussen deze methoden staat in de volgende afbeelding:
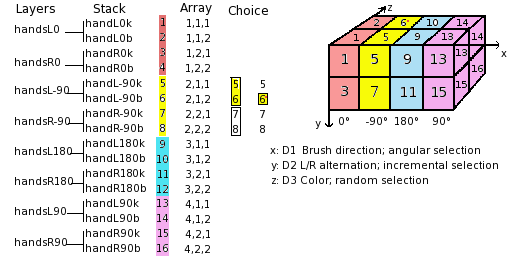
Hoe zal GIMP deze array lezen?: GIMP begint met de eerste dimensie die is geprogrammeerd voor “hoek”, bijvoorbeeld 90°. In deze rang 90°, in geel, in de tweede dimensie, selecteert het een wisseling tussen L/R, op een “oplopende” manier. Daarna, in de derde dimensie, op een willekeurige manier, kiest het een kleur. Tenslotte moeten onze lagen in de volgende volgorde staan:
-
Voilà. Uw penseel is klaar. Sla het eerst op als
.xcf, exporteer het dan als.gihmet de volgende parameters:-
Tussenruimte: 100
-
Beschrijving: Handen
-
Celgrootte: 30 x 30
-
Aantal cellen: 16
-
Dimensies: 3
-
Dimensie 1: 4 rangen, selectie: Hoek
-
Dimensie 2: 2 rangen, selectie: Oplopend
-
Dimensie 3: 2 rangen, selectie: Willekeurig
-
Plaats uw
.gih-bestand in de map brushes van GIMP en vernieuw het vak met de penselen (zie de stappen hierboven). U kunt nu uw penseel gebruiken.Afbeelding 7.19. Hier is het resultaat van het belijnen van een ovale selectie met het penseel:
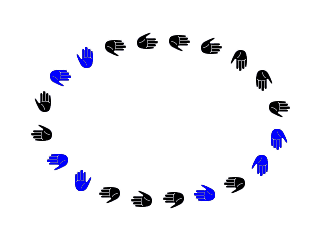
Het penseel wisselt telkens linker en rechterhanden af, toont willekeurig een blauwe of een zwarte en de richting komt overeen met de richting van het tekenen op dat punt.
-
-
[2] Oké, we sjoemelen hier een beetje: onze hand is geleend van https://commons.wikimedia.org/wiki/File:Stop_hand.png.


