Как и обычные кисти, анимированные кисти также могут быть в оттенках серого или цветными. Для изображений в оттенках серого, где фактическая кисть будет использовать текущий цвет переднего плана, для прозрачности используется белый цвет. Для цветных изображений прозрачные части используются как таковые, и при создании мазков кистью будут использоваться фактические цвета вместо цвета переднего плана.
Чтобы создать анимированную кисть, создайте изображение в оттенках серого или цветное, в зависимости от того, хотите ли вы, чтобы кисть использовала цвет переднего плана пользователя или фактические цвета в изображении. Затем создайте изображения для этапов анимации. Чтобы сохранить в формате gih, выберите → , укажите имя с разрешением gih и нажмите кнопку . Отобразится следующее окно:
Рисунок 7.18. Диалог экспорта изображения в виде анимированной кисти
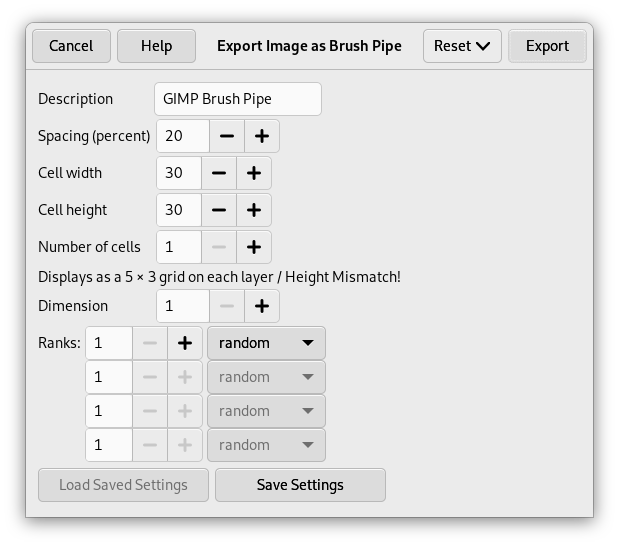
Диалоговое окно для сохранения изображения в формате GIMP image hose
Этот диалог содержит несколько параметров, позволяющих выбрать, каким образом будет анимирована кисть.
- Расстояние (процент)
-
Определяет расстояние между последовательными отпечатками кисти в одном мазке. Об этом легче думать как о печати, вне зависимости от инструмента рисования. Если расстояние мало, то печати будут лежать близко друг к другу, и мазок будет казаться сплошным. Если расстояние велико, печати лежат отдельно. Диапазон значений от 1 до 200, где под 100% принимается размер диаметра кисти.
- Описание
-
Название кисти, которое появится вверху диалога кисти (в режиме таблицы) при выборе этой кисти.
- Размер ячейки
-
Это размер ячейки. По умолчанию на один слой приходится одна ячейка, поэтому этот размер равен размеру слоя. Тогда есть только один аспект кисти на слой.
Можно использовать один большой слой и разрезать его на ячейки, которые будут использованы для разных аспектов анимированной кисти.
Например, нужно получить кисть размером 100x100 пикселей с восемью разными аспектами. Эти 8 аспектов можно взять из слоя в 400x200 пикселей или из слоя в 300x300 пикселей, не используя одну ячейку.
- Число ячеек
-
Это число ячеек (одна ячейка на аспект), которое будет вырезано в каждом слое. По умолчанию этот число слоёв, т. к. существует только один аспект на слой.
- Показать как:
-
Определяет, как ячейки располагаются в слоях. Например, если поместить восемь ячеек в четыре слоя до две ячейки на слой, то GIMP покажет
1 ряд из двух колонок в каждом слое. - Измерение, Порядки, Выбор из списка
-
Ниже следует описание работы GIMP для того, чтобы понять, как распределить ячейки и слои.
GIMP берёт ячейки из каждого слоя и кладёт их на стопку по принципу первый внутрь — первый наружу. Первая ячейка считается наверху стопки. В примере с четырьмя слоями и двумя ячейками стопка получается следующая (сверху вниз): первая ячейка первого слоя, вторая ячейка первого слоя, первая ячейка второго слоя, вторая ячейка второго слоя, ..., вторая ячейка четвёртого слоя. Результат не меняется от того, сколько ячеек в слое. Стопку можно увидеть в диалоге слоёв
.gihфайла.GIMP создаёт компьютерный массив из этой стопки с указанными Измерениями. Можно использовать до четырёх измерений.
В компьютерной науке массив в трёх измерениях имеет форму «массив(x,y,z)». Двухмерный массив легко представить: на бумаге это строки и столбцы

Для трёхмерных массивов говорят не о строках и столбцах, а об Измерениях и Порядках. Первое измерение идёт по x, второе — по y, третье — по z. У каждого измерения есть порядок ячеек.
Чтобы заполнить этот массив, GIMP берёт ячейки с верха стопки. Это напоминает одометр: сначала изменяются малозначащие цифры, а когда они достигают максимального значения, изменяется следующее по значимости число. Так, для массива (4,2,2) вы получите последовательность (1,1,1),(1,1,2),(1,2,1),(1,2,2),(2,1,1),(2,1,2),(2,2,2),(3,1,1).... (4,2,2). Вы это увидите на примерах ниже.
Кроме порядкового номера, каждому измерению можно присвоить и режим Выделения. Существует несколько режимов, которые будут применяться во время рисования:
- Постепенный
-
GIMP выбирает порядок из измерения согласно последовательности, по которой эти порядки сохранены в измерении.
- Угловой
-
GIMP выбирает порядок в соответствующем измерении согласно углу движения кисти.
Первый порядок берётся для направления 0°, вверх. Другие порядки используются в диапазоне до 360°/число порядков, считая против часовой стрелки. Так, с четырьмя порядками в измерении, угол изменится до 90° против часовой стрелки на каждое изменение направления. Второй порядок изменится до 90° (вправо), третий — до 180° (вниз), а четвёртый — до 270° (-90°) (влево).
- Случайный
-
GIMP выбирает порядок случайным образом из соответствующего измерения.
- Скорость, Нажим, Наклон по X, Наклон по Y
-
Эти параметры предназначены для многофункциональных графических планшетов.
Примеры
- Создание одномерного изображения
-
Ниже мы покажем на примерах, для чего всё это годится. Вы можете вставить в новое измерение новые свойства кисти.
Начнём с одномерной кисти, которая позволит нам изучить работу режимов выделения. Мы можем представить это, как показано здесь:
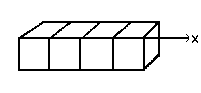
. Сделайте следующее:
-
Выберите пункт главного меню → .
Установите для Ширины и Высоты, например, 30 пикселей.
В Расширенных параметрахустановите для Цветового пространства значение Цвет RGB, а для Заливки — Прозрачность.
С помощью инструмента «Текст» создайте 4 слоя: «1», «2», «3», «4». Удалите «фоновый» слой.
-
Выберите → из главного меню, чтобы сначала сохранить изображение как файл
.xcfдля сохранения его свойств.Выберите → из главного меню, чтобы экспортировать изображение как анимированную кисть с расширением
.gih.Экспортируйте изображение с расширением
.gbrв каталогbrushes,расположенный в вашей личной папке конфигурации GIMP. -
В диалоговом окне Экспортировать как анимированную кисть введите Описание, установите значение Интервал (проценты) на 100, установите Размер ячейки на 30×30, установите Размер на 1 и установите Порядки на 4, а в раскрывающемся списке Выделение выберите постепенное. Затем нажмите кнопку .
-
В диалоге кистей нажмите кнопку
 .
.Ваша кисть появится среди других кистей. Её можно сразу же использовать без перезапуска GIMP.
Выберите кисть. Выберите, например, инструмент «Карандаш», нажмите и удерживайте его на новом изображении:
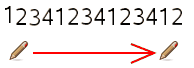
Цифры 1, 2, 3, 4 следуют друг за другом по порядку.
-
Теперь возьмите ваше изображение формата
.xcfи сохраните в формате.gih, выбирая выделение как «Случайное»: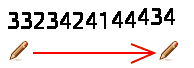
Цифры будут показаны в случайном порядке.
-
Теперь установите для Выделения значение угловое:
-
- Анимированная кисть с тремя измерениями
-
Мы создадим трёхмерную анимированную кисть: её ориентация будет изменяться в зависимости от направления кисти, регулярно чередоваться между левой и правой рукой, и её цвет будет изменяться случайным образом между чёрным и синим.
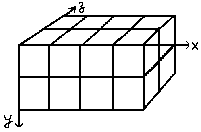
Первым делом необходимо определить нужное число изображений. Мы резервируем первое измерение (x) для направления кисти (4 направления). Второе измерение (y) будет для чередования левый/правый. Третье измерение (z) будет использовано для цвета. Такую кисть можно представить трёхмерным массивом «myarray(4,2,2)»:

В первом измерении (x) есть 4 порядка, во втором (y) — 2 и в третьем (z) — 2. Видно, что есть 4x2x2 = 16 ячеек. Поэтому необходимо 16 изображений.
-
Создание изображений одного измерения (x)
Откройте новое изображение размером 30x30 пикселей, RGB с прозрачным типом заливки. Нарисуйте левую руку с пальцами вверх. [2] Используйте масштаб для точного рисования. Сохраните изображение как
handL0k.xcf(левая рука, 0° поворота, чёрная).Откройте диалог слоёв. Нажмите дважды на слой, чтобы получить диалог свойств слоя и переименуйте его в handL0k.
Дублируйте слой, сделайте только его копию видимой и выберите её. Переименуйте его в handL90k. Примените команду → → .
Повторите те же операции для создания handL180k и handL-90k (или handL270k).
-
Создание изображений двух измерений (y)
У этого измерения в нашем примере два порядка — для левой стороны и для правой. Первый порядок, левый, уже существует. Мы построим правый порядок с помощью горизонтального отражения.
Дублируйте слой handL0k, сделайте только его видимым и выберите его. Переименуйте его в handR0K. Примените команду → → .
Повторите ту же операцию над другими слоями слева, чтобы создать им правосторонний эквивалент.
Пересортируйте слои, чтобы получить вращение по часовой стрелке сверху вниз с чередованием слева направо: handL0k, handR0k, handL90k, handR90k, …, handR-90k.
-
Создание изображений трёх измерений (z)
Создание изображений трёх измерений (z). У третьего измерения два порядка, один для чёрного цвета, другой для синего. Первый порядок, чёрный, уже существует. Видно, что изображения третьего порядка - синие копии изображений второго порядка. Таким образом получаются 16 изображений. Для удобства управления мы используем слои с двумя изображениями.
Выберите слой handL0k и сделайте только его видимым. Используйте → , чтобы изменить размер холста на 60×30 пикселей.
Дублируйте слой handL0k. В копии залейте руку синим с помощью инструмента «Плоская заливка».
Теперь выберите инструмент Перемещение. Нажмите на него дважды, чтобы получить доступ к его параметрам. Выберите параметр «Переместить активный слой». Переместите синюю руку в правую часть слоя. Для точного позиционирования используйте .
Убедитесь, что отображаются только handL0k и его синяя копия. Нажмите правой кнопкой на диалоге слоёв. Примените команду «Объединить видимые слои…» с настройкой «Расширить по мере надобности». Вы получите слой размером 60x30 пикселей с чёрной рукой слева и синей рукой справа. Переименуйте его в «handsL0».
Повторите эту операцию над другими слоями.
-
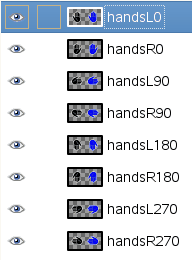
Установить слои по порядку
Слои должны быть упорядочены таким образом, чтобы GIMP мог найти нужное изображение в какой-либо точке использования кисти. Наши слои уже упорядочены, но мы должны получить более общее представление о том, как их упорядочить. Есть два способа представить это упорядочивание. Первый метод математический: GIMP сначала делит 16 слоёв на 4; это даёт 4 группы по 4 слоя для первого измерения. Каждая группа представляет направление кисти. Затем каждая группа делится на 2; это даёт 8 групп по 2 слоя для второго измерения: каждая группа представляет чередование Л/П. Затем ещё одно деление на 2 для третьего измерения, чтобы представить случайный цвет между чёрным и синим.
Второй способ — зрительный, используя представление массива. Соотношение между двумя методами показано в следующем изображении:
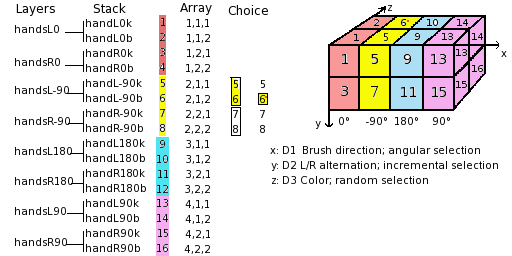
Как GIMP читает этот массив?: GIMP начинает с первого измерения, которое указано как «угловое», например 90°. В этом порядке 90° (жёлтый), во втором измерении он выбирает чередование Л/П «постеренным» образом. Потом, в третьем измерении, случайным образом, он выбирает цвет. И наконец, слои должны быть в следующем порядке:
-
Теперь кисть готова. Сначала сохраните её как
.xcf, затем как.gihсо следующими параметрами:-
Расстояние: 100
-
Описание: Руки
-
Размер ячейки: 30x30
-
Чисто ячеек: 16
-
Измерения: 3
-
Измерение 1: 4 порядка Выделение: Угловое
-
Измерение 2: 2 порядка Выделение: Постепенное
-
Измерение 3: 2 порядка Выделение: Случайное
-
Сохраните файл
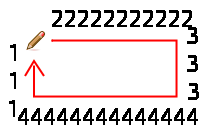
.gihв папке кистей GIMP и обновите список кистей. Теперь новую кисть можно использовать.Рисунок 7.19. Вот результат штрихования кистью эллиптического выделения:
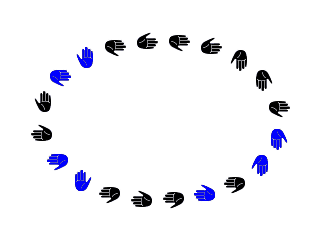
Эта кисть регулярно меняется между правосторонней и левосторонней, чёрной и синей случайным образом, в зависимости от четырёх направлений кисти.
-
-


