Sadržaj
- 1. Introduction to Menus
- 2. The “File” Menu
-
- 2.1. Overview
- 2.2. New…
- 2.3. Create
- 2.4. Open…
- 2.5. Open as Layers…
- 2.6. Open Location…
- 2.7. Open Recent
- 2.8. Save
- 2.9. Save As…
- 2.10. Save a Copy…
- 2.11. Revert
- 2.12. Export… and Overwrite…
- 2.13. Export As…
- 2.14. Create Template…
- 2.15. Print
- 2.16. Send by Email
- 2.17. Copy Image Location
- 2.18. Show in File Manager
- 2.19. Close View
- 2.20. Close All
- 2.21. Quit
- 3. The “Edit” Menu
-
- 3.1. Overview
- 3.2. Undo
- 3.3. Redo
- 3.4. Undo History
- 3.5. Cut
- 3.6. Copy
- 3.7. Copy Visible
- 3.8. Paste
- 3.9. Paste In Place
- 3.10. Paste as
- 3.11. Buffer
- 3.12. Clear
- 3.13. Fill with FG Color
- 3.14. Fill with BG Color
- 3.15. Fill with Pattern
- 3.16. Fill Selection Outline
- 3.17. Fill Paths
- 3.18. Stroke Selection
- 3.19. Stroke Paths
- 3.20. Preferences
- 3.21. Input Devices
- 3.22. Keyboard Shortcuts
- 3.23. Modules
- 3.24. Units
- 4. The “Select” Menu
-
- 4.1. Overview
- 4.2. Select All
- 4.3. None
- 4.4. Invert
- 4.5. Float
- 4.6. By Color
- 4.7. Selection From Paths
- 4.8. Selection Editor
- 4.9. Feather
- 4.10. Sharpen
- 4.11. Shrink
- 4.12. Grow
- 4.13. Border
- 4.14. Remove Holes
- 4.15. Distort
- 4.16. Rounded Rectangle
- 4.17. Toggle Quick Mask
- 4.18. Save to Channel
- 4.19. To Path
- 5. The “View” Menu
-
- 5.1. Overview
- 5.2. New View
- 5.3. Show All
- 5.4. Dot for Dot
- 5.5. Zoom
- 5.6. Flip & Rotate (0°)
- 5.7. Center Image in Window
- 5.8. Shrink Wrap
- 5.9. Full Screen
- 5.10. Move to Screen
- 5.11. Navigation Window
- 5.12. Display Filters
- 5.13. Color Management
- 5.14. Color-Manage this View
- 5.15. Proof Colors
- 5.16. Display Rendering Intent
- 5.17. Black Point Compensation
- 5.18. Mark Out Of Gamut Colors
- 5.19. As in Preferences
- 5.20. Show Selection
- 5.21. Show Layer Boundary
- 5.22. Show Canvas Boundary
- 5.23. Show Guides
- 5.24. Show Grid
- 5.25. Show Sample Points
- 5.26. Snap to Guides
- 5.27. Snap to Grid
- 5.28. Snap to Canvas
- 5.29. Snap to Active Path
- 5.30. Snap to Bounding Boxes
- 5.31. Snap to Equidistance
- 5.32. Padding Color
- 5.33. Show Menubar
- 5.34. Show Rulers
- 5.35. Show Scrollbars
- 5.36. Show Statusbar
- 6. The “Image” Menu
-
- 6.1. Overview
- 6.2. Duplicate
- 6.3. “Mode” Submenu
- 6.4. RGB mode
- 6.5. Grayscale mode
- 6.6. Indexed mode
- 6.7. “Encoding” Submenu
- 6.8. “Color Management” Submenu
- 6.9. Use sRGB Profile
- 6.10. Assign Color Profile
- 6.11. Convert to Color Profile
- 6.12. Discard Color Profile
- 6.13. Save Color Profile to File
- 6.14. Soft-Proof Profile
- 6.15. Soft-Proofing Rendering Intent
- 6.16. Black Point Compensation
- 6.17. “Transform” Submenu
- 6.18. Flip Horizontally; Flip Vertically
- 6.19. Rotation
- 6.20. Canvas Size
- 6.21. Fit Canvas to Layers
- 6.22. Fit Canvas to Selection
- 6.23. Print Size
- 6.24. Scale Image
- 6.25. Crop Image
- 6.26. Slice Using Guides
- 6.27. Zealous Crop
- 6.28. Merge Visible Layers
- 6.29. Flatten Image
- 6.30. Align Visible Layers…
- 6.31. “Guides” Submenu
- 6.32. New Guide (by Percent)
- 6.33. New Guide
- 6.34. New Guides from Selection
- 6.35. Remove all Guides
- 6.36. Configure Grid…
- 6.37. Image Properties
- 6.38. “Metadata” Submenu
- 6.39. Metadata Editor
- 6.40. Metadata Viewer
- 7. The “Layer” Menu
-
- 7.1. Overview
- 7.2. New Layer
- 7.3. New from Visible
- 7.4. New Layer Group
- 7.5. Duplicate layers
- 7.6. Anchor Floating Layer or Mask
- 7.7. Merge Down
- 7.8. Merge Layer Groups
- 7.9. Delete Layers
- 7.10. The Text Commands of the Layer Menu
- 7.11. Discard Text Information
- 7.12. Text to Path
- 7.13. Text along Path
- 7.14. “Stack” Submenu
- 7.15. Select Previous Layers
- 7.16. Select Next Layers
- 7.17. Select Top Layer
- 7.18. Select Bottom Layer
- 7.19. Raise Layers
- 7.20. Lower Layers
- 7.21. Layers to Top
- 7.22. Layers to Bottom
- 7.23. Reverse Layer Order
- 7.24. The “Mask” Submenu
- 7.25. Add Layer Masks
- 7.26. Apply Layer Masks
- 7.27. Delete Layer Masks
- 7.28. Show Layer Masks
- 7.29. Edit Layer Mask
- 7.30. Disable Layer Masks
- 7.31. Masks to Selection
- 7.32. Add Masks to Selection
- 7.33. Subtract Masks from Selection
- 7.34. Intersect Masks with Selection
- 7.35. The “Transparency” Submenu
- 7.36. Add Alpha Channel
- 7.37. Remove Alpha Channel
- 7.38. Color to Alpha
- 7.39. Semi-Flatten
- 7.40. Threshold Alpha
- 7.41. Alpha to Selection
- 7.42. Add Alpha to Selection
- 7.43. Subtract Alpha from Selection
- 7.44. Intersect Alpha with Selection
- 7.45. The “Transform” Submenu
- 7.46. Flip Horizontally
- 7.47. Flip Vertically
- 7.48. Rotate 90° clockwise
- 7.49. Rotate 90° counter-clockwise
- 7.50. Rotate 180°
- 7.51. Arbitrary Rotation
- 7.52. Offset
- 7.53. Layer Boundary Size
- 7.54. Layers to Image Size
- 7.55. Scale Layer
- 7.56. Resize Layers to Selection
- 7.57. Crop Layers to Content
- 8. The “Colors” Menu
-
- 8.1. Overview
- 8.2. Color Balance
- 8.3. Color Temperature
- 8.4. Hue Chroma
- 8.5. Hue-Saturation
- 8.6. Saturation
- 8.7. Exposure
- 8.8. Shadows-Highlights
- 8.9. Brightness-Contrast
- 8.10. Levels
- 8.11. Curves
- 8.12. Invert
- 8.13. Linear Invert
- 8.14. Value Invert
- 8.15. The “Auto” Submenu
- 8.16. Equalize
- 8.17. White Balance
- 8.18. Stretch Contrast
- 8.19. Stretch Contrast HSV
- 8.20. Color Enhance
- 8.21. The “Components” Submenu
- 8.22. Channel Mixer
- 8.23. Extract Component
- 8.24. Mono Mixer
- 8.25. Compose
- 8.26. Decompose
- 8.27. Recompose
- 8.28. The “Desaturate” Submenu
- 8.29. Color to Gray
- 8.30. Desaturate
- 8.31. Mono Mixer
- 8.32. Sepia
- 8.33. The “Map” Submenu
- 8.34. Rearrange Colormap
- 8.35. Set Colormap
- 8.36. Alien Map
- 8.37. Color Exchange
- 8.38. Rotate Colors
- 8.39. Gradient Map
- 8.40. Palette Map
- 8.41. Sample Colorize
- 8.42. The “Tone Mapping” Submenu
- 8.43. Fattal et al. 2002
- 8.44. Mantiuk 2006
- 8.45. Reinhard 2005
- 8.46. Stress
- 8.47. Destripe
- 8.48. Retinex
- 8.49. The “Info” Submenu
- 8.50. Histogram
- 8.51. Export Histogram
- 8.52. Border Average
- 8.53. Smooth Palette
- 8.54. Threshold
- 8.55. Colorize
- 8.56. Posterize
- 8.57. Color to Alpha…
- 8.58. Dither
- 8.59. RGB Clip
- 8.60. Hot…
- 8.61. Local Threshold
- 9. The “Tools” Menu
- 10. The “Filters” Menu
- 11. The “Windows” Menu
- 12. The “Help” Menu
There are many places in GIMP where you can find menus. The aim of this chapter is to explain all the commands that are accessible from the main menu at the top of GIMP's window, and the main menu you get by right clicking the canvas. All context menus and menu entries for other dialogs are described elsewhere in the chapters that describe the dialogs themselves.

![[Bilješka]](images/note.png)
If you right-click on certain parts of GIMP's interface, a “context menu” opens, which allows access to additional commands related to where you clicked. Some places where you can access context menus are:
-
Right-clicking on an image window displays the Main menu. This is useful when you are working in full-screen mode, without a menu bar.
-
Right-clicking on a layer in the Layers Dialog or on a channel in the Channels Dialog displays functions for the selected layer or channel.
-
Right-clicking on the Main Menu bar has the same effect as left-clicking.
-
Right-clicking on the title bar displays functions which do not belong to GIMP, but to the window manager of your computer.
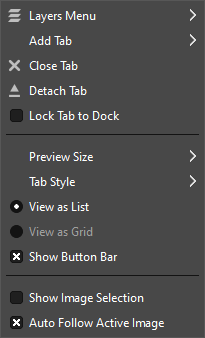
The “Tab Menu” is not related to the Main Menu, but mentioned here for the sake of completeness:
Every dockable dialog
contains a Tab Menu button
![]() .
Pressing this Tab
Menu button opens a special menu of tab-related operations, with an
entry at the top that opens the dialog's context menu.
.
Pressing this Tab
Menu button opens a special menu of tab-related operations, with an
entry at the top that opens the dialog's context menu.
See Odjeljak 2.3.2, “Tab Menu” to learn more about Tab menus.


