Inhoudsopgave
- 1. Inleiding tot de menu's
- 2. Het menu “Bestand”
-
- 2.1. Overzicht
- 2.2. Nieuw…
- 2.3. Aanmaken
- 2.4. Openen…
- 2.5. Openen als lagen…
- 2.6. Locatie openen…
- 2.7. Onlangs geopend
- 2.8. Opslaan
- 2.9. Opslaan als…
- 2.10. Kopie opslaan…
- 2.11. Terughalen
- 2.12. Exporteren… en Overschrijven…
- 2.13. Exporteren als…
- 2.14. Nieuw sjabloon aanmaken…
- 2.15. Afdrukken
- 2.16. Verzenden als e-mail
- 2.17. Afbeeldingslocatie kopiëren
- 2.18. Weergeven in bestandsbeheer
- 2.19. Afbeelding sluiten
- 2.20. Alles sluiten
- 2.21. Afsluiten
- 3. Het menu “Bewerken”
-
- 3.1. Items menu “Bewerken”
- 3.2. Ongedaan maken
- 3.3. Opnieuw uitvoeren
- 3.4. Geschiedenis Ongedaan maken
- 3.5. Knippen
- 3.6. Kopiëren
- 3.7. Zichtbare kopiëren
- 3.8. Plakken
- 3.9. Plak op zelfde plek als origineel
- 3.10. Plakken als
- 3.11. Buffers
- 3.12. Wissen
- 3.13. Vullen met VG-kleur
- 3.14. Vullen met AG-kleur
- 3.15. Met patroon vullen
- 3.16. Selectie vullen
- 3.17. Paden vullen
- 3.18. Selectie belijnen
- 3.19. Paden belijnen
- 3.20. Voorkeuren
- 3.21. Invoerapparaten
- 3.22. Sneltoetsen
- 3.23. Modules
- 3.24. Eenheden
- 4. Menu “Selecteren”
-
- 4.1. Inleiding in het menu “Selecteren”
- 4.2. Alles selecteren
- 4.3. Niets
- 4.4. Inverteren
- 4.5. Zwevend
- 4.6. Op kleur
- 4.7. Selectie uit paden
- 4.8. Selectiebewerker
- 4.9. Selectieranden verzachten
- 4.10. Verscherpen
- 4.11. Krimpen…
- 4.12. Vergroten
- 4.13. Rand
- 4.14. Gaten verwijderen
- 4.15. Vervormen
- 4.16. Afgeronde rechthoek
- 4.17. Snelmasker aan/uit
- 4.18. Opslaan naar kanaal
- 4.19. Naar pad
- 5. Het menu “Beeld”
-
- 5.1. Inleiding tot het menu “Beeld”
- 5.2. Nieuwe weergave
- 5.3. Alles tonen
- 5.4. Punt voor punt
- 5.5. Zoomen
- 5.6. Spiegelen en draaien (0°)
- 5.7. Afbeelding in venster centreren
- 5.8. Venster naar afbeeldingsgrootte
- 5.9. Volledig scherm
- 5.10. Verplaatsen naar scherm
- 5.11. Navigatievenster
- 5.12. Weergavefilters
- 5.13. Kleurbeheer
- 5.14. Kleurbeheer voor deze weergave activeren
- 5.15. Afdrukvoorbeeld
- 5.16. Renderintentie beeldscherm
- 5.17. Zwartpuntcompensatie
- 5.18. Kleuren buiten het kleurengamma markeren
- 5.19. Terug naar standaardinstellingen
- 5.20. Selectie tonen
- 5.21. Laaggrens tonen
- 5.22. Canvasgrens tonen
- 5.23. Hulplijnen tonen
- 5.24. Raster tonen
- 5.25. Monsterpunten tonen
- 5.26. Kleven aan hulplijnen
- 5.27. Raster magnetisch
- 5.28. Canvasranden magnetisch
- 5.29. Actieve pad magnetisch
- 5.30. Kleef aan canvasranden
- 5.31. Kleven aan gelijkeafstand lijnen
- 5.32. Opvulkleur
- 5.33. Menubalk tonen
- 5.34. Linialen tonen
- 5.35. Schuifbalken tonen
- 5.36. Statusbalk tonen
- 6. Het menu “Afbeelding”
-
- 6.1. Overzicht
- 6.2. Dupliceren
- 6.3. Submenu “Modus”
- 6.4. Modus RGB
- 6.5. Modus Grijswaarden
- 6.6. Modus Geïndexeerd
- 6.7. Submenu “Codering”
- 6.8. Submenu “Kleurbeheer”
- 6.9. sRGB-profiel gebruiken
- 6.10. Kleurprofiel toewijzen
- 6.11. Naar kleurprofiel converteren
- 6.12. Kleurprofiel weggooien
- 6.13. Kleurprofiel opslaan in bestand
- 6.14. Profiel afdrukvoorbeeld
- 6.15. Renderintentie afdrukvoorbeeld
- 6.16. Zwartpuntcompensatie
- 6.17. Submenu “Transformeren”
- 6.18. Horizontaal spiegelen; Verticaal spiegelen
- 6.19. Draaiing
- 6.20. Canvasgrootte
- 6.21. Canvas laten passen op lagen
- 6.22. Canvas laten passen op selectie
- 6.23. Afdrukgrootte
- 6.24. Afbeelding schalen
- 6.25. Afbeelding bijsnijden
- 6.26. Opdelen met gebruik van hulplijnen
- 6.27. Bedreven bijsnijden
- 6.28. Zichtbare lagen samenvoegen
- 6.29. Alle lagen samenvoegen
- 6.30. Zichtbare lagen uitlijnen…
- 6.31. Submenu “Hulplijnen”
- 6.32. Nieuwe hulplijn (op percentage)
- 6.33. Nieuwe hulplijn
- 6.34. Nieuwe hulplijnen vanaf selectie
- 6.35. Alle hulplijnen verwijderen
- 6.36. Raster instellen…
- 6.37. Afbeeldingsinfo
- 6.38. Submenu “Metadata”
- 6.39. Metagegevens bewerken
- 6.40. Weergave metadata
- 7. Het menu “Laag”
-
- 7.1. Introductie tot het menu “Laag”
- 7.2. Nieuwe laag
- 7.3. Nieuw uit zichtbaar
- 7.4. Nieuwe laaggroep
- 7.5. Lagen dupliceren
- 7.6. Zwevende laag of masker verankeren
- 7.7. Neerwaarts samenvoegen
- 7.8. Laaggroepen samenvoegen
- 7.9. Lagen verwijderen
- 7.10. De opdrachten voor tekst van het menu Laag
- 7.11. Tekstinformatie weggooien
- 7.12. Tekst naar pad
- 7.13. Tekst langs pad
- 7.14. Submenu “Stapel”
- 7.15. Vorige lagen selecteren
- 7.16. Volgende lagen selecteren
- 7.17. Bovenste laag selecteren
- 7.18. Onderste laag selecteren
- 7.19. Lagen omhoog
- 7.20. Lagen omlaag
- 7.21. Lagen naar bovenaan
- 7.22. Lagen naar onderaan
- 7.23. Laagvolgorde omkeren
- 7.24. Het submenu “Masker”
- 7.25. Laagmaskers toevoegen
- 7.26. Laagmaskers toepassen
- 7.27. Laagmaskers verwijderen
- 7.28. Laagmaskers tonen
- 7.29. Laagmasker bewerken
- 7.30. Laagmaskers uitschakelen
- 7.31. Maskers naar selectie
- 7.32. Maskers aan selectie toevoegen
- 7.33. Maskers van selectie aftrekken
- 7.34. Doorsnede van maskers met selectie
- 7.35. Het submenu “Transparantie”
- 7.36. Alfakanaal toevoegen
- 7.37. Alfakanaal verwijderen
- 7.38. Kleur naar alfa
- 7.39. Semi-vlak maken
- 7.40. Alfadrempel
- 7.41. Alfa naar selectie
- 7.42. Alfa aan selectie toevoegen
- 7.43. Alfa van selectie aftrekken
- 7.44. Doorsnede van alfa en selectie
- 7.45. Het submenu “Transformeren”
- 7.46. Horizontaal spiegelen
- 7.47. Verticaal spiegelen
- 7.48. 90° met de klok mee draaien
- 7.49. 90° tegen de klok in draaien
- 7.50. 180° draaien
- 7.51. Willekeurige draaiing
- 7.52. Verschuiven
- 7.53. Grensgrootte laag
- 7.54. Lagen naar afbeeldingsgrootte
- 7.55. Laag schalen
- 7.56. Lagen bijsnijden tot selectie
- 7.57. Lagen bijsnijden tot inhoud
- 8. Het menu “Kleuren”
-
- 8.1. Inleiding tot het menu “Kleuren”
- 8.2. Kleurbalans
- 8.3. Kleurtemperatuur
- 8.4. Tint/Chroma
- 8.5. Tint/Verzadiging
- 8.6. Verzadiging
- 8.7. Belichting
- 8.8. Schaduwen/Hooglichten
- 8.9. Helderheid/contrast
- 8.10. Niveaus
- 8.11. Curves
- 8.12. Omkeren
- 8.13. Lineair omkeren
- 8.14. Omkeren op waarde
- 8.15. Het submenu “Auto”
- 8.16. Gelijkmaken
- 8.17. Witbalans
- 8.18. Contrast uitrekken
- 8.19. Contrast uitrekken HSV
- 8.20. Kleurverbetering
- 8.21. Het submenu “Componenten”
- 8.22. Kanalenmixer
- 8.23. Extraheer component
- 8.24. Monochrome mixer
- 8.25. Samenstellen
- 8.26. Ontleden
- 8.27. Opnieuw samenstellen
- 8.28. Het submenu “Grijswaarden”
- 8.29. Kleur naar grijs
- 8.30. Grijswaarden
- 8.31. Monochrome mixer
- 8.32. Sepia
- 8.33. Het submenu “Projecteren”
- 8.34. Kleurenkaart opnieuw ordenen
- 8.35. Kleurenkaart instellen
- 8.36. Kleurverschuivingen
- 8.37. Kleuruitwisseling
- 8.38. Kleuren roteren
- 8.39. Kleurverloopprojectie
- 8.40. Paletprojectie
- 8.41. Inkleuren met monsters
- 8.42. Het submenu “Toonmappen”
- 8.43. Fattal et al. 2002
- 8.44. Mantiuk 2006
- 8.45. Reinhard 2005
- 8.46. Stress
- 8.47. Ontstrepen
- 8.48. Retinex
- 8.49. Het submenu “Info”
- 8.50. Histogram
- 8.51. Histogram exporteren
- 8.52. Randgemiddelde
- 8.53. Glad palet
- 8.54. Drempelwaarde
- 8.55. Verkleuren
- 8.56. Posterkleuren
- 8.57. Kleur naar alfa…
- 8.58. Rasteren
- 8.59. RGB knippen
- 8.60. Heet…
- 8.61. Drempelwaarde
- 9. Het menu “Gereedschap”
- 10. Het menu “Filters”
- 11. Menu “Vensters”
- 12. Het menu “Hulp”
Er zijn veel plaatsen in GIMP waar u menu's kunt vinden. Het doel van dit hoofdstuk is om alle opdrachten uit te leggen die toegankelijk zijn vanuit het hoofdmenu aan de bovenzijde van het venster van GIMP en het hoofdmenu dat u krijgt door met rechts te klikken op het canvas. Alle contextmenu's en menu-items voor andere dialoogvensters worden elders beschreven in de hoofdstukken die de dialoogvensters zelf beschrijven.

![[Opmerking]](images/note.png)
Als u met rechts klikt op bepaalde delen van de interface van GIMP, opent een “contextmenu”, dat u in staat stelt aanvullende opdrachten te gebruiken, gerelateerd aan de plaats waar u hebt geklikt. Enkele plaatsen waar u toegang hebt tot contextmenu's zijn:
-
Met rechts klikken op een afbeeldingsvenster geeft het hoofdmenu weer. Dat is handig als u werkt in de modus Volledig scherm, zonder een menubalk.
-
Met rechts klikken op een laag in het dialoogvenster Lagen of op een kanaal in het dialoogvenster Kanalen geeft functies weer voor de geselecteerde laag of kanaal.
-
Met rechts klikken op de balk van het hoofdmenu heeft hetzelfde effect als met links klikken.
-
Met rechts klikken op de titelbalk geeft functies weer die niet tot GIMP behoren, maar tot het programma voor vensterbeheer van uw computer.
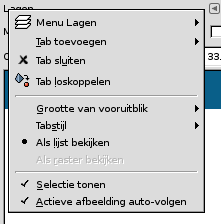
Het “menu Tab” is niet gerelateerd aan het hoofdmenu, maar wordt volledigheidshalve hier vermeld:
Elk dokbaar dialoogvenster bevat een knop Menu Tab
![]() . Drukken op deze knop Menu Tab opent een speciaal menu van aan de tab gerelateerde bewerkingen, met een item aan de bovenkant dat het contextmenu van het dialoogvenster opent.
. Drukken op deze knop Menu Tab opent een speciaal menu van aan de tab gerelateerde bewerkingen, met een item aan de bovenkant dat het contextmenu van het dialoogvenster opent.
Bekijk Paragraaf 2.3.2, “Menu Tab” voor meer informatie over menu's Tab.


