Dette filteret flyttar pikslane i det gjeldande laget eller utvalet i høve til forandringane i grånivåa i eit forskyvingskart. Pikslane vert forskyvde i høve til kor bratt fargeovergangen er i forskyvingskartet. Pikslar som svarar til flate område vert ikkje forskjøve. Dess brattare område dess større forskyving.
Figur 17.323. Frå venstre mot høgre: det opphavlege biletet, forflyttingskartet, forflytta bilete
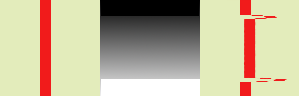
Einsfarga område i forflyttingskartet gjev ingen forflyttingar. Store forandringar i kartet gjev store forflyttingar. Ein lineær overgang gjev einsforma forflytting. Retningen for flyttinga er rettvinkla i høve til forandringane i kartet.
Figur 17.324. Bruk av eit kart med ulineær fargeovergang
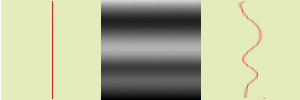
Ein ulineær fargeovergang fører til bølger.
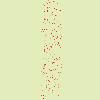
Figur 17.325. Bruk av eit kart med kompleks fargeovergang:
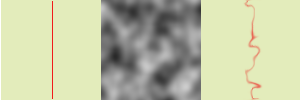
Ein kompleks overgang som f. eks. kan lagast med filteret Massiv støy, gjev ein kvervlande effekt.
Det er mogleg å verne deler av biletet mot å verta påverka av filteret.
Du finn dette filteret i hovudmenyen under → → . Filteret har ikkje føregandsvising.

Grunnleggjande innstillingar
- Steglengde
-
Her bestemmer du kor mykje pikslane skal forskyvast for kvar filtergjennomgang. Verdien 10 er nødvendig for å få ei forskyving på 1 piksel. Ein negativ verdi vil føre til at forskyvinga vert i motsett retning i høve til normalen.
- Gjentaking
-
Kor mange gonger filterfunksjonen skal repeterast.
- På kantane
-
På grunn av forflyttingane kan ein del av pikslane hamna utføre kanten på laget eller utvalet, pog på den andre sida vert utan pikslar. Dei fire nestevala bestemmer korleis du kan fiksa dette:
- Bryt
-
Det som forsvinn over biletkanten vil dukke opp på motsett side. (Dette er normalinnstillinga).
- Smør ut
-
Dei tomme plassane vert fylt ved å spreie den næraste biletlinja.
- Svart
-
Dei tomme plassane vert fylt med svart.
- Forgrunnsfarge
-
Dei ledige plassane vert fylt med den forgrunnsfargen som er sett i verktøykassa.
- Forskyvingskart
-
For å verta lista her i denne filplukkaren må forskyvingskartet, som må vera i gråtoner, finnast på skjermen når du opnar filteret og må vera i same storleik som det opphavlege biletet.
Avanserte innstillingar
- Utjamningsstorleik
-
Etter at pikslane er forflytta, vil denne innstillinga spreia pikslane tilfeldig utover og gje korning i biletet. Dess høgare tal (0,00 - 100,00), dess tynnare korn.
- Rotasjonsvinkel
-
Dette alternativet set forskyvingsvinkelen for pikslane i høve til skråninga på fargeovergangen. Dei tidlegare eksempla er laga med ein loddrett fargeovergang og ein vinkel på 90°. Dermed er pikslane flytt vassrett og ingenting er flytt utanfor biletkantane. Her er eit eksempel der vinkelen er sett til 10° og med seks gjennomkøyringar:
Figur 17.328. Med vinkel 10° og 6 gjentakingar:

Forskyvinga er 10° i høve til loddrett. Pikslar som forsvinn over den nedre biletkanten ved kvar gjennomkøyring dukkar opp øvst i biletet som ei prikkelinje. Kanthandteringa er sett til «Bryt».
- Mellomsteg
-
Dersom du spesifiserer ein verdi > 1 vil forskyvingsvektoren verta rekna ut i fleire steg slik at du har ein betre kontroll med prosessen.
- Vektleggingskart
-
I tillegg til forskyvingskart, kan du leggja til eit «Vektleggingskart». Dette kartet må også vera eit gråtonebilete, med same storleik som kjeldebiletet og må finnast på skjermen når du kallar opp filteret. Dette kartet gjev meir eller mindre styrke til filteret på enkelte delar av biletet, i høve til grånivåa til dette vektleggingskartet. Biletområder som svarar til kvite delar av dette kartet vert fullt ut påverka av filteret. Bildeområder som svarar til svarte delar av kartet vert ikkje rørt av filteret. Der kartet er grått, er filterberknaden avhengig av grånivået. Føresetnaden er at det er merkt av for Bruk vektleggingskart.
Figur 17.329. Eksempel med vektleggingskart:
Frå venstre til høgre: det opphavlege biletet, forskyvingskartet, vektleggingskartet og etter bruk av filteret «Deformering». Legg merkje til at svarte område på vektleggingskartet hindrar påverknad frå filteret.
Meir avanserte innstillingar
I dette avsnittet kan du leggja til to nye kart, eit overgangskart og eit vektorkart.
![[Notat]](images/note.png)
|
Notat |
|---|---|
|
For å prøva ut desse innstillingane åleine, må dei andre karta vera einsfarga. |
- Overgangsskala
-
Når du brukar eit overgangskart (som også må vera i gråtoner) vil flyttinga av pikslane vera avhengig av retninga på gråtoneovergangane. Innstillinga Overgangsskala bestemmer kor mykje variasjonane i gråskalaen skal påverka flyttinga av pikslane. Filteret verkar på heile biletet ved kvar gjennomkøyring, ikkje berre det raude objektet. Dette forklarar sløringa.
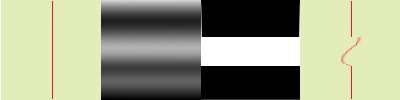
Figur 17.330. Eksempel på bruk av overgangskart
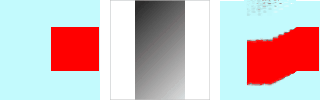
Frå venstre: det opphavlege biletet, overgangskartet, filteret brukt.
I eksemplet ovanfor er «Deformeringsfilteret» brukt med eit overgangskart sett til 10,0. Overgangen i kartet skråner frå øvre venstre hjørne til nedre høgre hjørne. Den delen av biletet som samsvarar med fargeovergangen er flytt på skrå og rotert 90° fordi rotasjonsvinkelen i avanserte innstillingar er sett til 90°.
- Vektorforstørring
-
Med dette kartet er forflyttinga avhengig av vinkelen du set i boksen Vinkel. 0° tilsvarar rett opp. Vektorforstørring bestemmer kor mange pikslar biletet vert flytt i kvar gjennomkøyring.
Figur 17.331. Eksempel på bruk av vektorforstørring

Frå venstre mot høgre: det opphavlege biletet, forflyttingskartet, filteret brukt.
I eksemplet ovanfor er «Deformeringsfilteret» brukt med vektorforstørring. Overgangen i vektorkartet går ovanfrå og nedover. Vektorvinkelen er 45°. Biletet er flytt på skrå 45° mot øvre, venstre hjørne. Biletet er noko sløra fordi kvar gjennomkøyring verkar på heile biletet, ikkje berre på det raude området.
- Vinkel
-
Vinkel for fast vektor (sjå ovanfor).


