Out-of-focus photographs and most digitized images often need a sharpness correction. This is due to the digitizing process that has to divide a color continuum in points with slightly different colors. Elements smaller than the sampling frequency will be averaged into a uniform color. So sharp borders will be rendered a little blurred. The same phenomenon appears when printing color dots on paper.
The Sharpen filter (previously called Unsharp Mask) sharpens edges of the elements without increasing noise or blemish.
![[Astuce]](images/tip.png)
|
Astuce |
|---|---|
|
Some imaging devices like digital cameras or scanners offer to sharpen the created images for you. We strongly recommend you disable this means of sharpening and use GIMP filters instead. This way you regain the full control over the sharpening of your images. |
To prevent color distortion while sharpening, you can Decompose your image to HSV and work only on Value. Go to → → . Make sure the Decompose to layers box is checked. Choose HSV and click OK. You will get a new gray-level image with three layers, one for Hue, one for Saturation, and one for Value. (Close the original image so you won't get confused). Select the Value layer and apply your sharpening to it. When you are done, with that same layer selected, reverse the process by using Compose. Go to → → . Again choose HSV and click OK. You will get back your original image except that it will have been sharpened in the Value component.
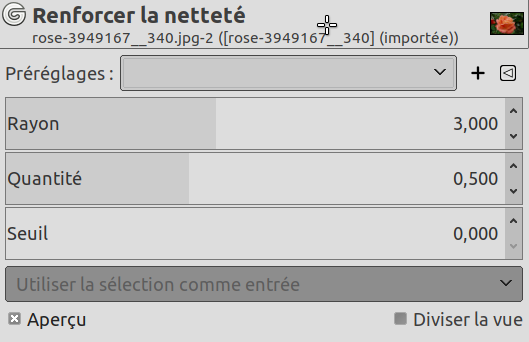
- Presets, « Input Type », Rognage, Blending Options, Aperçu, Merge filter, Split view
-
![[Note]](images/note.png)
Note Ces options sont décrites dans Section 2, « Options communes ».
- Rayon
-
The slider and input boxes (0.0-1500.0) allow you to set how many pixels on either side of an edge will be affected by sharpening. It is better to always sharpen an image at its final resolution.
- Quantité
-
This slider and input boxes (0.0-300.0) allow you to set the strength of sharpening.
- Seuil
-
This slider and input boxes (0.0-1.0) allow you to set the minimum difference in pixel values that indicates an edge where sharpen must be applied. So you can protect areas of smooth tonal transition from sharpening, and avoid creation of blemishes in face, sky or water surface.
Le filtre Renforcer la Netteté, qui en anglais s’appelle « Unsharp Mask » utilise la technique du masque flou. Il peut paraître bizarre que, pour obtenir de la netteté, on utilise du flou. Voici l’explication :
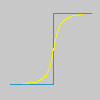
Imaginez une image avec un contraste à un endroit. La courbe des intensités des pixels d’une ligne passant par ce contraste montrera une montée d’intensité en marche d’escalier si la limite est parfaitement nette. Si la limite est floue, la courbe aura une forme en S (en jaune).
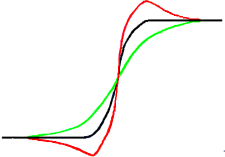
Nous avons donc une image un peu floue dont nous voulons améliorer la netteté (courbe noire). Si nous appliquons un léger flou supplémentaire à cette image, nous obtenons la courbe verte.
Soustrayons l’intensité du flou de l’intensité de l’image d’origine. Nous obtenons la courbe rouge, plus abrupte : le contraste a été augmenté et la netteté renforcée. C.Q.F.D.
Unsharp mask was first used in silver photography. The photographer first creates a copy of the original negative by contact, on a film, placing a thin glass plate between both; that will produce a blurred copy because of light diffusion. Then both films are placed in a photo enlarger, to reproduce them on paper. The dark areas of the positive blurred film, opposed to the clear areas of the original negative will prevent light to go through and so will be subtracted from the light going through the original film.
En photographie numérique, avec GIMP, vous passerez par les étapes suivantes:
-
Ouvrez votre image et dupliquez-la: →
-
In the copy, duplicate the layer → , then from the Filters menu apply → to the duplicated layer with the default IIR option and radius 5.
-
In the Layers dialog of the duplicated image, change Mode to « Subtract », and in the right-click menu, select « Merge down ».
-
Faites glisser le calque unique obtenu dans l’image d’origine, où il apparaît comme nouveau calque.
-
Change the Mode in this Layers dialog to « Addition ».
Voilà. The « Sharpen (Unsharp Mask) » filter does the same for you.
Sur la courbe, vous remarquez un creux au début et une bosse à la fin de la montée. Si le flou est important (si le paramètre Quantité est élevé), ces encoches seront très marquées et si le résultat de la soustraction tombe en dessous de zéro, une bande de couleurs complémentaires apparaîtra en bordure de contraste, ou un halo noir autour d’une étoile isolée sur le fond plus clair d’une nébuleuse (effet d’œil noir).