
Φωτογραφίες εκτός εστίασης και οι περισσότερες ψηφιοποιημένες εικόνες συχνά χρειάζονται μια διόρθωση οξύτητας. Αυτό οφείλεται στην επεξεργασία ψηφιοποίησης που πρέπει να διαιρέση μια χρωματική συνέχεια σε σημεία με μικρή διαφορά χρωμάτων. Στοιχεία πιο μικρά από τη συχνότητα δειγματοληψίας θα γίνουν μέσος όρος σε ένα ομοιόμορφο χρώμα. Έτσι τα απότομα όρια αποδίδονται λίγο θολωμένα. Το ίδιο φαινόμενο εμφανίζεται όταν εκτυπώνονται κουκκίδες χρώματος σε χαρτί.
Το φίλτρο όξυνσης (το παλιό όνομα ήταν μάσκα απόξυνσης) οξύνει τις άκρες των στοιχείων χωρίς αύξηση θορύβου ή ατέλειες.
![[Υπόδειξη]](images/tip.png)
|
Υπόδειξη |
|---|---|
|
Μερικές συσκευές εικόνας όπως ψηφιακές κάμερες ή σαρωτές προσφέρουν όξυνση των δημιουργούμενων εικόνων για σας. Σας συνιστούμε έντονα να απενεργοποιήσετε αυτά τα μέσα όξυνσης και να χρησιμοποιήσετε τα φίλτρα GIMP. Με αυτόν τον τρόπο ξανακερδίζετε τον πλήρη έλεγχο στην οξύτητα των εικόνων σας. |
Για να αποφύγετε την παραμόρφωση του χρώματος κατά την όξυνση, μπορείτε να αποσυνθέσετε την εικόνα σας σε HSV και να εργαστείτε μόνο στην Τιμή. Μεταβείτε σε → → . Βεβαιωθείτε ότι το πλαίσιο Αποσύνθεση σε στρώσεις είναι επιλεγμένο. Επιλέξτε HSV και πατήστε Εντάξει. Θα λάβετε μια νέα εικόνα σε στάθμη γκρι με τρεις στρώσεις, μία για την απόχρωση, μία για τον κορεσμό και μία για την τιμή. (Κλείστε την αρχική εικόνα για να μην μπερδευτείτε). Επιλέξτε τη στρώση τιμής και εφαρμόστε την όξυνσή σας σε αυτή. Όταν τελειώσετε, με την ίδια στρώση επιλεγμένη, αντιστρέψτε τη διαδικασία χρησιμοποιώντας το Σύνθεση. Μεταβείτε στο → → . Επιλέξτε και πάλι HSV και πατήστε Εντάξει. Θα λάβετε πίσω την αρχική σας εικόνα, εκτός από το ότι θα έχει οξυνθεί στο συστατικό τιμή.
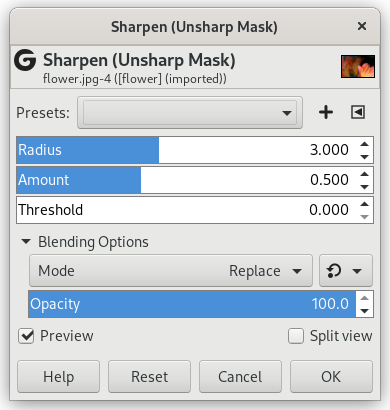
- Προεπιλογές, «Τύπος εισόδου», Περικοπή, Επιλογές ανάμειξης, Προεπισκόπηση, Συγχώνευση φίλτρου, Διαίρεση προβολής
-
![[Σημείωση]](images/note.png)
Σημείωση Αυτές οι επιλογές περιγράφονται στο Τμήμα 2, «Κοινά χαρακτηριστικά».
- Ακτίνα
-
Το ρυθμιστικό και τα πλαίσια εισόδου (0,0-1500,0) σας επιτρέπουν να ορίσετε πόσα εικονοστοιχεία σε κάθε πλευρά μιας ακμής θα επηρεαστούν με την όξυνση. Είναι καλύτερα να οξύνεται πάντοτε μια εικόνα στην τελική της ανάλυση.
- Ποσότητα
-
Αυτός το ρυθμιστικό και τα πλαίσια εισόδου (0,0-300,0) σας επιτρέπουν να ορίσετε τη δύναμη όξυνσης.
- Κατώφλι
-
Αυτός το ρυθμιστικό και τα πλαίσια εισόδου (0,0-1,0) σας επιτρέπουν να ορίσετε την ελάχιστη διαφορά σε τιμές εικονοστοιχείων που υποδεικνύει μια ακμή όπου πρέπει να εφαρμοστεί όξυνση. Έτσι μπορείτε να προστατεύσετε περιοχές ομαλής τονικής μετάπτωσης από όξυνση και να αποφύγετε τη δημιουργία ατελειών στο πρόσωπο, στον ουρανό ή στην επιφάνεια νερού.
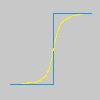
Η χρήση μιας μάσκας απόξυνσης για όξυνση μιας εικόνας μπορεί να φαίνεται μάλλον παράξενη. Ιδού η εξήγηση:
Σκεφτείτε μια εικόνα με αντίθεση σε κάποια θέση. Η καμπύλη έντασης των εικονοστοιχείων σε μια γραμμή που πηγαίνει μέσα από αυτήν την αντίθεση θα εμφανίσει μια απότομη αύξηση της έντασης: σαν μια σκάλα, εάν η αντίθεση είναι τελείως απότομη (γαλάζια), σαν S εάν υπάρχει κάποια θόλωση (κίτρινη).
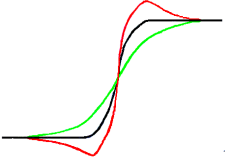
Τώρα, έχουμε μια αρχική εικόνα με κάποια θόλωση (μαύρη καμπύλη) που θέλουμε να οξύνουμε. Εφαρμόζουμε λίγο περισσότερη θόλωση: η διακύμανση της έντασης θα είναι πιο βαθμιαία (πράσινη καμπύλη).
Ας αφαιρέσουμε τη διαφορά μεταξύ έντασης θαμπάδας (πράσινη καμπύλη) και της έντασης της αρχικής εικόνας (μαύρη καμπύλη) από την ένταση της αρχικής εικόνας (μαύρη καμπύλη). Παίρνουμε την κόκκινη καμπύλη, που είναι πιο απότομη: αντίθεση και οξύτητα αυξήθηκαν. QED.
Η μάσκα απόξυνσης χρησιμοποιήθηκε πρώτα στην φωτογραφία αργύρου. Ο φωτογράφος δημιουργεί πρώτα ένα αντίγραφο της αρχικής αρνητικής φωτογραφίας με επαφή, σε ένα φιλμ, τοποθετώντας μια λεπτή πλάκα γυαλιού μεταξύ τους· αυτό θα παράξει ένα θολωμένο αντίγραφο λόγω διάχυσης του φωτός. Έπειτα τοποθετούμε και τα δύο φιλμ, σε ένα φωτογραφικό μεγεθυντή, για να τα αναπαράξουμε σε χαρτί. Οι σκοτεινές περιοχές του θετικού θολωμένου φιλμ, αντιτιθέμενες στις καθαρές περιοχές του αρχικού αρνητικού θα αποτρέψουν το φως να περάσει από μέσα και έτσι θα αφαιρεθούν από το φως που πηγαίνει μέσα από το αρχικό φιλμ.
Στην ψηφιακή φωτογραφία, με GIMP, πηγαίνετε μέσα από τα εξής βήματα:
-
Ανοίξτε την εικόνα σας και διπλασιάστε την →
-
Στο αντίγραφο, διπλασιάστε τη στρώση → , έπειτα από το μενού φίλτρων εφαρμόστε → στην διπλασιασμένη στρώση με την προεπιλεγμένη επιλογή IIR και ακτίνα 5.
-
Στο διάλογο στρώσεων της διπλασιασμένης εικόνας, αλλάξτε την κατάσταση σε «Αφαίρεση» και δεξιοπατώντας το μενού, επιλέξτε «Συγχώνευση κάτω».
-
Κλικ και σύρσιμο της μοναδικής στρώσης που έχετε στην αρχική εικόνα, όπου εμφανίζεται ως μια νέα στρώση.
-
Αλλαγή της κατάστασης σε αυτόν τον διάλογο στρώσεων σε «Προσθήκη».
Ιδού. Το φίλτρο «Όξυνση (μάσκα απόξυνσης)» κάνει το ίδιο για εσάς.
Στο ξεκίνημα της καμπύλης, μπορείτε να δείτε μια κλίση. Εάν η θόλωση είναι σημαντική, αυτή η κλίση είναι πολύ βαθιά· το αποτέλεσμα της αφαίρεσης μπορεί να είναι αρνητικό και μια συμπληρωματική λουρίδα χρώματος θα εμφανιστεί μαζί με την αντίθεση ή ένα μαύρο φωτοστέφανο γύρω από ένα αστέρι στο φωτεινό παρασκήνιο ενός νεφελώματος (εφέ μαύρου ματιού).


