Figura 17.43. Esempio di applicazione del filtro «Nitidizza»
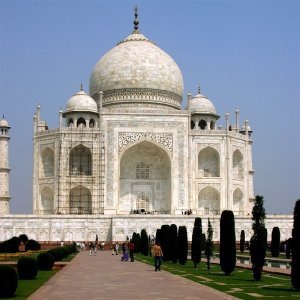
Immagine originale

Filtro «Nididizza» applicato
Out-of-focus photographs and most digitized images often need a sharpness correction. This is due to the digitizing process that has to divide a color continuum in points with slightly different colors. Elements smaller than the sampling frequency will be averaged into a uniform color. So sharp borders will be rendered a little blurred. The same phenomenon appears when printing color dots on paper.
The Sharpen filter (previously called Unsharp Mask) sharpens edges of the elements without increasing noise or blemish.
![[Suggerimento]](images/tip.png)
|
Suggerimento |
|---|---|
|
Some imaging devices like digital cameras or scanners offer to sharpen the created images for you. We strongly recommend you disable this means of sharpening and use GIMP filters instead. This way you regain the full control over the sharpening of your images. |
To prevent color distortion while sharpening, you can Decompose your image to HSV and work only on Value. Go to → → . Make sure the Decompose to Layers box is checked. Choose HSV and click OK. You will get a new gray-level image with three layers, one for Hue, one for Saturation, and one for Value. (Close the original image so you won't get confused). Select the Value layer and apply your sharpening to it. When you are done, with that same layer selected, reverse the process by using Compose. Go to → → . Again choose HSV and click OK. You will get back your original image except that it will have been sharpened in the Value component.
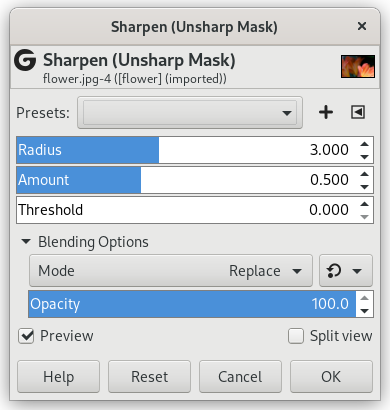
- Presets, «Input Type», Ritaglio, Blending Options, Anteprima, Merge filter, Split view
-
![[Nota]](images/note.png)
Nota Queste opzioni sono descritte in Sezione 2, «Caratteristiche comuni».
- Raggio
-
The slider and input boxes (0.0-1500.0) allow you to set how many pixels on either side of an edge will be affected by sharpening. It is better to always sharpen an image at its final resolution.
- Ammontare
-
This slider and input boxes (0.0-300.0) allow you to set the strength of sharpening.
- Soglia
-
This slider and input boxes (0.0-1.0) allow you to set the minimum difference in pixel values that indicates an edge where sharpen must be applied. So you can protect areas of smooth tonal transition from sharpening, and avoid creation of blemishes in face, sky or water surface.
Utilizzare una maschera di contrasto per aumentare il contrasto di una immagine può sembrare strano. Il perché viene esposto di seguito.
Si pensi ad un'immagine con aree contrastate. La curva di intensità dei pixel su una linea che attraversi quest'area mostrerà una variazione improvvisa nel valore dell'intensità: uno scalino se il contrasto è netto (blu), una curva a forma di S se è presente una transizione più dolce (giallo).
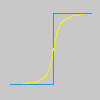
Ora, abbiamo un'immagine con delle aree sfocate (curva nera) che vogliamo rendere più nitide. Applichiamo una ulteriore sfocatura: la variazione di intensità sarà più graduale (curva verde).
Sottraiamo la differenza tra la l'intensità della sfocatura (curva verde) e l'intensità dell'immagine originale (curva nera) dall'intensità dell'immagine originale (curva nera). Otteniamo la curva rossa che è più ripida: il contrasto e la nitidezza sono aumentati. c.v.d.

Unsharp mask was first used in silver photography. The photographer first creates a copy of the original negative by contact, on a film, placing a thin glass plate between both; that will produce a blurred copy because of light diffusion. Then both films are placed in a photo enlarger, to reproduce them on paper. The dark areas of the positive blurred film, opposed to the clear areas of the original negative will prevent light to go through and so will be subtracted from the light going through the original film.
In fotografia digitale, con GIMP, si dovrebbero seguire questi passi:
-
Aprire un'immagine e duplicarla →
-
In the copy, duplicate the layer → , then from the Filters menu apply → to the duplicated layer with the default IIR option and radius 5.
-
In the Layers dialog of the duplicated image, change Mode to «Subtract», and in the right-click menu, select «Merge down».
-
Prendere e trascinare l'unico livello così ottenuto nell'immagine originale dove compare come nuovo livello.
-
Change the Mode in this Layers dialog to «Addition».
Fatto. Il filtro «maschera di contrasto» fa tutto questo in un'unica passata.
All'inizio della curva si può osservare un avvallamento. Se la sfocatura è notevole l'avvallamento è molto profondo; il risultato della differenza può essere negativo e una striscia di colore complementare comparirà lungo la parte contrastata oppure un alone nero intorno a una stella sullo sfondo chiaro di una nebulosa (effetto occhio nero).