The command strokes a path in the image. There are two ways you can stroke the path, either by using a paint tool, or without using one. There are various options which you can use to specify how this stroke should look.
![[Note]](images/note.png)
|
Note |
|---|---|
|
Cette commande n’est active que si un chemin existe dans votre image. |
-
You can access this command from the main menu through → .
-
You can also access it by clicking on the button with the same name in the Paths Dialog.
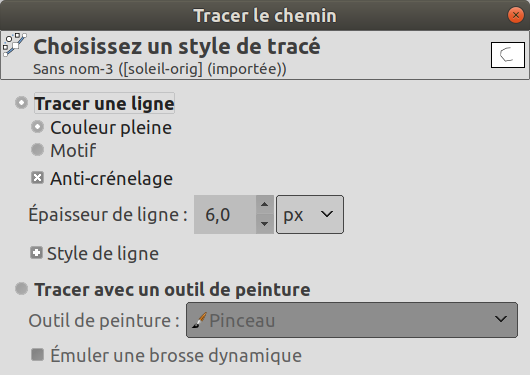
The Choose Stroke Style dialog box allows you to choose between stroking the path with the options you specify or stroking it with a .
Line
- Foreground color, Background color, Motif
-
Choose whether the line is drawn with the current Foreground color or Background color or Pattern, set in the Toolbox. This is distinct from the Dash pattern. If you select one of the two color options with no dash pattern, an unbroken line is drawn in the color set in the Toolbox. If you select Pattern with no dash pattern, an unbroken line is drawn with the pattern set in the Toolbox. If you select a line with a dash pattern, the color or pattern is still determined by the color or pattern set in the Toolbox. That is, if you have a marbled pattern set in the Toolbox, and select Pattern and dashed lines as Dash pattern, the dashes are drawn in the marbled pattern.
- Anti-crénelage
-
Curved strokes or strokes drawn at an angle may look jagged or stair-stepped. The anti-aliasing option smooths them out.
- Line width
-
Vous pouvez régler la largeur du tracé grâce au curseur ou à la boîte de texte, en pixels par défaut, mais vous avez la possibilité de choisir une autre unité de mesure avec le bouton de liste déroulante.
- Cap style
-
Choose the shape of the ends of an unclosed path, which can be Butt, Round or Square.
- Join style
-
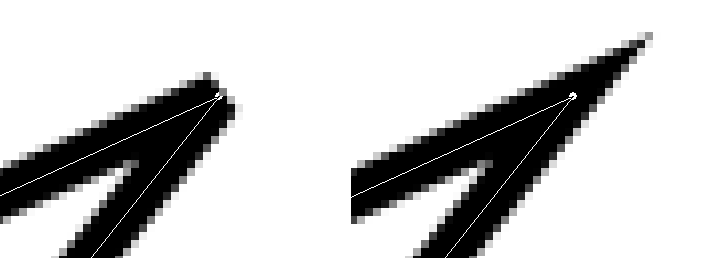
You can choose the shape of the path corners by clicking on Miter, Round or Bevel.
- Miter limit
-
When two segments of a path come together, the mitering of the corner is determined by the Miter Limit. If the strokes were wide, and no mitering were done, there would be pointed ends sticking out at the corner. The Miter Limit setting determines how the gap, formed when the outer edges of the two lines are extended, will be filled. You can set it to a value between 0.0 and 100.0, by using the slider or the associated text box and its arrows.
- Dash pattern
-
On the pixel level, a dashed line is drawn as a series of tiny boxes. You can modify the pattern of these boxes. The black area with thin vertical lines represents the pixels of the dash. If you click on a black pixel, you remove it from the dash. If you click on a white pixel, you add it to the dash. The gray areas indicate how the pattern will be repeated when a dashed line is drawn.
- Dash preset
-
Instead of making your own dash pattern, you can choose one from the drop-down box. This pattern will then be displayed in the Dash pattern area, so you can get an idea of how it will look.
Outil de peinture
- Paint tool
-
Select a paint tool to use from the drop-down box to draw the stroke. The current options of the paint tool options are used to draw the stroke.
- Emulate brush dynamics
-
Voir Dynamique de la brosse.


