Dans les dialogues des Brosses, des Motifs et des Palettes, et dans certains autres dialogues ancrables, vous pouvez définir des mots-clés et, dès lors, réorganiser les éléments selon les mots-clés choisis.
Tagging is divided in two parts:
-
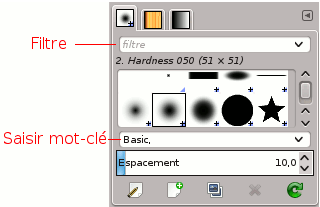
A « Filter » field at the top where you can enter or select a tag previously defined. Only the resources (Brushes, gradients, patterns, palettes, etc.) that have the specified tag, will be displayed.
You can enter several tags, separated with commas. In which case only the resources that have all these tags defined, will be shown.
Selecting a tag with the mouse works differently: only a single tag can be active at a time. If you want to select another tag, you first have to click the active tag to unselect that one, before selecting a different tag.
-
« Enter tag » field, below the list of resources can be used to add tags to the selected resource. The tags belonging to the current brush, gradient, pattern, palette, etc. are displayed.
You can add more tags to the current resource by clicking on one of the defined tags in the pop-up list of the field; or you can create your own tag for this item by typing its name in the field. The new tag will then appear in the tag list.
![[Note]](images/note.png)
|
Note |
|---|---|
|
The Fonts dialog also has Filter and Enter tag fields. But GIMP doesn't yet automatically generate any tags from fonts metadata, nor does it save the tags you add to fonts. |
Figure 15.44. Exemple

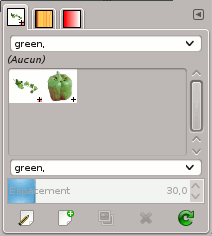
In this example, we defined a « green » tag for the Pepper and Vine brushes. Then, we entered « green » in the Filter input field and so, only brushes with the green tag are displayed.
![[Astuce]](images/tip.png)
|
Astuce |
|---|---|
|
To give several brushes the same tag at once, display brushes in List Mode, and use Ctrl+ on the brushes you want to select. |
Pour supprimer un mot-clé : sélectionnez une brosse, puis sélectionnez un mot-clé dans le champ « Saisir mot-clé » et appuyez sur la touche Supprimer. Quand ce mot-clé a été supprimé dans toutes les brosses, il disparaît de la liste.


