Figure 2
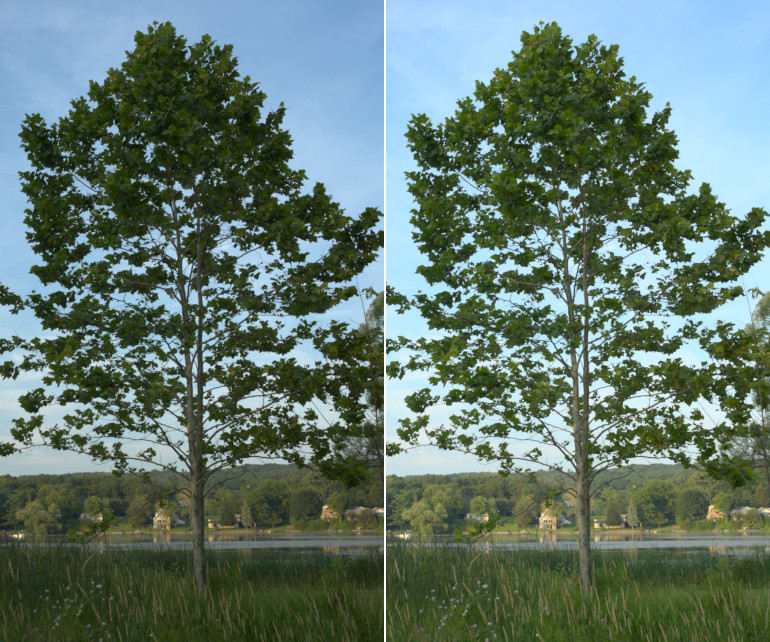
Using high bit depth GIMP’s Exposure operation to lighten the ground by one stop without blowing out portions of the sky.
-
Gauche : image d’origine, fichier RAW de photographie délibérément sous-exposée pour éviter d’effacer le ciel. Il semble que ce ne soit pas le cas, mais cette image est déjà très proche d’avoir des valeurs de canaux RVB hors-gamut, et un simple Couleurs/Auto/Étendre le contraste n’éclairera pas du tout cette image.
-
Right: The same image after using high bit depth GIMP’s Exposure operation at 32-bit floating point linear precision to add one stop of positive exposure compensation. An inverse grayscale mask was used to keep the highlights from blowing out.
Cet exemple pas à pas fournit une image et est divisé en cinq étapes, démarrant par le chargement de l’image. Les étapes 3, 4 et 5 décrivent vraiment la procédure.
-
Téléchargez tree.png, qui est une image sRVB en entiers 16 bits. GIMP profondeur de bits est en fait un éditeur d’image « sRVB seulement », aussi vaut-il mieux ne pas tenter des modifications dans d’autres espaces de travail RVB.
-
Open tree.png with GIMP and assign the GIMP built-in sRGB profile (the image colors won’t change a bit). Then convert the image to 32-bit floating point linear precision: Select → → , and in the Encoding Conversion dialog, select Linear light (this ensures that the Normal blend mode produces radiometrically correct results).
-
Make a copy of the “tree.png” layer via → or → , and label it “+1 stop exposure comp”. Then use → to add one stop of positive exposure compensation. Figure 3 below shows the proper settings for the Exposure operation dialog, and Figure 4 shows the result:
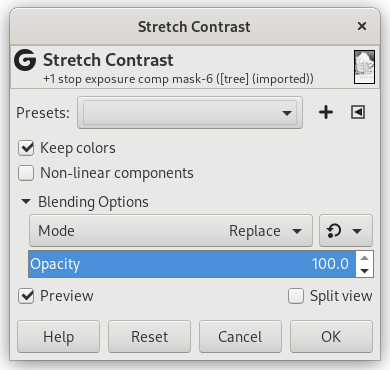
Figure 3
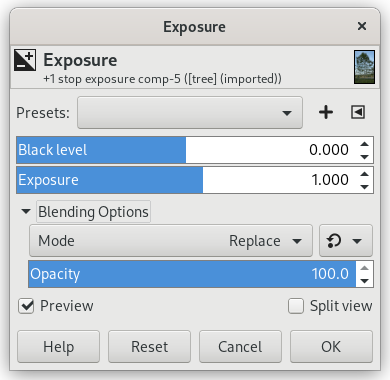
Using the Exposure operation to add one stop of positive exposure compensation.
When using the Exposure operation to add one stop of positive exposure compensation, make sure the image really is at floating point precision, because integer precision will clip the highlights.
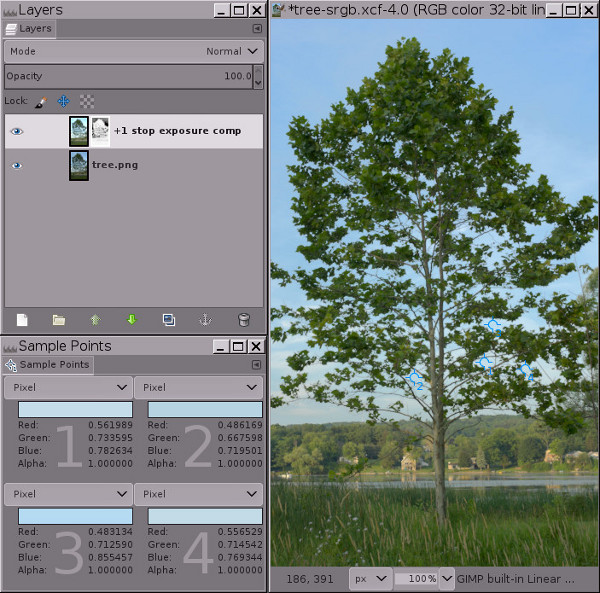
Figure 4
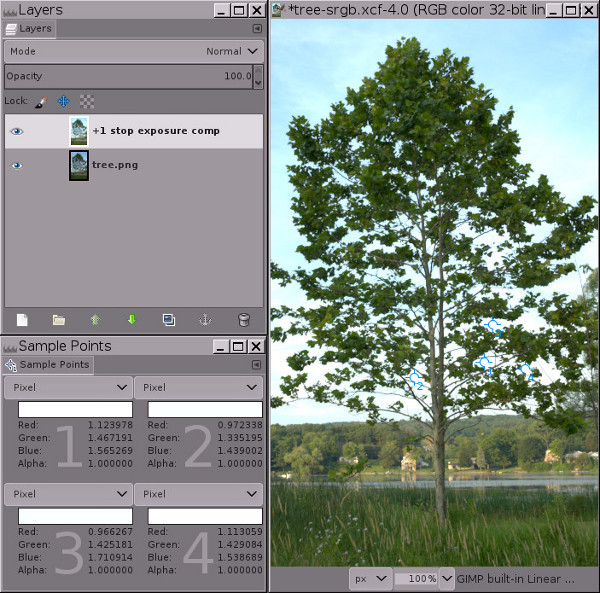
At floating point precision, GIMP’s Exposure operation is unbounded. This means you can use the Exposure operation to add positive exposure compensation without blowing out the highlights.
Notez les valeurs des canaux RVB pour les quatre points-échantillons : l’information des canaux qui aurait été éliminée en utilisant une précision en entiers est encodée en se servant des valeurs plus grandes que 1,0 en virgule flottante.
The image in Figure 4 clearly has “blown” highlights in the sky. But the highlights aren’t really blown (that is, clipped to 1.0 in one or more channels). Instead the highlight information is still there, but the RGB channel values fall outside the RGB display channel value range of 0.0f to 1.0f. The sample points dialog in Figure 4 above shows four sample points that have RGB channel values that are greater than 1.0. As shown in Figure 5 below, adding a mask allows you to recover these highlights by bringing them back down into the display range.
Si vous aviez utilisé une précision en entiers au lieu d’une précision en virgule flottante, l’information des zones claires aurait disparu. Les points échantillon auraient des valeurs de canaux maximales de 255, 65535 ou 42949672295, en fonction de la profondeur de bits. Et le masquage ne récupèrerait qu’une étendue de gris uniforme, manquant totalement de détails : essayez par vous-même pour voir.
-
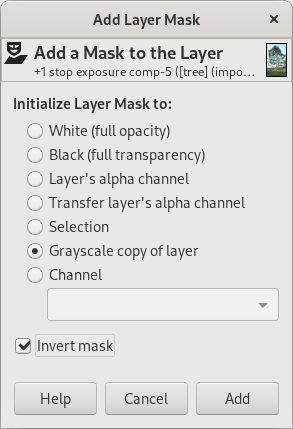
Add an inverse grayscale layer mask: Right-click on the layer and select → → , and when the Add Layer Mask dialog pops up, choose Grayscale copy of layer and check the Invert mask box.
Comme le montre la Figure 5 ci-dessous, à ce stade les tons clairs sont remis dans l’intervalle d’affichage, ce qui signifie que toutes les valeurs des canaux RVB sont entre 0.0f et 1.0f. Mais l’image parait probablement un peu étrange (brumeuse et plate), et selon l’image, les zones les plus lumineuses peuvent être parsemées de taches noires : ne vous inquiétez pas : C’est temporaire.
Figure 5
Résultat de l’addition d’un masque de calque en niveaux de gris inverse pour remettre les tons clairs dans l’intervalle d’affichage.
L’addition d’un masque de calque en niveaux de gris inverse remet les détails des zones lumineuses dans l’intervalle d’affichage, mais, à ce stade la plupart des images paraissent plates et brumeuses, certaines ayant même des taches noires dans les zones claires. L’étape suivante, « Auto/Étendre le contraste » sur le masque, va régler le problème.
-
Click on the layer mask to select it for editing, and then select → → :
L’option « Conserver les couleurs » doit être cochée (quoique cela importe peu sur des images en niveaux de gris telles que les masques de calque).
La Figure 6 ci-dessous montre le résultat final :
Doing → → on the layer mask removes the “cloudy” appearance, leaving a nicely brightened image with intact highlights.
→ → on the mask is necessary because just like the image layer has out of gamut RGB channel values, the inverted grayscale mask contains out of gamut grayscale values. → → brings all the mask grayscale values back into the display range, allowing the mask to proportionately compensate for the layer’s otherwise out-of-gamut RGB channel values, masking more in the layer highlights and less/not at all in the image’s shadows and midtones.
Notice that one of the sample points still has a blue RGB channel value that is slightly out of gamut. The easiest way to deal with this is to use → and drag the middle slider triangle to make a Gamma adjustment of 0.45 on the mask, not on the actual image layer. You can make this Gamma adjustment either on the entire mask (works well, less effort). Or else you can make the adjustment just on the mask shadows (which correspond to the layer highlights), in which case you’d load the mask as a selection, invert the selection, and make the Gamma adjustment. Or if the remaining out of gamut channel values are only very slightly out of gamut, make a “New from Visible” layer and then → → the result to bring the remaining channel values back into gamut.
That’s the whole procedure for using the Exposure operation to add a stop of positive exposure compensation to the shadows without blowing out the highlights. Now you can either fine-tune the mask, or else just make a “New from Visible” layer and continue editing your nicely brightened image. Depending on the image and also on your artistic intentions for the image, the mask might not need fine-tuning. But very often you’ll want to modify the resulting tonal distribution by doing a gamma correction, or perhaps a Curves operation on the mask, or else by painting directly on the mask. And sometimes you’ll want to blur the mask to restore micro contrast.


