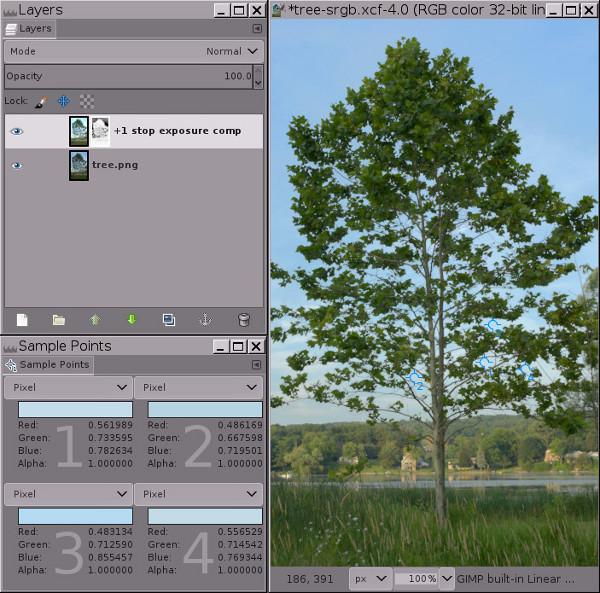
Рисунок 2
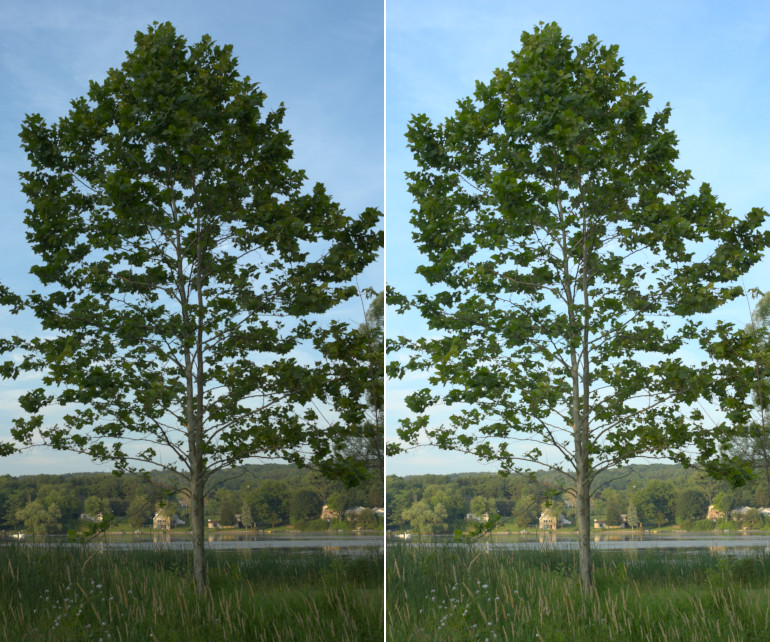
Использование операции «Цвета → Экспозиция» с высоким значением глубины цвета для осветления поверхности земли без пересвета участков неба.
-
Слева: исходное изображение, файл raw, снятый интерполированной камерой, и намеренно недодержанный в камере для избежания пересвета области неба. Может показаться неочевидным, но значения каналов RGB в этом изображении уже очень близки к выпадению за пределы цветовой палитры, и простое применение «Авто → Увеличить контраст» совсем не осветлит это изображение.
-
Справа: то же самое изображение после применения операции «Цвета → Экспозиция» с глубиной цвета в 32 бит и линейной точностью для добавления одной опорной точки положительной компенсации экспозиции. Для предотвращения пересвета светлых областей была применена обратная маска в оттенках серого.
Данный пошаговый пример предоставляет образец изображения и разбит на пять шагов, начиная с загрузки изображения. Сама операция описана в шагах 3, 4 и 5.
-
Скачайте tree.png, представляющее собой целочисленное изображение sRGB с глубиной цвета в 16 бит. Работа с изображениями с высокими значениями глубины цвета в GIMP — это работа фактически только с sRGB, поэтому лучше даже и не пытаться выполнять редактирование в других рабочих пространствах RGB.
-
Откройте tree.png в GIMP и присвойте ему встроенный профиль sRGB (цвета изображения нисколько не изменятся). Затем преобразуйте изображение в линейную точность с плавающей запятой и глубиной в 32 бита: выберите → → , и в диалоге Преобразование кодировки выберите Линейный свет (это обеспечит радиометрически корректные результаты при применении нормального режима смешивания).
-
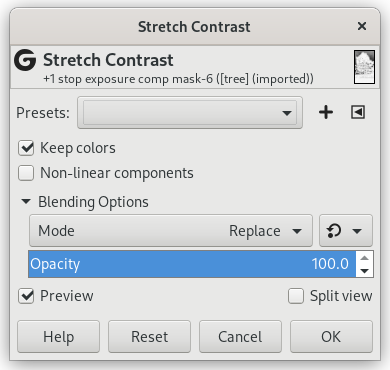
Сделайте копию слоя «tree.png» с помощью меню → или → и назовите его «+1 stop exposure comp». Затем используйте → , чтобы добавить одну опорную точку положительной компенсации экспозиции. На рис. 3 показаны нужные параметры диалога «Цвета → Экспозиция», а на рис. 4 показан результат:
Рисунок 3
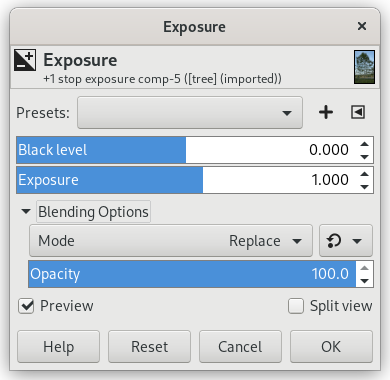
Использование диалога «Цвета → Экспозиция» для добавления одной опорной точки положительной компенсации экспозиции.
Во время добавления одной опорной точки положительной компенсации экспозиции с помощью «Цвета → Экспозиция», убедитесь в том, что изображение действительно имеет точность с плавающей запятой, так как целочисленная точность обрежет значения всех светлых областей.
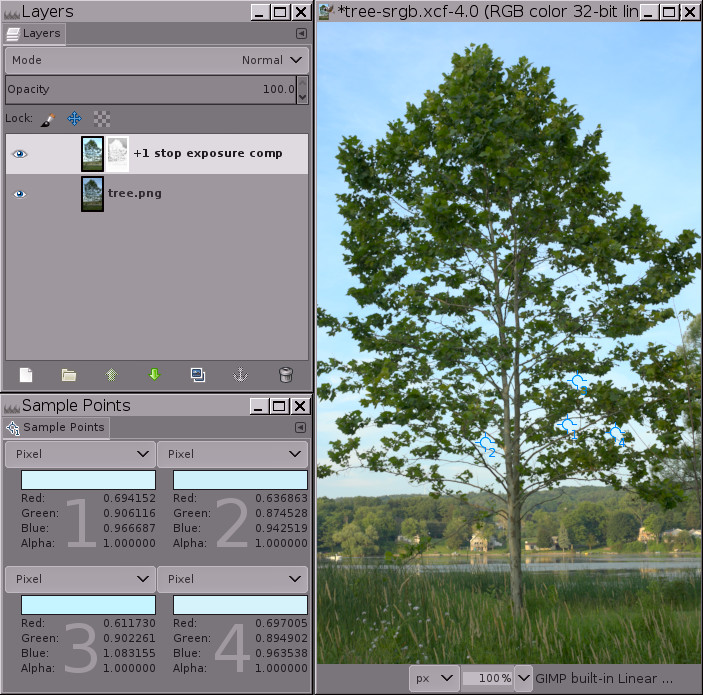
Рисунок 4
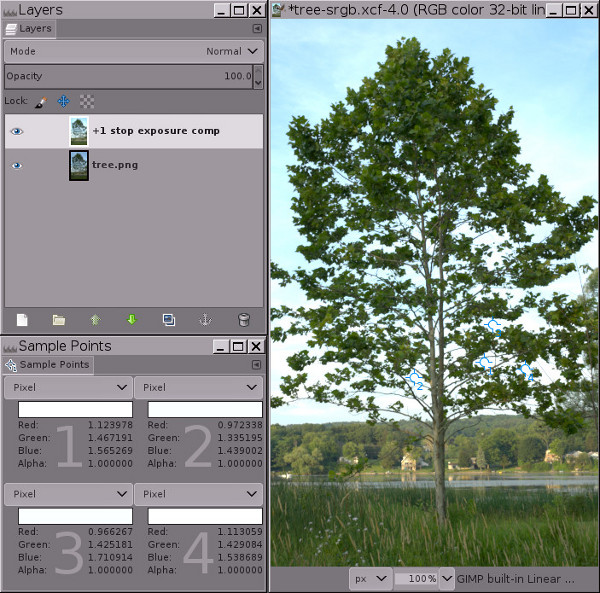
При точности с плавающей запятой, операция GIMP «Цвета → Экспозиция» имеет неограниченную точность. Это означает, что добавление положительной компенсации экспозиции можно использовать, не опасаясь пересвета светлых областей изображения.
Обратите внимание на значения каналов RGB четырёх выборочных точек: данные канала, которые при использовании целочисленной точности были бы обрезаны, закодированы с использованием значений канала, превышающих 1,0 с плавающей запятой.
У изображения на рис. 4 явно имеются пересвеченные блики на небе. Но на самом деле это не является пересветом (то есть обрезанными до значения 1,0 в одном или более каналов). Данные светлых областей и бликов по-прежнему присутствуют, но значения канала RGB выпадают за диапазон RGB значения каналов экрана (ссылка на англ. яз.), равный 0.0f - 1.0f. В диалоге выборочных точек на рис. 4 выше показаны четыре выборочных точки со значениями каналов RGB больше 1,0. Как показано на рис. 5 ниже, добавление маски позволяет восстановить эти светлые области, вернув их в диапазон отображения.
Если бы мы использовали целочисленную точность вместо точности с плавающей запятой, то светлые области действительно были бы пересвечены: выборочные точки имели бы максимальные значения каналов 255, 65535 или 4294967295, в зависимости от глубины цвета. А добавление маски «восстановило» бы области сплошного серого цвета без всяких деталей (попробуйте сами и посмотрите, что получится).
-
Добавим обратную маску слоя в оттенках серого: Сделайте щелчок ПКМ по слою и выберите → → и в появившемся диалоге Добавить маску слоя выберите Копия слоя в градациях серого, а также отметьте галочкой пункт Инвертировать маску.
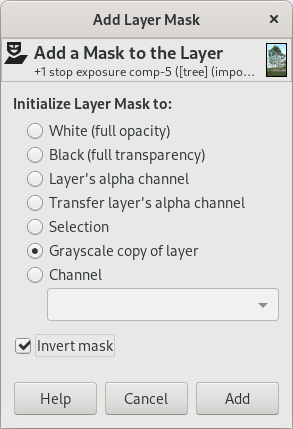
Как показано на Рисунке 5 ниже, на данном этапе все светлые области вернутся в отображаемый диапазон, то есть все значения каналов RGB будут помещаться между 0.0f и 1.0f. Но изображение будет, вероятно, смотреться немного странно (мутноватое и плоское), а также, в зависимости от изображения, на самых ярких участках могут присутствовать тёмные пятнышки — но не беспокойтесь, это временно.
Рисунок 5
Результат добавления обратной маски слоя в оттенках серого для возвращения значений светлых областей в отображаемый диапазон.
Добавление обратной маски слоя в оттенках серого возвращает светлые области в показываемый диапазон, но на данном этапе большинство изображений будет выглядеть плоскими и мутными, а в светлых областях некоторых изображений будут присутствовать тёмные пятнышки. Следующий шаг, «Авто → Растянуть контраст», выполненный для маски, позаботится об этой проблеме.
-
Нажмите на маску слоя, чтобы выбрать её для редактирования, а затем выберите → → :
Параметр «Сохранять цвета» должен быть отмечен галочкой (хотя для изображений в оттенках серого, таких, как маски слоёв, это не имеет значения).
На Рисунке 6 ниже показан окончательный результат:
Применение → → к маске слоя убирает видимость мутного налёта, оставляя чудесное яркое изображение с нетронутыми светлыми областями.
Применение → → к маске необходимо, поскольку так же, как в слое изображения присутствуют значения канала RGB, выпадающие за пределы цветовой палитры, так и маска содержит значения серого, выпадающие из палитры. → → возвращает все значения серого маски в отображаемый диапазон, давая возможность маске пропорционально компенсировать значения канала RGB слоя, которые в противном случае выпадают из палитры, и маскируя по большей части светлые области и блики слоя и почти или совсем не маскируя тени и полутона.
Обратите внимание, что значение синего канала RGB одной из выборочных точек всё ещё слегка выходит за пределы цветовой палитры. Самый простой способ исправить это — применить → и перетащить средний треугольник ползунка и настроить гамму на значение 0,45 (для маски, а не для слоя). Выполнить эту корректировку можно либо для всей маски (хорошая эффективность, минимум усилий), либо только для теней маски (которые соответствуют самым светлым областям слоя), и в этом случае нужно будет загрузить маску как выделение, инвертировать выделение и сделать корректировку гаммы. Или, в случае если оставшиеся выходящие за палитру значения только слегка выбиваются из диапазона, создайте слой «из видимого», а затем примените → → , чтобы вернуть оставшиеся значения в пределы цветовой палитры.
И это все действия по добавлению опорной точки положительной компенсации экспозиции для областей тени без пересвета светлых областей с использованием операции «Цвета → Экспозиция». Теперь можно либо сделать тонкую настройку маски, либо просто создать новый слой «из видимого» и продолжить работу с изображением, ставшим ярким и красивым. В зависимости от изображения, а также от планов художника относительно этого изображения, тонкая настройка маске может и не понадобится. Но достаточно часто приходится редактировать полученное распределение тонов с помощью инструмента коррекции гаммы «Цвета → Экспозиция», или применять «Кривые» для маски, или даже рисовать непосредственно по маске. А иногда бывает необходимо размывание маски для восстановления микроконтраста.


