Σχήμα 2
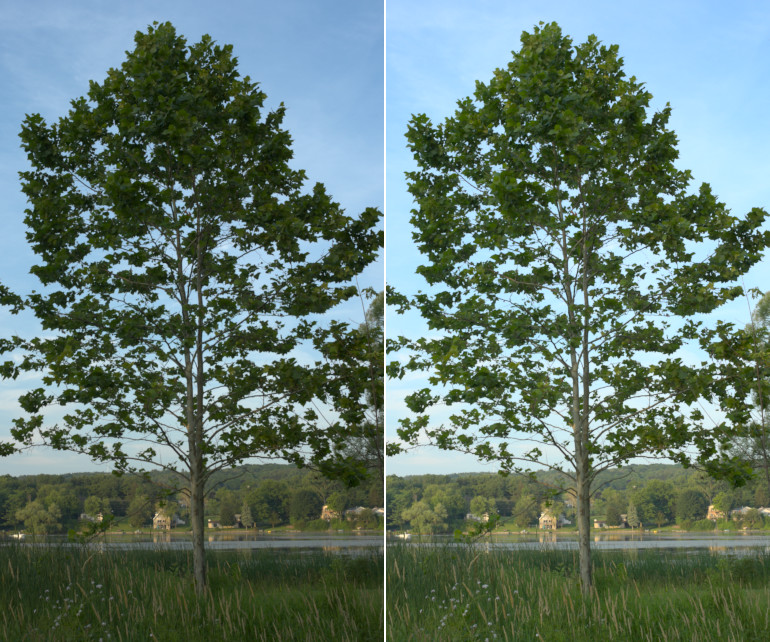
Χρήση της λειτουργίας έκθεσης με υψηλό βάθος δυαδικών του GIMP για να φωτίσετε το έδαφος κατά μία στάση χωρίς να σβήνετε τμήματα του ουρανού.
-
Αριστερά: Η αρχική εικόνα, ακατέργαστο αρχείο κάμερας με παρεμβολή που είναι εξεπίτηδες υποεκτεθειμένη για να αποφύγει σβήσιμο του ουρανού. Μπορεί να μην φαίνεται ότι είναι τέτοια περίπτωση, αλλά αυτή η εικόνα είναι ήδη πολύ κοντά από το να έχει εκτός εύρους τις τιμές καναλιών RGB στον ουρανό και μια αυτόματη απλή επέκταση δεν θα φωτίσει καθόλου την εικόνα.
-
Δεξιά: Η ίδια εικόνα μετά τη χρήση της λειτουργίας έκθεσης του GIMP με υψηλού βάθους δυαδικά (bit) με γραμμική ακρίβεια 32 δυαδικών κινητής υποδιαστολής για να προσθέσετε μια στάση θετικής αντιστάθμισης έκθεσης. Μια αντίστροφη μάσκα γκρίζας κλίμακας χρησιμοποιήθηκε για τη διατήρηση των υψηλών φωτισμών από σβήσιμο.
Αυτό το σταδιακό παράδειγμα παρέχει παράδειγμα εικόνας διαιρεμένο σε πέντε βήματα, ξεκινώντας με την μεταφόρτωση της εικόνας. Τα βήματα 3, 4 και 5 περιγράφουν την ενεργή διαδικασία.
-
Μεταφορτώστε το tree.png, που είναι μια εικόνα sRGB 16 δυαδικών ακεραίων. Στην πραγματικότητα το υψηλού βάθους δυαδικών GIMP είναι επεξεργαστής εικόνας “μόνο sRGB”, έτσι είναι καλύτερο να μην καν προσπαθήσετε να την επεξεργαστείτε με άλλους RGB χώρους εργασίας.
-
Ανοίξτε την tree.png με το GIMP και δώστε στο GIMP την ενσωματωμένη κατατομή (προφίλ) sRGB (τα χρώματα της εικόνας δεν θα αλλάξουν καθόλου). Έπειτα μετατρέψτε την εικόνα με γραμμική ακρίβεια 32 δυαδικών κινητής υποδιαστολής: Επιλέξτε → → και στο παράθυρο διαλόγου Μετατροπή κωδικοποίησης, επιλέξτε Γραμμικό φως (αυτό διασφαλίζει ότι η λειτουργία Κανονική ανάμειξη παράγει ραδιομετρικά σωστά αποτελέσματα).
-
Δημιουργήστε ένα αντίγραφο της στρώσης "tree.png" μέσω → , ή → και τοποθετήστε την ετικέτα "+1 stop exposure comp". Στη συνέχεια, χρησιμοποιήστε → για να προσθέσετε μία στάση θετικής αντιστάθμισης έκθεσης. Το σχήμα 3 παρακάτω δείχνει τις κατάλληλες ρυθμίσεις για το παράθυρο διαλόγου λειτουργίας έκθεσης και το σχήμα 4 δείχνει το αποτέλεσμα:
Σχήμα 3
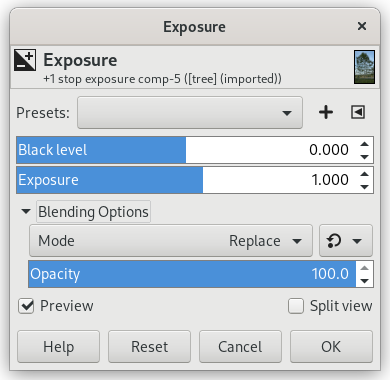
Χρησιμοποιώντας τη λειτουργία έκθεσης για να προσθέσετε μία στάση θετικής αντιστάθμισης έκθεσης.
Όταν χρησιμοποιείτε τη λειτουργία Έκθεσης για να προσθέσετε μία στάση θετικής αντιστάθμισης έκθεσης, βεβαιωθείτε ότι η εικόνα είναι όντως με ακρίβεια κινητής υποδιαστολής, επειδή η ακρίβεια ακέραιου αριθμού θα κόψει τα τονισμένα σημεία.
Σχήμα 4
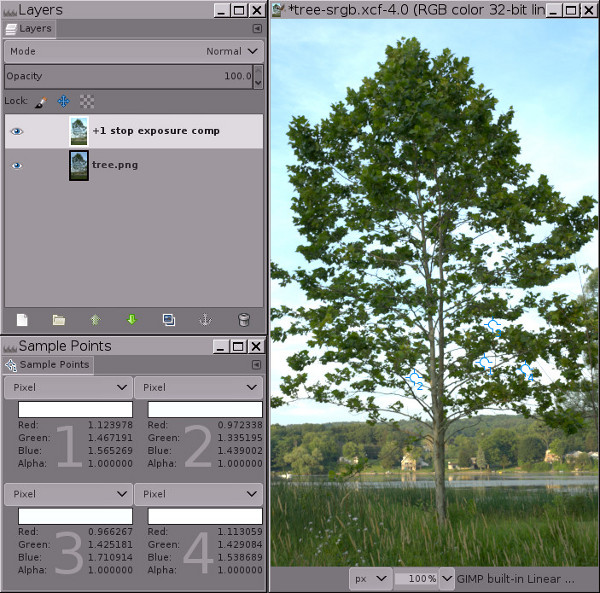
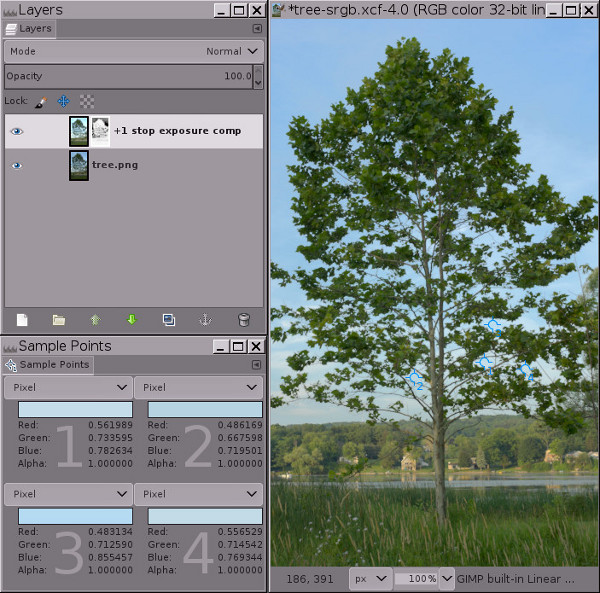
Με ακρίβεια κινητής υποδιαστολής, η λειτουργία έκθεσης του GIMP είναι απεριόριστη. Αυτό σημαίνει ότι μπορείτε να χρησιμοποιήσετε τη λειτουργία Έκθεσης για να προσθέσετε αντιστάθμιση θετικής έκθεσης χωρίς να σβήσετε τους υψηλούς φωτισμούς.
Σημειώστε τις τιμές καναλιών RGB για τα τέσσερα σημεία του δείγματος: οι πληροφορίες καναλιού που θα περικόπτονταν χρησιμοποιώντας ακέραιη ακρίβεια κωδικοποιούνται χρησιμοποιώντας τιμές καναλιού που είναι μεγαλύτερες από κινητή υποδιαστολή 1,0.
Η εικόνα στο Σχήμα 4 έχει ξεκάθαρα "καμένα" φωτεινά σημεία στον ουρανό. Όμως, τα φωτεινά σημεία δεν είναι πραγματικά καμένα (δηλαδή, περικόπτονται στο 1,0 σε ένα ή περισσότερα κανάλια). Αντίθετα, οι πληροφορίες για τα φωτεινά σημεία εξακολουθούν να υπάρχουν, αλλά οι τιμές των καναλιών RGB βρίσκονται εκτός του εύρους τιμών των καναλιών προβολής RGB από 0,0f έως 1,0f. Ο διάλογος δειγματικών σημείων στο Σχήμα 4 παραπάνω δείχνει τέσσερα δειγματικά σημεία που έχουν τιμές καναλιού RGB μεγαλύτερες από 1,0. Όπως φαίνεται στο Σχήμα 5 παρακάτω, η προσθήκη μιας μάσκας σάς επιτρέπει να ανακτήσετε αυτά τα φωτεινά σημεία φέρνοντάς τα πίσω στο εύρος εμφάνισης.
Εάν είχατε χρησιμοποιήσει ακέραιη ακρίβεια αντί για κινητή υποδιαστολή, οι υψηλοί φωτισμοί θα είχαν πραγματικά σπαταληθεί: Τα σημεία του δείγματος θα είχαν μέγιστες τιμές καναλιών 255, 65535 ή 4294967295, ανάλογα με το βάθος δυαδικών. Και η μάσκα θα μπορούσε μόνο να “ανακτήσει” μια συμπαγή επέκταση του γκρίζου, στην οποία θα λείπουν πλήρως οι λεπτομέρειες (δοκιμάστε μόνοι σας και δείτε τι συμβαίνει).
-
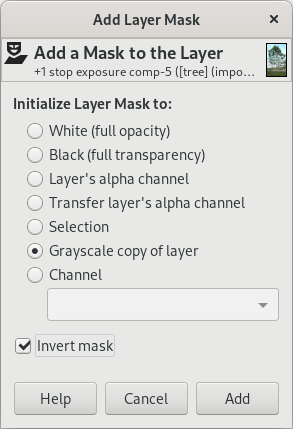
Προσθήκη αντίστροφης μάσκας στρώσης γκρίζας κλίμακας: Δεξιοπατήστε την στρώση και επιλέξτε → → και όταν εμφανιστεί το παράθυρο διαλόγου Προσθήκη μάσκας στρώσης, επιλέξτε Αντιγραφή γκρίζας κλίμακας της στρώσης και επιλέξτε το πλαίσιο Αντιστροφή μάσκας.
Όπως φαίνεται στο παρακάτω σχήμα 5, σε αυτό το σημείο οι υψηλοί φωτισμοί θα επανέλθουν στην περιοχή εμφάνισης, που σημαίνει ότι όλες οι τιμές καναλιών είναι μεταξύ 0,0f και 1,0f. Αλλά η εικόνα θα δείχνει προφανώς κάπως παράξενη (κάπως συννεφιασμένη και επίπεδη) και ανάλογα με την εικόνα, τα πιο φωτεινά σημεία υψηλού φωτισμού μπορεί να έχουν στην πραγματικότητα σκούρες κηλίδες—μην ανησυχείτε! αυτό είναι προσωρινό.
Σχήμα 5
Αποτέλεσμα προσθήκης αντίστροφης μάσκας στρώσης γκρίζας κλίμακας για επαναφορά υψηλών φωτισμών στην περιοχή εμφάνισης.
Η προσθήκη αντίστροφης μάσκας στρώσης γκρίζας κλίμακας επαναφέρει τους υψηλούς φωτισμούς στην περιοχή εμφάνισης, αλλά σε αυτό το σημείο οι περισσότερες εικόνες θα δείχνουν επίπεδες και συννεφιασμένες και οι περισσότερες εικόνες θα έχουν σκούρες κηλίδες στους υψηλούς φωτισμούς. Το επόμενο βήμα -η “Αυτόματη επέκταση αντίθεσης” που εκτελείται στη μάσκα- θα φροντίσει αυτό το πρόβλημα.
-
Πατήστε στη μάσκα στρώσης για να την επιλέξετε για επεξεργασία και, στη συνέχεια, επιλέξτε → → :
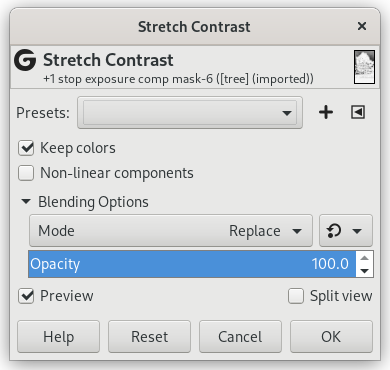
Θα πρέπει να επιλεγεί το “Διατήρηση χρωμάτων” (αν και δεν πειράζει στην πραγματικότητα για εικόνες γκρίζας κλίμακας όπως οι μάσκες στρώσης).
Το παρακάτω Σχήμα 6 εμφανίζει το τελικό αποτέλεσμα:
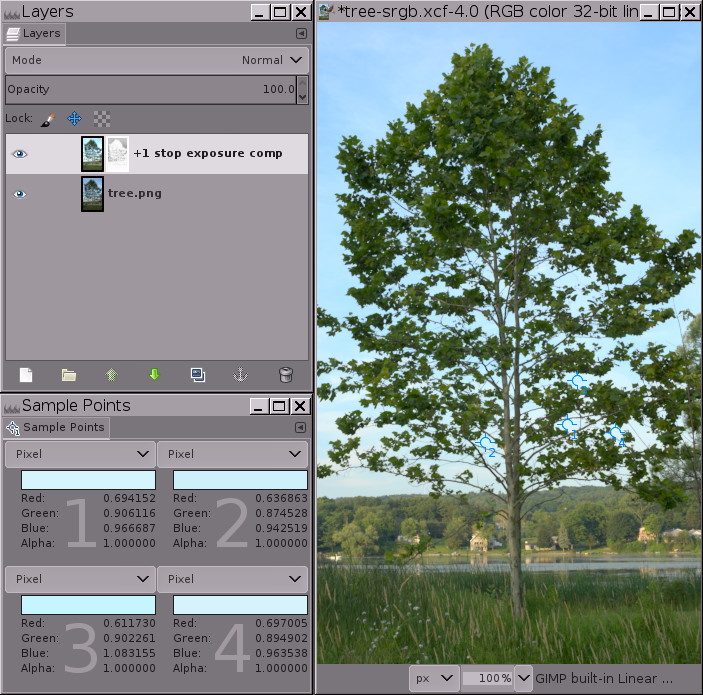
Κάνοντας → → στη μάσκα στρώματος αφαιρεί τη "νεφελώδη" εμφάνιση, αφήνοντας μια όμορφα φωτισμένη εικόνα με άθικτα φωτεινά σημεία.
→ → στη μάσκα είναι απαραίτητη επειδή, όπως ακριβώς η στρώση εικόνας έχει τιμές καναλιών RGB εκτός εύρους, έτσι και η αντεστραμμένη μάσκα κλίμακας του γκρι περιέχει τιμές κλίμακας του γκρι εκτός εύρους. Το → → επαναφέρει όλες τις τιμές της γκρίζας κλίμακας της μάσκας στο εύρος απεικόνισης, επιτρέποντας στη μάσκα να αντισταθμίσει αναλογικά τις τιμές του καναλιού RGB της στρώσης που κατά τα άλλα είναι εκτός εύρους, καλύπτοντας περισσότερο τα φωτεινά σημεία της στρώσης και λιγότερο/καθόλου τις σκιές και τους μεσαίους τόνους της εικόνας.
Παρατηρήστε ότι ένα από τα σημεία του δείγματος εξακολουθεί να έχει τιμή γαλάζιου καναλιού RGB που είναι ελαφρώς εκτός εύρους. Ο ευκολότερος τρόπος για να το αντιμετωπίσετε αυτό είναι να χρησιμοποιήσετε → και σύρετε το μεσαίο τρίγωνο του ρυθμιστικού για να κάνετε μια προσαρμογή Γάμμα 0,45 στη μάσκα, όχι στην πραγματική στρώση της εικόνας. Μπορείτε να κάνετε αυτή την προσαρμογή Γάμμα είτε σε ολόκληρη τη μάσκα (λειτουργεί καλά, λιγότερη προσπάθεια). Ή αλλιώς μπορείτε να κάνετε την προσαρμογή μόνο στις σκιές της μάσκας (οι οποίες αντιστοιχούν στα φωτεινά σημεία της στρώσης), οπότε φορτώνετε τη μάσκα ως επιλογή, αντιστρέφετε την επιλογή και κάνετε την προσαρμογή Γάμμα. Ή εάν οι υπόλοιπες τιμές των καναλιών εκτός εύρους είναι μόνο πολύ λίγο εκτός εύρους, δημιουργήστε μια στρώση "Νέα από τα ορατά" και στη συνέχεια → → με αποτέλεσμα να επαναφέρετε τις υπόλοιπες τιμές των καναλιών στο εύρος.
Αυτή είναι όλη η διαδικασία για τη χρήση της λειτουργίας Έκθεσης για να προσθέσετε μία στάση (στοπ) θετικής αντιστάθμισης έκθεσης στις σκιές χωρίς να βλάψετε τα φωτεινά σημεία. Τώρα μπορείτε είτε να τελειοποιήσετε τη μάσκα, είτε απλά να δημιουργήσετε μια στρώση "Νέα από τα ορατά" και να συνεχίσετε την επεξεργασία της όμορφα φωτισμένης εικόνας σας. Ανάλογα με την εικόνα και επίσης με τις καλλιτεχνικές σας προθέσεις για την εικόνα, η μάσκα μπορεί να μην χρειάζεται λεπτομερή ρύθμιση. Αλλά πολύ συχνά θα θέλετε να τροποποιήσετε την προκύπτουσα κατανομή των τόνων, κάνοντας μια διόρθωση γάμμα, ή ίσως μια λειτουργία καμπυλών στη μάσκα, ή αλλιώς βάφο ντας απευθείας στη μάσκα. Και μερικές φορές θα θέλετε να θολώσετε τη μάσκα για να αποκαταστήσετε τη μικροαντίθεση.


