Figura 2
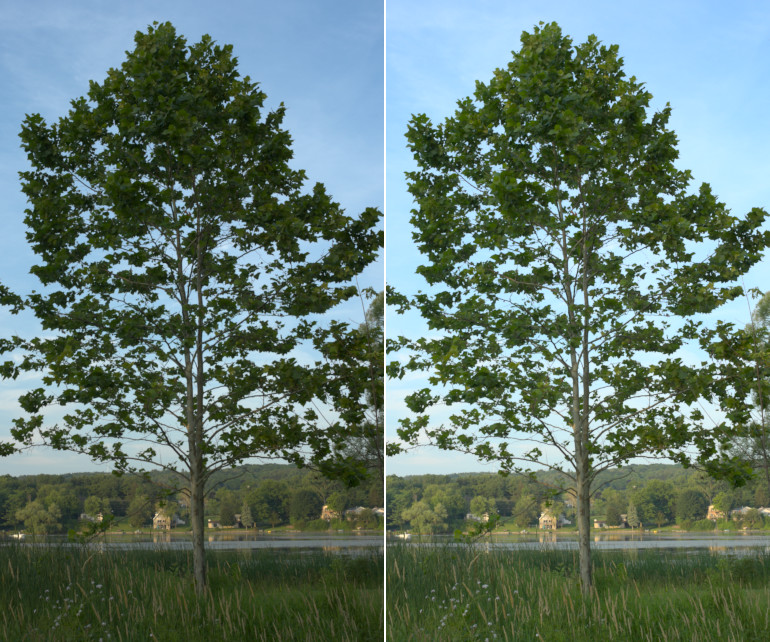
Uso del comando di GIMP ad alta profondità di colore in virgola mobile di Esposizione per schiarire la terra di uno stop senza sovraesporre porzioni del cielo.
-
Sinistra: l'immagine originale, un file raw interpolato nella macchina fotografica che è stato deliberatamente sottoesposto nella per evitare di distruggere il cielo. Potrebbe non sembrare, ma questa immagine è già molto vicina ad avere valori di canale RGB fuori gamut nel cielo, ed un semplice Auto estendi contrasto non schiarirà per nulla l'immagine.
-
Destra: la stessa immagine dopo aver usato il comando di GIMP ad alta profondità di colore in virgola mobile a 32-bit di precisione lineare Esposizione per aggiungere uno stop positivo di compensazione dell'esposizione. Una maschera in scala di grigi inversa è stata usata per preservare le alteluci.
Questo esempio passo-passo fornisce una immagine campione ed è diviso in cinque passi, a partire dallo scaricamento dell'immagine. I passi 3, 4, e 5 descrivono l'effettiva procedura.
-
Scaricaretree.png, che è un'immagine sRGB a 16-bit interi. GIMP ad alta profondità di colore in realtà è un editor immagine “solo sRGB”, perciò è meglio non provare neanche a fare modifiche in altri spazi di colore RGB.
-
Aprire tree.png con GIMP ed assegnare il profilo incorporato di GIMP sRGB (i colori dell'immagine non cambieranno). Poi convertire l'immagine in precisione virgola mobile lineare a 32-bit: selezionare → → , e nella finestre Conversione codifica, selezionare Luce lineare (ciò assicura che la modalità di fusione Normale produca i risultati radiometricamente corretti).
-
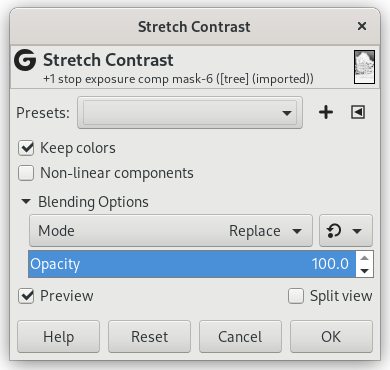
Fare una copia del livello “tree.png”, tramite → o → ed etichettarla “+1 stop exposure comp”. Poi usare → per aggiungere uno stop di compensazione positiva di esposizione. Figura 3 sotto mostra le corrette impostazioni per la finestra di dialogo Esposizione, e Figura 4 mostra il risultato:
Figura 3
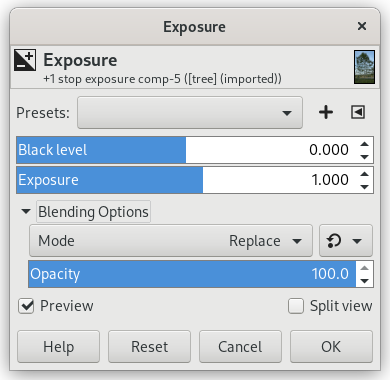
Uso del comando Esposizione per aggiungere uno stop positivo di compensazione dell'esposizione.
Quando si usa Esposizione per aggiungere uno stop positivo di compensazione dell'esposizione, assicurarsi che l'immagine sia veramente a precisione in virgola mobile, dato che la precisione intera andrebbe a tagliare le alteluci.
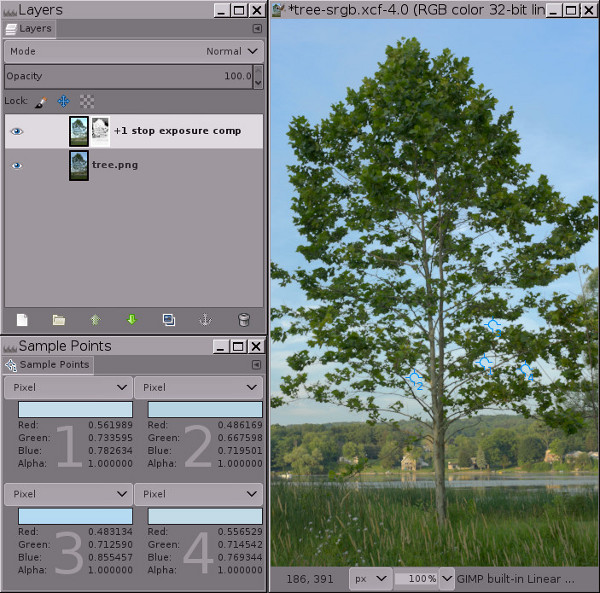
Figura 4
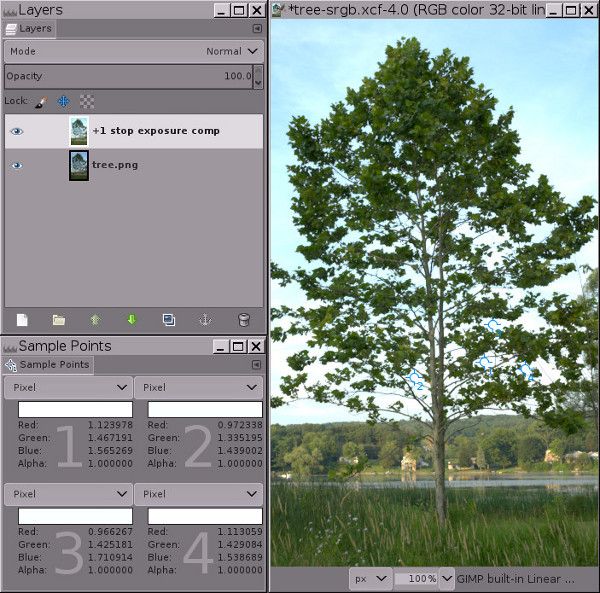
Alla precisione in virgola mobile, l'operazione di Esposizione non ha limiti. Questo significa che si può usare Esposizione per aggiungere una compensazione positiva di esposizione senza rischio di bruciare le alteluci.
Si notino i valori di canale RGB per i quattro punti di campionamento: le informazioni di canale che sarebbero state tagliate usando la precisione intera vengono codificare usando valori di canale di valore maggiore di 1.0 in virgola mobile.
L'immagine in Figura 4 chiaramente presenta alteluci “bruciate” nel cielo. Ma le alteluci non sono veramente bruciate (cioè, tagliate a 1.0 in uno o più canali). Invece le informazioni delle alteluci sono ancora presenti, ma i valori dei canali RGB cadono al di fuori del campo dei valori dei canali RGB dello schermo che vanno da 0.0f a 1.0f. La finestra di dialogo dei punti di campionamento in Figura 4 sopra mostra quattro punti di campionamento che hanno valori di canale RGB che sono maggiori di 1.0. Come mostrato in Figura 5 sotto, l'aggiunta di una maschera permette di recuperare queste alteluci portandole giù nel campo di visualizzazione dello schermo.
Se si fosse usata la precisione intera invece che quella in virgola mobile, le alteluci sarebbero veramente bruciate: i punti di campionamento avrebbero avuto valori massimi di canale di 255, 65535 o 4294967295, a seconda della profondità di bit. E la mascheratura avrebbe solo “recuperato” una chiazza piena di grigio, completamente senza alcun dettaglio (provare per credere).
-
Aggiungere una maschera di livello in scala di grigi inversa: fare clic destro sul livello e selezionare → → , e poi quando apparirà la finestra di dialogo Aggiungi una maschera al livello, scegliere Copia del livello in scala di grigi e selezionare la casella Inverti maschera.
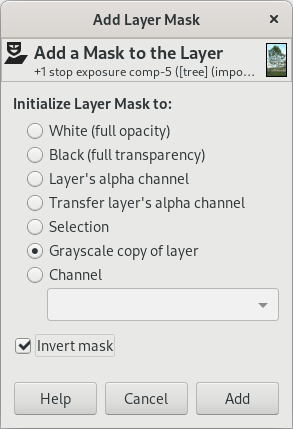
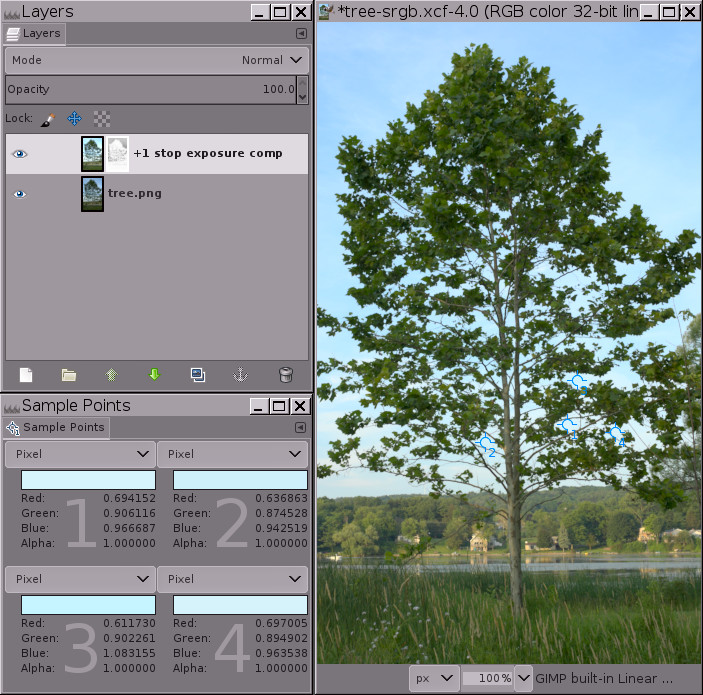
Come mostrato in Figura 5 sotto, a questo punto le alteluci verranno riportate nel campo di visualizzazione, questo significa che tutti i valori dei canali RGB saranno tra 0.0f e 1.0f. Ma l'immagine probabilmente apparirà un po' strana (un po' nuvolosa e piatta), e a seconda dell'immagine, le alteluci più luminose potranno avere delle macchie scure—non preoccupatevi! Tutto ciò sarà temporaneo.
Figura 5
Il risultato dell'aggiungere una maschera di livello in scala di grigi inversa per riportare le alteluci nel campo di visualizzazione.
L'aggiunta di una maschera di livello inversa a scala di grigi riporta le alteluci nel campo di visualizzazione, ma a questo punto molte delle immagini sembreranno piatte e nuvolose, ed alcune immagini avranno macchie scure nelle alteluci. Il prossimo passo—“Auto ampliamento contrasto” eseguito sulla maschera—si occuperà di questo problema.
-
Fare clic sulla maschera di livello per selezionarla per la modifica, e poi selezionare → → :
“Mantieni colori” dovrebbe essere selezionata (anche se non importa sulle immagini in scala di grigi come le maschere di livello).
La Figura 6 sotto mostra il risultato finale:
Eseguendo → → sulla maschera di livello si rimuove l'aspetto "nuvoloso", lasciando un'immagine ben illuminata con alteluci intatte.
→ → sulla maschera è necessario perché, proprio come il livello immagine ha valori di canale RGB fuori gamut, la maschera in scala di grigi invertita contiene anch'essa valori di scala di grigi fuori gamut. → → riporta tutti i valori della scala di grigi della maschera nell'intervallo di visualizzazione, consentendo alla maschera di compensare proporzionalmente i valori del canale RGB fuori scala, mascherando di più nelle alteluci e meno o per nulla nelle ombre e nei mezzitoni dell'immagine.
Si noti che uno dei punti di campionamento ha ancora un valore di canale RGB blu che è leggermente fuori gamut. Il modo più semplice per gestire questo è tramite → e trascinare il triangolo del cursore di mezzo per fare un aggiustamento di gamma di 0.45 sulla maschera, non sul reale livello immagine. Si può fare questo aggiustamento di gamma sia sull'intera maschera (funziona bene, meno sforzo), oppure si può fare l'aggiustamento solo sulle ombre della maschera (che corrispondono alle alteluci del livello), ed in tal caso si deve caricare la maschera come una selezione, invertire la selezione, ed effettuare l'aggiustamento di gamma. Oppure, se i rimanenti valori di canale fuori gamut sono solo leggermente fuori gamut, fare un livello “Nuovo dal visibile” e poi fare un → → del risultato per riportare il resto dei valori di canale nuovamente in gamut.
Questa è l'intera procedura d'uso del comando Esposizione per aggiungere uno stop positivo di compensazione di esposizione alle ombre senza bruciare le alteluci. Ora si può regolare finemente la maschera, o semplicemente creare un livello “Nuovo dal visibile” e continuare la modifica dell'immagine che si è ben illuminata. A seconda dell'immagine ed anche dell'intento artistico per l'immagine, la maschera potrebbe non necessitare di finitura, ma molto spesso si vorrà modificare la risultante distribuzione tonale effettuando una correzione di gamma tramite, o forse una operazione Curve sulla maschera, o anche dipingendo direttamente sulla maschera. Ed alle volte si vorrà sfocare la maschera per ripristinare il micro contrasto.


